Wirecard Payment Page v2
HPP Integration Guide


Overview
To integrate the Hosted Payment Page (HPP) in your shop, use a simple backend-to-backend JSON WPP v2 Workflow for the payment process.
-
Create a payment session: You send an initial POST request with details of the transaction to the Wirecard Payment Page v2 (WPP v2). This POST request is secured by basic access authentication.
-
Redirect the consumer to the payment page: WPP v2 returns an initial response URL.
-
If the initial POST request is correct, use the response URL to redirect the consumer to the payment page. The consumer fills out the required fields on the payment page and submits the payment. Continue with step 3.
-
If the initial POST request is faulty, WPP v2 returns an error code with a description of the problem in the response. Return to step 1.
-
-
Parse and process the payment response: The payment is processed. Depending on the result (successful, pending, failed or canceled), the consumer is redirected to the respective page. The WPP v2 sends a POST request containing base64 encoded payment data to the same URL. It is highly recommended that you parse and process this base64 encoded response to verify the payment.
The payment process is complete.
Payment-Processing Example
This is an example of a credit card transaction to show how to process a payment with the Hosted Payment Page.
For more supported payment methods and payment-method-specific integration guides, go to Payment Methods with WPP v2.
The payment-processing example is designed for the testing environment and does not use real information.
Payment processing with the Wirecard Payment Page v2 generally follows the same steps:
|
We provide ready-made JSON samples for each step of this process. Use a tool such as Postman to test them.
Before you can send your first request, use the following information to set up your testing tool:
URL (Endpoint) |
|
|---|---|
Merchant Account ID (MAID) |
7a6dd74f-06ab-4f3f-a864-adc52687270a |
Username |
70000-APIDEMO-CARD |
Password |
ohysS0-dvfMx |
Secret Key (used for response verification) |
a8c3fce6-8df7-4fd6-a1fd-62fa229c5e55 |
Test Card |
|
Card number |
4200000000000018 |
Expiration date |
01/23 |
CVV |
018 |
To create a payment session, send a POST request to the
/api/payment/register endpoint,
e.g. https://wpp-test.wirecard.com/api/payment/register.
This is an HTTP request with two headers:
Content-Type: application/json
Authorization: Basic NzAwMDAtQVBJREVNTy1DQVJEOm9oeXNTMC1kdmZNeA==
The Authorization header needs to be formatted as:
"Authorization"="Basic" + base64("username:password")
{
  "payment": {
    "merchant-account-id": {
      "value": "7a6dd74f-06ab-4f3f-a864-adc52687270a"
    },
    "request-id": "{{$guid}}",
    "transaction-type": "authorization",
    "requested-amount": {
      "value": 10,
      "currency": "EUR"
    },
    "account-holder": {
      "first-name": "John",
      "last-name": "Doe"
    },
    "payment-methods": {
      "payment-method": [
        {
          "name": "creditcard"
        }
      ]
    },
    "success-redirect-url": "https://demoshop-test.wirecard.com/demoshop/#/success",
    "fail-redirect-url": "https://demoshop-test.wirecard.com/demoshop/#/error",
    "cancel-redirect-url": "https://demoshop-test.wirecard.com/demoshop/#/cancel"
  }
}| Field (JSON) | Data Type | Required/Optional | Size | Description | |
|---|---|---|---|---|---|
|
|
String |
Required |
36 |
A unique identifier assigned to every merchant account (by Wirecard). |
|
String |
Required |
150 |
A unique identifier assigned to every request (by merchant). Used when
searching for or referencing it later. |
|
|
String |
Required |
36 |
The requested transaction type. |
|
|
|
Numeric |
Required |
18 |
The full amount that is requested/contested in a transaction. 2 decimal
places allowed. |
|
String |
Required |
3 |
The currency of the requested/contested transaction amount. |
|
|
|
String |
Optional |
32 |
The first name of the account holder. |
|
String |
Required |
32 |
The last name of the account holder. |
|
|
|
String |
Optional |
15 |
The name of the payment method used. Set this value to |
|
String |
Optional |
256 |
The URL to which the consumer is redirected after a successful payment,
e.g. |
|
|
String |
Optional |
256 |
The URL to which the consumer is redirected after a unsucessful payment,
e.g. |
|
|
String |
Optional |
256 |
The URL to which the consumer is redirected after having canceled a payment,
e.g. |
|
|
To create a payment session with Credit Card using 3D Secure 2 authentication, you need to include 3D Secure 2 fields in your initial request. Most of these fields are optional but we recommend the implementation of optional fields, as this creates a smoother user experience and ensures a higher level of security. Need more information on 3D Secure 2? Head to our general introduction to 3D Secure 2. |
|
Which Payment Methods Can I Choose? Leave out the Alternatively, check out Payment Methods with WPP v2 for an overview of all supported payment methods. |
The response to the initial authorization request contains the
payment-redirect-url.
{
  "payment-redirect-url": "https://wpp-test.wirecard.com/?wPaymentToken=f0c0e5b3-23ad-4cb4-abca-ed80a0e770e7"
}
Use the payment-redirect-url to redirect the consumer.
You can implement the redirection in any way that suits you best.
Redirecting Consumers to the Payment Page Using WPP.hostedPayUrl
You can use our ready-made function to handle the redirection:
-
Add the
paymentPage.jslibrary to your checkout page HTML code<script src="https://wpp-test.wirecard.com/loader/paymentPage.js" type="text/javascript"></script> -
Submit the initial payment request on the backend.
-
Call the
WPP.hostedPayUrl(payment-redirect-url)function in your HTML code to redirect the consumer to a new window:<script type="text/javascript"> WPP.hostedPayUrl("https://wpp-test.wirecard.com/?wPaymentToken=f0c0e5b3-23ad-4cb4-abca-ed80a0e770e7") </script>Make sure to pass the
payment-redirect-urlvalue from the initial response to the redirection function and call it.
|
The consumer is redirected to the payment form. There they enter their data and submit the form to confirm the payment. The response can
The transaction result is displayed as the value
of In any case, a base64 encoded response containing payment information is
sent to the corresponding redirection URL
( See Configuring Redirects and IPNs for WPP v2 for more information on redirection targets after payment. |
Where Can I Find the Payment Response?
WPP v2 sends the final response to the success/fail page where the consumer
is redirected to at the end of the payment session. This final response
contains the payment data in a base64 encoded JSON format. It is sent
with a POST request as form data response-base64.
Before you are able to parse and process the payment response, you need to decode it.
To test this
-
Copy and paste the
payment-redirect-urlinto your browser. -
Open your browser’s console and complete the payment with the credit card information provided above.
-
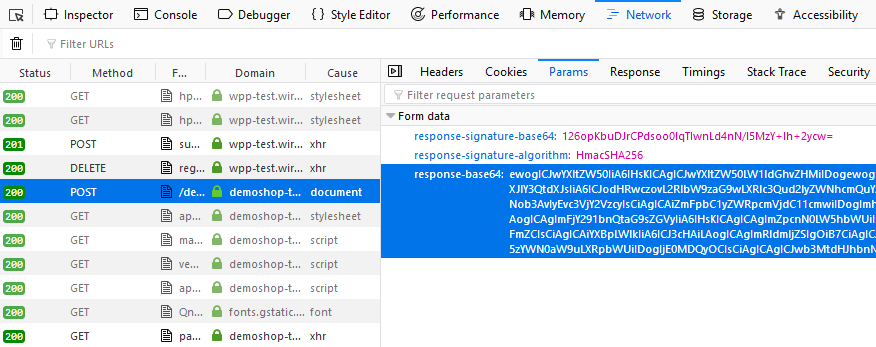
In your browser’s console, find the form data
response-base64(see screenshot). -
Copy and paste the response into a base64 decoder of your choice, e.g. Base64 Decode.
-
Decode the response to view the payment response details.
You can find a decoded payment response example below.
{
  "payment": {
    "transaction-type": "authorization",
    "transaction-id": "08649015-eb17-4c67-ab5f-d132af616e02",
    "completion-time-stamp": "2018-12-19T12:02:26",
    "card-token": {
      "token-id": "4242796444090018",
      "masked-account-number": "420000******0018"
    },
    "merchant-account-id": {
      "value": "7a6dd74f-06ab-4f3f-a864-adc52687270a"
    },
    "transaction-state": "success",
    "payment-methods": {
      "payment-method": [
        {
          "name": "creditcard"
        }
      ]
    },
    "cancel-redirect-url": "https://demoshop-test.wirecard.com/demoshop/#/cancel",
    "success-redirect-url": "https://demoshop-test.wirecard.com/demoshop/#/success",
    "fail-redirect-url": "https://demoshop-test.wirecard.com/demoshop/#/error",
    "api-id": "wpp"
  },
  "request-id": "28285dbd-ecd3-49bd-a7e5-0239affa2448",
  "requested-amount": {
    "currency": "EUR",
    "value": 10
  },
  "statuses": {
    "status": [
      {
        "description": "3d-acquirer:The resource was successfully created.",
        "severity": "information",
        "code": "201.0000"
      }
    ]
  },
  "authorization-code": "801433",
  "account-holder": {
    "first-name": "John",
    "last-name": "Doe"
  },
  "descriptor": "demo descriptor"
}| Field (JSON) | Data Type | Description | |
|---|---|---|---|
|
String |
The requested transaction type. |
|
|
String |
A unique identifier to every transaction (by Wirecard). Used when searching for or referencing to it later. |
|
|
YYYY-MM-DD-Thh:mm:ss |
The UTC/ISO time-stamp documents the time & date when the transaction was executed. Format: YYYY-MM-DDThh:mm:ss (ISO). |
|
|
|
String |
A unique identifier assigned to every card token. |
|
String |
This is the masked card account number of the consumer. |
|
|
|
String |
A unique identifier assigned to every merchant account (by Wirecard). |
|
String |
The current transaction state. Possible values:
Typically, a transaction starts with state |
|
|
|
String |
The name of the payment method used for the transaction. |
|
String |
The URL to which the consumer is redirected after having canceled payment,
e.g. |
|
|
String |
The URL to which the consumer is redirected after successful payment,
e.g. |
|
|
String |
The URL to which the consumer is redirected after unsuccessful payment,
e.g. |
|
|
String |
Identifier of the currently used API. |
|
|
String |
A unique identifier assigned to every request (by merchant). Used when searching for or referencing it later. |
|
|
|
String |
The currency of the requested/contested transaction amount. |
|
Numeric |
The full amount that is requested/contested in a transaction. |
|
|
|
String |
The description of the transaction status message. |
|
String |
The definition of the status message. Possible values:
|
|
|
String |
Status code of the status message |
|
|
String |
Output code for transaction type |
|
|
|
String |
The first name of the account holder. |
|
String |
The last name of the account holder. |
|
|
String |
Describes the transaction. |
|
|
For more information on redirect URLs, see Configuring Redirects and IPNs for WPP v2. |
Merchants Integrated with NVP (HPP)
Migrating to WPP v2
In addition to the new backend-to-backend JSON flow, WPP v2 supports an updated NVP flow for merchants who already integrated one of the Payment Page solutions previously and do not want to switch.
In that case, the migration to WPP v2 requires only a few minor changes. New features have an NVP field equivalent so you can use them in your integration. Check the WPP v2 Features section for specifics.
| Contact merchant support for your production credentials. |
-
Find the
paymentPageLoaderJavaScript library in your<head>HTML code:<script src="https://api-test.wirecard.com/engine/hpp/paymentPageLoader.js" type="text/javascript"></script>Replace it with:
<script src="https://wpp-test.wirecard.com/loader/paymentPage.js" type="text/javascript"></script> -
Find the
hostedPayfunction call at the end of your Pay button function:WirecardPaymentPage.hostedPay(requestData);Replace it with:
WPP.hostedPay(requestData);The fields in
requestDataremain the same and no changes are needed.
EPP Integration Guide


Overview
To integrate the Embedded Payment Page (EPP) in your shop, use a simple backend-to-backend JSON workflow for the payment process.
-
Create a payment session: You send an initial POST request with details of the transaction to the Wirecard Payment Page v2 (WPP v2). This POST request is secured by basic access authentication.
-
Render/create the payment page: WPP v2 returns an initial response URL.
-
If the initial POST request is correct, use the response URL to render the embedded payment page as an overlay to the checkout page. The consumer fills out the required fields on the payment page and submits the payment. Continue with step 3.
-
If the initial POST request is faulty, WPP v2 returns an error code with a description of the problem in the response. Return to step 1.
-
-
Parse and process the payment response: The payment is processed. Depending on the result (successful, pending, failed or canceled), the consumer is redirected to the respective page. The WPP v2 sends a POST request containing base64 encoded payment data to the same URL. It is highly recommended that you parse and process this base64 encoded response to verify the payment.
The payment process is complete.
Payment-Processing Example
This is an example of a credit card transaction to show how to process a
payment with the Embedded Payment Page.
For more supported payment methods and payment-method-specific
integration guides, go to
Payment Methods with WPP v2.
The payment-processing example is designed for the testing environment and does not use real information.
Payment processing with the Wirecard Payment Page v2 generally follows the same steps:
|
We provide ready-made JSON samples for each step of this process. Use a tool such as Postman to test them.
Before you can send your first request, use the following information to set up your testing tool:
URI (API Endpoint) |
|
|---|---|
Merchant Account ID (MAID) |
7a6dd74f-06ab-4f3f-a864-adc52687270a |
Username |
70000-APIDEMO-CARD |
Password |
ohysS0-dvfMx |
Secret Key (used for response verification) |
a8c3fce6-8df7-4fd6-a1fd-62fa229c5e55 |
Test Card |
|
Card number |
4200000000000018 |
Expiration date |
01/23 |
CVV |
018 |
To create a payment session, send a POST request to the
/api/payment/register endpoint,
e.g. https://wpp-test.wirecard.com/api/payment/register.
This is an HTTP request with two headers:
Content-Type: application/json
Authorization: Basic NzAwMDAtQVBJREVNTy1DQVJEOm9oeXNTMC1kdmZNeA==
The Authorization header must be formatted as:
Authorization=Basic + base64 (username:password)
You can try it using the authorization headers above.
{
  "payment": {
    "merchant-account-id": {
      "value": "7a6dd74f-06ab-4f3f-a864-adc52687270a"
    },
    "request-id": "{{$guid}}",
    "transaction-type": "authorization",
    "requested-amount": {
      "value": 10,
      "currency": "EUR"
    },
    "account-holder": {
      "first-name": "John",
      "last-name": "Doe"
    },
    "payment-methods": {
      "payment-method": [
        {
          "name": "creditcard"
        }
      ]
    },
    "success-redirect-url": "https://demoshop-test.wirecard.com/demoshop/#/success",
    "fail-redirect-url": "https://demoshop-test.wirecard.com/demoshop/#/error",
    "cancel-redirect-url": "https://demoshop-test.wirecard.com/demoshop/#/cancel"
  },
  "options": {
    "mode": "embedded",
    "frame-ancestor": "https://example.com"
  }
}| Field (JSON) | Data Type | Required/Optional | Size | Description | |
|---|---|---|---|---|---|
|
|
String |
Required |
36 |
A unique identifier assigned to every merchant account (by Wirecard). |
|
String |
Required |
150 |
A unique identifier assigned to every request (by merchant). Used when
searching for or referencing it later. |
|
|
String |
Required |
36 |
The requested transaction type. |
|
|
|
Numeric |
Required |
18 |
The full amount that is requested/contested in a transaction. 2 decimal
places allowed. |
|
String |
Required |
3 |
The currency of the requested/contested transaction amount. |
|
|
|
String |
Required |
32 |
The first name of the account holder. |
|
String |
Required |
32 |
The last name of the account holder. |
|
|
|
String |
Optional |
15 |
The name of the payment method used. Set this value to |
|
String |
Optional |
256 |
The URL to which the consumer is redirected after a successful payment,
e.g. |
|
|
String |
Optional |
256 |
The URL to which the consumer is redirected after an unsuccessful payment,
e.g. |
|
|
String |
Optional |
256 |
The URL to which the consumer is redirected after having canceled a payment,
e.g. |
|
|
|
String |
Required |
8 |
Indicates which mode of payment page is used for the payment. Currently supports |
|
String |
Required |
256 |
The URL of the checkout page where the iframe is rendered. |
|
|
To create a payment session with Credit Card using 3D Secure 2 authentication, you need to include 3D Secure 2 fields in your initial request. Most of these fields are optional but we recommend the implementation of optional fields, as this creates a smoother user experience and ensures a higher level of security. Need more information on 3D Secure 2? Head to our general introduction to 3D Secure 2. |
|
Which Payment Methods Can I Choose? Leave out the Alternatively, check out Payment Methods with WPP v2 for an overview of all supported payment methods. |
The payment page is in this case an overlay window. It is created using
the payment-redirect-url, contained in the response to the initial
authorization request.
{
  "payment-redirect-url": "https://wpp-test.wirecard.com/?wPaymentToken=f0c0e5b3-23ad-4cb4-abca-ed80a0e770e7"
}
Embedding the Payment Page in your Checkout Page Using WPP.embeddedPayUrl
You can use our predefined function to embed the payment page:
-
Add the
paymentPage.jslibrary to your checkout page HTML code.<script src="https://wpp-test.wirecard.com/loader/paymentPage.js" type="text/javascript"></script>Make sure to pass the
payment-redirect-urlvalue from the initial response to theWPP.embeddedPayUrlfunction and call it to render the payment page. -
Submit the initial payment request on the backend.
-
Call the
WPP.embeddedPayUrl(payment-redirect-url)function in your HTML code to render the new pop-up window.<script type="text/javascript">WPP.embeddedPayUrl("https://wpp-test.wirecard.com/?wPaymentToken=f0c0e5b3-23ad-4cb4-abca-ed80a0e770e7")</script>
|
The consumer is redirected to the payment form. There they enter their data and submit the form to confirm the payment. The response can either:
The transaction result is displayed as the value
of In any case, a base64 encoded response containing payment information is
sent to the corresponding redirection URL
( See Configuring Redirects and IPNs for WPP v2 for more information on redirection targets after payment. |
Where Can I Find the Payment Response?
WPP v2 sends the final response to the success/fail page where the consumer
is redirected to at the end of the payment session. This final response
contains the payment data in a base64 encoded JSON format. It is sent
with a POST request as form data response-base64.

Before you are able to parse and process the payment response, you need to decode it.
To test this:
-
Copy and paste the
payment-redirect-urlinto your browser. -
Open your browser’s console and complete the payment with the credit card information provided above.
-
In your browser’s console, find the form data
response-base64(see screenshot). -
Copy and paste the response into a base64 decoder of your choice, e.g. Base64 Decode.
-
Decode the response to view the payment response details.
You can find a decoded payment response example below.
{
  "payment": {
    "transaction-type": "authorization",
    "transaction-id": "08649015-eb17-4c67-ab5f-d132af616e02",
    "completion-time-stamp": "2018-12-19T12:02:26",
    "card-token": {
      "token-id": "4242796444090018",
      "masked-account-number": "420000******0018"
    },
    "merchant-account-id": {
      "value": "7a6dd74f-06ab-4f3f-a864-adc52687270a"
    },
    "transaction-state": "success",
    "payment-methods": {
      "payment-method": [
        {
          "name": "creditcard"
        }
      ]
    },
    "cancel-redirect-url": "https://demoshop-test.wirecard.com/demoshop/#/cancel",
    "success-redirect-url": "https://demoshop-test.wirecard.com/demoshop/#/success",
    "fail-redirect-url": "https://demoshop-test.wirecard.com/demoshop/#/error",
    "api-id": "{api-id]"
  },
  "request-id": "28285dbd-ecd3-49bd-a7e5-0239affa2448",
  "requested-amount": {
    "currency": "EUR",
    "value": 10
  },
  "statuses": {
    "status": [
      {
        "description": "3d-acquirer:The resource was successfully created.",
        "severity": "information",
        "code": "201.0000"
      }
    ]
  },
  "authorization-code": "801433",
  "account-holder": {
    "first-name": "John",
    "last-name": "Doe"
  },
  "descriptor": "demo descriptor"
}| Field (JSON) | Data Type | Description | |
|---|---|---|---|
|
String |
The requested transaction type. |
|
|
String |
A unique identifier to every transaction (by Wirecard). Used when searching for or referencing to it later. |
|
|
YYYY-MM-DD-Thh:mm:ss |
The UTC/ISO time-stamp documents the time & date when the transaction was executed. Format: YYYY-MM-DDThh:mm:ss (ISO). |
|
|
|
String |
A unique identifier assigned to every card token. |
|
String |
This is the masked card account number of the consumer. |
|
|
|
String |
A unique identifier assigned to every merchant account (by Wirecard). |
|
String |
The current transaction state. Possible values:
Typically, a transaction starts with state |
|
|
|
String |
The name of the payment method used for the transaction. |
|
String |
The URL to which the consumer is redirected after having canceled payment,
e.g. |
|
|
String |
The URL to which the consumer is redirected after successful payment,
e.g. |
|
|
String |
The URL to which the consumer is redirected after unsuccessful payment,
e.g. |
|
|
String |
Identifier of the currently used API. |
|
|
String |
A unique identifier assigned to every request (by merchant). Used when searching for or referencing it later. |
|
|
|
String |
The currency of the requested/contested transaction amount. |
|
Numeric |
The full amount that is requested/contested in a transaction. |
|
|
|
String |
The description of the transaction status message. |
|
String |
The definition of the status message. Possible values:
|
|
|
String |
Status code of the status message |
|
|
String |
Output code for transaction type |
|
|
|
String |
The first name of the account holder. |
|
String |
The last name of the account holder. |
|
|
String |
Describes the transaction. |
|
|
For more information on redirect URLs, see Configuring Redirects and IPNs for WPP v2. |
Merchants Integrated with NVP (EPP)
Migrating to WPP v2
In addition to the new backend-to-backend JSON flow, WPP v2 supports an updated NVP flow for merchants who already integrated one of the Payment Page solutions previously and do not want to switch.
In that case, the migration to WPP v2 requires only a few minor changes. New features have an NVP field equivalent so you can use them in your integration. Check the WPP v2 Features section for specifics.
| Contact merchant support for your production credentials. |
-
Find the
paymentPageLoaderJavaScript library in your<head>HTML code:<script src="https://api-test.wirecard.com/engine/hpp/paymentPageLoader.js" type="text/javascript"></script>Replace it with:
<script src="https://wpp-test.wirecard.com/loader/paymentPage.js" type="text/javascript"></script> -
Find the
embeddedPayfunction call at the end of yourPay buttonfunction:WirecardPaymentPage.embeddedPay(requestData);Replace it with:
WPP.embeddedPay(requestData);The fields in
requestDataremain the same and no changes are needed.
Seamless Integration Guide


Overview
To integrate the Wirecard Payment Page v2 in Seamless Mode in your shop, get your checkout page ready in two steps:
-
Preparing your checkout page: Add the
paymentPage.jslibrary to your checkout page’s HTML code. -
Changing the background color setting in Payment Page Designer: Set the background color to transparent in Payment Page Designer.
Then use a backend-to-backend JSON workflow for the payment process.
-
Create a payment session: You send an initial POST request with details of the transaction to the Wirecard Payment Page v2 (WPP v2). This POST request is secured by basic access authentication.
-
Render the seamless payment form: WPP v2 returns an initial response URL.
-
If the initial POST request is correct, use this response URL and the
WPP.seamlessRenderlibrary call to render the payment form in a seamless iframe. Continue with step 3. -
If the initial POST request is faulty, WPP v2 returns an error code with a description of the problem in the response. Return to step 1.
-
-
Submit the payment: The consumer fills in the payment form. Use the
WPP.seamlessSubmitfunction to submit the payment. Ensure that the function is bound to an interactive UI element, such as a button, in your HTML code.-
3D Secure credit card payment automatically redirects the consumer to the authentication page, and then to a WPP v2 success- or fail-redirect-url. Include the success- and fail-redirect-urls in your initial request! This page includes a JSON sample for 3D Secure credit card payment.
-
Non-3D Secure credit card payment requires you to implement redirects to subsequent pages, such as a
success-/fail-/cancel-redirect-urlto let the consumer know about the payment outcome, by yourself.
-
-
Parse and Process the Payment Response: The payment is processed. WPP v2 returns base64 encoded payment data. It is highly recommended that you parse and process this base64 encoded response to verify the payment.
First Steps
Before processing payments in Seamless Mode, you need to make a small adjustment to your checkout page’s HTML code, and change a setting in the Payment Page Designer.
Add the paymentPage.js library to your checkout page HTML code:
<script src="https://wpp-test.wirecard.com/loader/paymentPage.js" type="text/javascript"></script>This library lets you render the payment form as an iframe in your checkout page.
| The URL included here serves only as an example. Please enter the domain of the instance received during merchant configuration. |
Open the Payment Page Designer to set the background color to transparent. Transparency of the card form’s background ensures a seamless appearance when it is embedded in your checkout page.
-
Select the Payment tab and click on Colors.
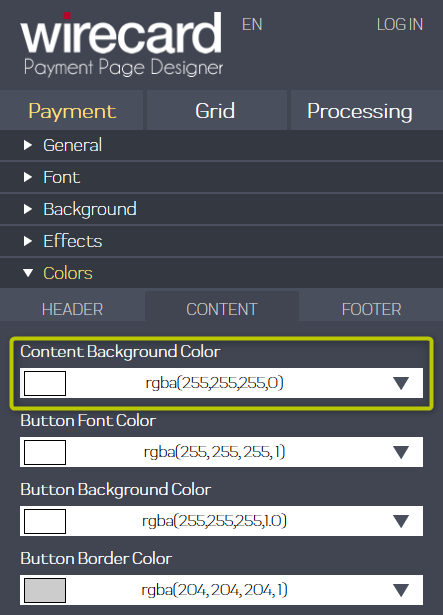
-
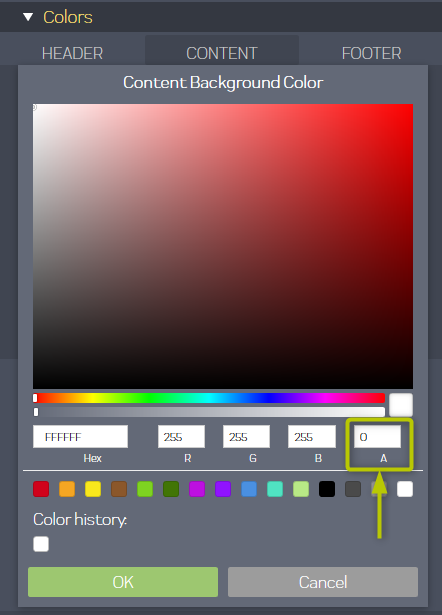
In Colors, go to the Content tab and open the Content Background Color window.
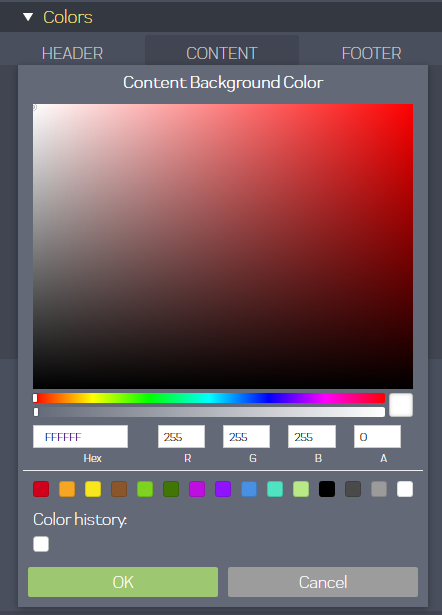
-
Set the Content Background Color alpha value (A) to 0
Payment-Processing Example
This is an example of a credit card 3D Secure transaction to show how to process a payment with the Wirecard Payment Page v2 in Seamless Mode. Currently, Seamless Mode supports only credit card payments. For a more payment-method-specific integration guide, go to Credit Card.
The payment-processing example is designed for the testing environment and does not use real information.
Payment processing with Wirecard Payment Page v2 in Seamless Mode deviates a little bit from the
Payment Processing with Wirecard Payment Page v2 in Seamless Mode |
|---|
|
Payment Processing with HPP and EPP |
|
Before you can send your first request, use the following information to set up your testing tool:
URI (Endpoint) |
|
|---|---|
Username |
70000-APILUHN-CARD |
Password |
8mhwavKVb91T |
MAID |
cad16b4a-abf2-450d-bcb8-1725a4cef443 |
Secret Key |
b3b131ad-ea7e-48bc-9e71-78d0c6ea579d |
Test Card |
|
Card Number |
4012000300001003 |
Expiration Date |
01/23 |
CVV |
003 |
3D Verification Password |
wirecard |
To create a payment session, send a POST request to the /api/payment/register endpoint,
e.g. https://wpp-test.wirecard.com/api/payment/register.
This is an HTTP request with two headers:
Content-Type: application/json
Authorization: Basic NzAwMDAtQVBJTFVITi1DQVJEOjhtaHdhdktWYjkxVA==
The Authorization header needs to be formatted as:
"Authorization"="Basic" + base64("username:password")
{
    "payment": {
        "merchant-account-id": {
            "value": "cad16b4a-abf2-450d-bcb8-1725a4cef443"
        },
        "request-id": "{{$guid}}",
        "transaction-type": "purchase",
        "requested-amount": {
            "value": 10.1,
            "currency": "EUR"
        },
        "payment-methods": {
            "payment-method": [
                {
                    "name": "creditcard"
                }
            ]
        },
        "three-d": {
            "attempt-three-d": "true"
        },
        "success-redirect-url": "https://demoshop-test.wirecard.com/demoshop/#/success",
        "fail-redirect-url": "https://demoshop-test.wirecard.com/demoshop/#/error",
        "cancel-redirect-url": "https://demoshop-test.wirecard.com/demoshop/#/cancel"
    },
    "options": {
        "mode": "seamless",
        "frame-ancestor": "https://www.example.com"
    }
}| Field (JSON) | Data Type | Required/Optional | Size | Description | |
|---|---|---|---|---|---|
|
|
String |
Required |
36 |
A unique identifier assigned to every merchant account (by Wirecard). |
|
String |
Required |
150 |
A unique identifier assigned to every request (by merchant). Used when searching for or referencing it later. |
|
|
String |
Required |
36 |
The requested transaction type. |
|
|
|
Numeric |
Required |
18 |
The full amount that is requested/contested in a transaction. 2 decimal places allowed. |
|
String |
Required |
3 |
The currency of the requested/contested transaction amount. Format: 3-character abbreviation according to ISO 4217. |
|
|
|
String |
Optional |
15 |
The name of the payment method used. Set this value to |
|
|
Boolean |
Conditional |
N/A |
Required for 3D Secure transactions. Indicates whether 3D Secure authentication is enabled for the transaction. |
|
String |
Optional |
256 |
The URL to which the consumer is redirected after successful payment,
e.g. |
|
|
String |
Optional |
256 |
The URL to which the consumer is redirected after successful payment, e.g. |
|
|
String |
Optional |
256 |
The URL to which the consumer is redirected after successful payment,
e.g. |
|
|
|
String |
Required |
8 |
Indicates which mode of payment page is used for the payment. Currently supports |
|
To create a payment session with Credit Card using 3D Secure 2 authentication, you need to include 3D Secure 2 fields in your initial request. Most of these fields are optional but we recommend the implementation of optional fields, as this creates a smoother user experience and ensures a higher level of security. Need more information on 3D Secure 2? Head to our general introduction to 3D Secure 2. |
|
You must include Seamless Mode renders the payment form into an iframe. Therefore, you
need to include |
The response to the initial authorization request contains the
payment-redirect-url.
{
    "payment-redirect-url": "https://wpp-test.wirecard.com/seamless?wPaymentToken=XUcGTdnxwwCWPEP-YOeDmT05_hg1bKbaibLTpcdR8cU"
}
Use the WPP.seamlessRender function to render the payment form in a seamless iframe.
Include the payment-redirect-url here:
WPP.seamlessRender({
    url: paymentredirecturl, // this is the payment link returned in response to your initial request
    wrappingDivId: "seamless-form-target",
    onSuccess: function (response) { // called when seamless form is successfully rendered
    },
    onError: function (errResp) { // called if seamless form failed to render
    }
});| This function renders only the payment form! The button with which consumers confirm their payment must be part of your checkout page. Bind the function to an interactive UI element, such as a button, in your HTML code. |
wrappingDivId
<html>
<head>
    <!-- ... -->
    <script src="https://wpp-test.wirecard.com/loader/paymentPage.js" type="text/javascript"></script>
    <!-- ... -->
</head>
<body>
    <!-- ... -->
    <!-- the form will render in the following div -->
    <div id="seamless-form-target"></div>

    <!-- the following javascript will render the form; make sure to set paymentredirecturl -->
    <script type="text/javascript">
          // change the next line to include YOUR TOKEN
          var paymentredirecturl = "https://wpp-test.wirecard.com/seamless?wPaymentToken=YOUR_TOKEN_HERE";

          // frame-ancestor in the initial request (Step 1) must match the domain you are using to test this
          WPP.seamlessRender({
               url: paymentredirecturl,
               wrappingDivId: "seamless-form-target",
               onSuccess: function (response) {
                 console.log(response);
               },
               onError: function (response) {
                 console.log(response);
               }
          });
    </script>
    <!-- ... -->
</body>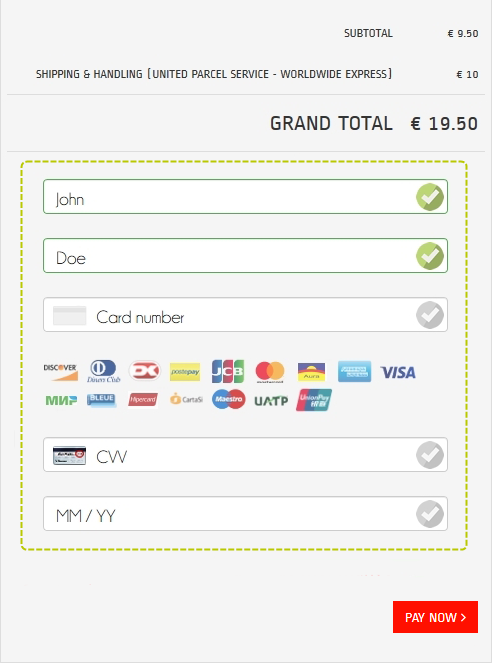
</html>Now the payment form has been rendered and consumers can enter their payment information.
To submit that data, use the WPP.seamlessSubmit function:
WPP.seamlessSubmit({
    onSuccess: function (response) { // called when seamless form data is successfully submitted
    },
    onError: function (response) { //called when data submission fails
    }
});| Bind the function to an interactive UI element, such as a button, in your HTML code. The consumer can then click the button to submit the payment. |
<html>
<head>
    <!-- ... -->
    <script src="https://wpp-test.wirecard.com/loader/paymentPage.js" type="text/javascript"></script>
    <!-- ... -->
</head>
<body>
    <!-- ... -->
    <!-- the form will render in the following div -->
    <div id="seamless-form-target"></div>

    <!-- the following javascript will render the form; make sure to set paymentredirecturl -->
    <script type="text/javascript">
          // change the next line to include YOUR TOKEN
          var paymentredirecturl = "https://wpp-test.wirecard.com/seamless?wPaymentToken=YOUR_TOKEN_HERE";

          // frame-ancestor in the initial request must match the domain you are using to test this
          WPP.seamlessRender({
               url: paymentredirecturl,
               wrappingDivId: "seamless-form-target",
               onSuccess: function (response) {
                 console.log(response);
               },
               onError: function (response) {
                 console.log(response);
               }
          });
    </script>

    <!-- this code will generate the "Pay Now" button and enable the submission of the form -->
    <input id="wirecard_pay_btn" type="button" onclick="pay()" value="Pay Now"/>
    <script type="text/javascript">
        function pay() {
            WPP.seamlessSubmit({
                onSuccess: function (response) {
                // called when seamless form data is successfully submitted with non-3D Secure credit card
                // see section 4 (Parse and Process the Payment Response) on how to deal with this data
                  console.log(response);
                },
                onError: function (response) {
                // called when seamless form data is successfully submitted with non-3D Secure credit card
                // see section 4 (Parse and Process the Payment Response) on how to deal with this data
                  console.log(response);
                }
             });
        }
    </script>
    <!-- ... -->
</body>
</html>| The function only submits the payment. |
3D Secure Transaction Redirect
For 3D Secure transactions, WPP v2 in Seamless Mode automatically redirects the consumer to the card provider 3D Secure authentication pages. There are no actions required from you for this process.
After 3D Secure authentication, the payment is further processed.
Depending on the outcome, the consumer is redirected to a
success-/fail-/cancel-redirect-url. As the consumer leaves your page
for 3D Secure authentication, these URLs need to be set up in the same
way as those for HPP and EPP
integrations.
|
This means that for 3D Secure Transactions, you need to include the URLs for successful, failed, and canceled transactions can also be set during the initial merchant configuration and saved in the database. If you would like to change these default values, please contact Merchant Support. More information on |
Non 3D Secure Transaction Redirect
For Non-3D Secure transactions, any further steps, such as displaying success messages to your consumer, or redirecting your consumer to success-/fail-/cancel-pages, need to be implemented separately in your online shop.
Once you have submitted the payment, and it has been processed, you
receive a payment response. The payment response is sent in three parts:
the response-signature-base64, the response-signature-algorithm,
and the response-base64.
Object {
"response-signature-base64": "9JSIJ/G4Otz6KbAJTg20LSNOcvidhgGWAPR3BMXfbxQ=",
"response-signature-algorithm": "HmacSHA256",
"response-base64": "ewogICJwYXltZW50IiA6IHsKICAgICJmYWlsLXJlZGlyZWN0LXVybCIgOiAiaHR0cHM6Ly9kZW1vc2hvcC10ZXN0LndpcmVjYXJkLmNvbS9kZW1vc2hvcC8jIS9lcnJvciIsCiAgICAidHJhbnNhY3Rpb24tc3RhdGUiIDogInN1Y2Nlc3MiLAogICAgInN1Y2Nlc3MtcmVkaXJlY3QtdXJsIiA6ICJodHRwczovL2RlbW9zaG9wLXRlc3Qud2lyZWNhcmQuY29tL2RlbW9zaG9wLyMhL3N1Y2Nlc3MiLAogICAgInBheW1lbnQtbWV0aG9kcyIgOiB7CiAgICAgICJwYXltZW50LW1ldGhvZCIgOiBbIHsKICAgICAgICAibmFtZSIgOiAiY3JlZGl0Y2FyZCIKICAgICAgfSBdCiAgICB9LAogICAgInRocmVlLWQiIDogewogICAgICAiY2FyZGhvbGRlci1hdXRoZW50aWNhdGlvbi1zdGF0dXMiIDogIkEiLAogICAgICAiYXR0ZW1wdC10aHJlZS1kIiA6IGZhbHNlCiAgICB9LAogICAgImNhbmNlbC1yZWRpcmVjdC11cmwiIDogImh0dHBzOi8vZGVtb3Nob3AtdGVzdC53aXJlY2FyZC5jb20vZGVtb3Nob3AvIyEvY2FuY2VsIiwKICAgICJtZXJjaGFudC1hY2NvdW50LWlkIiA6IHsKICAgICAgInZhbHVlIiA6ICJjYWQxNmI0YS1hYmYyLTQ1MGQtYmNiOC0xNzI1YTRjZWY0NDMiCiAgICB9LAogICAgImN1c3RvbS1maWVsZHMiIDogewogICAgICAiY3VzdG9tLWZpZWxkIiA6IFsgewogICAgICAgICJmaWVsZC1uYW1lIiA6ICJlbGFzdGljLXBhZ2UtYXBpLjNkLm9yaWdpbmFsX3R4bl90eXBlIiwKICAgICAgICAiZmllbGQtdmFsdWUiIDogInB1cmNoYXNlIgogICAgICB9IF0KICAgIH0sCiAgICAidHJhbnNhY3Rpb24taWQiIDogImFkOWY5YjEyLTY4ODgtNDkxOC04N2NkLTZmYWRjNzRkYzRjOCIsCiAgICAiY29tcGxldGlvbi10aW1lLXN0YW1wIiA6ICIyMDE5LTAyLTExVDE1OjIzOjAwIiwKICAgICJyZXF1ZXN0ZWQtYW1vdW50IiA6IHsKICAgICAgImN1cnJlbmN5IiA6ICJFVVIiLAogICAgICAidmFsdWUiIDogMTAuMQogICAgfSwKICAgICJhdXRob3JpemF0aW9uLWNvZGUiIDogIjY4NzIwNiIsCiAgICAiY3NjLWNvZGUiIDogIk4iLAogICAgImFjY291bnQtaG9sZGVyIiA6IHsKICAgICAgImxhc3QtbmFtZSIgOiAibGFzdCIsCiAgICAgICJmaXJzdC1uYW1lIiA6ICJmaXJzdCIKICAgIH0sCiAgICAiY2FyZCIgOiB7CiAgICAgICJleHBpcmF0aW9uLW1vbnRoIiA6IDEsCiAgICAgICJleHBpcmF0aW9uLXllYXIiIDogMjAyMywKICAgICAgImNhcmQtdHlwZSIgOiAidmlzYSIsCiAgICAgICJtZXJjaGFudC10b2tlbml6YXRpb24tZmxhZyIgOiBmYWxzZQogICAgfSwKICAgICJzdGF0dXNlcyIgOiB7CiAgICAgICJzdGF0dXMiIDogWyB7CiAgICAgICAgImRlc2NyaXB0aW9uIiA6ICIzZC1hY3F1aXJlcjpUaGUgcmVzb3VyY2Ugd2FzIHN1Y2Nlc3NmdWxseSBjcmVhdGVkLiIsCiAgICAgICAgInNldmVyaXR5IiA6ICJpbmZvcm1hdGlvbiIsCiAgICAgICAgImNvZGUiIDogIjIwMS4wMDAwIgogICAgICB9LCB7CiAgICAgICAgImRlc2NyaXB0aW9uIiA6ICIzZC1hY3F1aXJlcjpQcm9vZiBvZiBhdXRoZW50aWNhdGlvbiBhdHRlbXB0IHdhcyBnZW5lcmF0ZWQuIiwKICAgICAgICAic2V2ZXJpdHkiIDogImluZm9ybWF0aW9uIiwKICAgICAgICAiY29kZSIgOiAiMjAwLjEwODQiCiAgICAgIH0gXQogICAgfSwKICAgICJwYXJlbnQtdHJhbnNhY3Rpb24taWQiIDogImFiMWI0MmI2LWIwYzktNGVmMC1iYjBjLTA1N2MzMjAzOTk1NyIsCiAgICAicGFyZW50LXRyYW5zYWN0aW9uLWFtb3VudCIgOiB7CiAgICAgICJjdXJyZW5jeSIgOiAiRVVSIiwKICAgICAgInZhbHVlIiA6IDEwLjEwMDAwMAogICAgfSwKICAgICJhcGktaWQiIDogIndwcCIsCiAgICAiZGV2aWNlIiA6IHsKICAgICAgImZpbmdlcnByaW50IiA6ICIzYmFiMTI2Zi05YjEzLWEzYmYtY2YwNS0yZTA5NjVmZGIwZGQiCiAgICB9LAogICAgImNhcmQtdG9rZW4iIDogewogICAgICAibWFza2VkLWFjY291bnQtbnVtYmVyIiA6ICI0MDEyMDAqKioqKio2MDAyIiwKICAgICAgInRva2VuLWlkIiA6ICI0ODE5MjUzODg4MDk2MDAyIgogICAgfSwKICAgICJ0cmFuc2FjdGlvbi10eXBlIiA6ICJwdXJjaGFzZSIsCiAgICAicmVxdWVzdC1pZCIgOiAiNGU4MTkyNDEtYTc1OS00NWYxLThmM2ItNWM3MTJlYjkyMzNmIgogIH0KfQ=="
}-
response-base64contains the payment data. -
response-signature-base64and theresponse-signature-algorithm, together with the Secret Key you receive upon signing a contract with Wirecard, are required for calculating the security response signature. The security response signature is essential for verifying the payment status.
Please consult WPP v2 Security for details and examples of response signature verification.
In Seamless Mode, the WPP v2 sends the final response containing the payment data to either of the following destinations, depending on the payment mode.
3D Secure Credit Card Payment
The WPP v2 sends the final response containing the payment data to the
success-redirect-url/fail-redirect-url specified in the initial request. This is the URL where the consumer is redirected to at the end
of a payment session.
To parse and process the payment response of 3D Secure credit card payment, please consult WPP v2 Security for details.
This is the decoded payment data contained in the example payment response provided above.
{
    "payment": {
        "transaction-state": "success",
        "payment-methods": {
            "payment-method": [
                {
                    "name": "creditcard"
                }
            ]
        },
        "three-d": {
            "cardholder-authentication-status": "A",
            "attempt-three-d": false
        },
        "merchant-account-id": {
            "value": "cad16b4a-abf2-450d-bcb8-1725a4cef443"
        },
        "custom-fields": {
            "custom-field": [
                {
                    "field-name": "elastic-page-api.3d.original_txn_type",
                    "field-value": "purchase"
                }
            ]
        },
        "transaction-id": "ad9f9b12-6888-4918-87cd-6fadc74dc4c8",
        "completion-time-stamp": "2019-02-11T15:23:00",
        "requested-amount": {
            "currency": "EUR",
            "value": 10.1
        },
        "authorization-code": "687206",
        "csc-code": "N",
        "account-holder": {
            "last-name": "last",
            "first-name": "first"
        },
        "card": {
            "expiration-month": 1,
            "expiration-year": 2023,
            "card-type": "visa",
            "merchant-tokenization-flag": false
        },
        "statuses": {
            "status": [
                {
                    "description": "3d-acquirer:The resource was successfully created.",
                    "severity": "information",
                    "code": "201.0000"
                },
                {
                    "description": "3d-acquirer:Proof of authentication attempt was generated.",
                    "severity": "information",
                    "code": "200.1084"
                }
            ]
        },
        "parent-transaction-id": "ab1b42b6-b0c9-4ef0-bb0c-057c32039957",
        "parent-transaction-amount": {
            "currency": "EUR",
            "value": 10.1
        },
        "api-id": "wpp"
        },
        "card-token": {
            "masked-account-number": "401200******6002",
            "token-id": "4819253888096002"
        },
        "transaction-type": "purchase",
        "request-id": "4e819241-a759-45f1-8f3b-5c712eb9233f"
    }
}| Field (JSON) | Data Type | Description | |
|---|---|---|---|
|
String |
The current transaction state. Possible values:
- Typically, a transaction starts with state |
|
|
|
String |
The name of the payment method used for the transaction. |
|
|
String |
Result of the 3D Secure check. |
|
Boolean |
Indicates whether the transaction should use the 3-D Secure workflow. |
|
|
|
String |
A unique identifier assigned to every merchant account (by Wirecard). |
|
|
String |
Custom field. |
|
String |
Custom field. |
|
|
String |
A unique identifier assigned to every transaction(by Wirecard). Used when searching for or referencing to it later. |
|
|
YYYY-MM-DD-Thh:mm:ss |
The UTC/ISO time-stamp documents the time & date when the transaction was executed. |
|
|
|
String |
The currency of the requested/contested transaction amount. |
|
Numeric |
The full amount that is requested/contested in a transaction. |
|
|
String |
Provider authorization code. |
|
|
String |
Code indicating Card Verification Value (CVV/CVC) verification results. |
|
|
|
String |
The first name of the account holder. |
|
String |
The last name of the account holder. |
|
|
|
Numeric |
The expiration month of the card used in the transaction. |
|
Numeric |
The expiration year of the card used in the transaction. |
|
|
String |
The type/provider of the card used in the transaction. |
|
|
Boolean |
Indicates whether Cardholder card data was stored by the Merchant for future transactions. Maps to the Visa field Stored Credential. |
|
|
|
String |
The description of the transaction status message. |
|
String |
The definition of the status message. Possible values:
|
|
|
String |
Status code of the status message. |
|
|
String |
The unique identifier of a transaction that is being referenced (sometimes referred to as the "original transaction"). |
|
|
|
String |
The currency of the requested/contested transaction amount. |
|
Numeric |
The full amount that is requested/contested in a transaction. |
|
|
String |
Description of the transaction for account holder’s bank statement purposes. |
|
|
|
String |
A unique identifier assigned to every card token. |
|
String |
The masked code that represents the account (card) number used in the transaction. |
|
|
String |
The requested transaction type. |
|
|
String |
A unique identifier assigned to every request (by merchant). Used when searching for or referencing to it later. |
|
Non 3D Secure Credit Card Payment
The WPP v2 sends the final response containing the payment data as part of the onSuccess/onError function. Use the response to redirect the
consumer to a success-/fail-/cancel-redirect-url of your own choice and design to inform the consumer about the transaction status.
To parse and process the payment response of Non 3D Secure credit card payment, please consult WPP v2 Security for details.