Payment Page Solutions
Our payment page solutions maximize the user experience of the checkout process by giving you control over its design and feel. With three readily available integration options, you decide where and how you want your customers to pay, while still enjoying the benefits of a dependable payment solution. All you need to get started is PCI SAQ A compliance.
| Wirecard Payment Page v2 |
Wirecard Payment Page v1 |
|---|---|
|
Wirecard Payment Page v2 delivers a highly customizable, secure and polished checkout experience with multiple integration options. If visual design is your main priority, Wirecard Payment Page v2 gives you all the tools you need to create a great-looking payment page.
|
Wirecard Payment Page v1 offers safe and smooth payment processing available with 3 different integration options.
|


| Wirecard Payment Page v2 |
Wirecard Payment Page v1 |
|
|---|---|---|
Credit Card support |
✅ |
✅ |
Integration types |
Hosted/Embedded/Seamless |
|
Multi-language support |
✅ |
✅ |
Custom CSS |
✅ |
✅ |
Ready-to-use integration code in Java/PHP |
✅ |
❌ |
API formats |
JSON/NVP |
NVP only |
Customization through GUI designer |
✅ |
❌ |
Multiple themes |
✅ |
❌ |
Responsive design (mobile & desktop) |
✅ |
✅ |
Wirecard Payment Page v2
Wirecard Payment Page v2 (WPP v2) is an online checkout solution which combines a highly customizable user interface with payment processing for various payment methods.
WPP v2 allows merchants to customize the visual representation of their payment page while keeping an optimal payment flow. WPP v2 is designed to streamline integration so merchants can accept payments quickly. Additionally, Wirecard hosts all sensitive data so merchants can focus on their business instead of worrying about data security and PCI.
Merchants can easily modify the design of WPP v2 through Payment Page Designer, an intuitive web interface for customizing nearly every visual element the consumer would see. As an added benefit, using Designer requires no graphical design experience or coding - new payment pages can be created in minutes!
Payment Page Modes
Hosted |
Embedded |
Seamless |
|
|
|
A standalone payment page hosted independently from your checkout page. |
A payment form rendered over your checkout page as a modal window. |
A card form seamlessly integrated into your checkout form. |


What Does It Do?
WPP v2 provides an appealing user interface for Wirecard Payment Gateway (WPG), enhancing the user experience of paying customers. Payments are created through backend payment sessions which supply a live URL to the payment page.
Customers are redirected to this URL where they submit the payment and WPP v2 handles the processing automatically, for the benefit of both the merchant & customer.
Who Is This Documentation for?
This documentation is primarily for developers integrating WPP v2 into an online shop. Each variation of WPP v2 has a short introduction, and a more extensive overview of integration procedures and code.
A basic understanding of REST API services, JavaScript and HTML is assumed.
Which Payment Methods Are Supported?
Merchants can accept Credit Card payments from all the major card schemes and various local providers as well as many alternative payment methods. See the list of all supported payment methods below:
Hosted Payment Page
-
Standalone payment page
-
Customization with Payment Page Designer
-
Expiration times for HPP payment hyperlinks
-
PCI DSS SAQ A
Integrate the Hosted Payment Page (HPP) to redirect the consumer from your shop to a standalone payment page hosted by Wirecard.
Use the Payment Page Designer to customize the HPP interface: set background, colors, fonts, logos and more for a cohesive look that meets your preferences and fits your merchant branding. The redirect to the HPP will be barely noticeable, which makes consumers feel at ease.
HPP also allows you to configure expiration times for payment hyperlinks: payments can be postponed.
Wirecard hosts all sensitive data - you only need to meet the requirements of SAQ A to be fully PCI DSS compliant. With the HPP you can focus on your business and stop worrying about data security.


Embedded Payment Page
-
Payment form as overlay (iframe) to the checkout page
-
No consumer redirection
-
Customization with Payment Page Designer
-
PCI DSS SAQ A
Integrate the Embedded Payment Page (EPP) to display the payment form as an overlay to the checkout page. The consumer stays on the same page until the payment is finished, rather than being redirected to a separate site. This creates a smooth, uninterrupted shopping experience.
Use the Payment Page Designer to customize the EPP interface: set colors, fonts, logos and more for a cohesive look that meets your preferences and fits your merchant branding.
Wirecard hosts all sensitive data - you only need to meet the requirements of SAQ A to be fully PCI DSS compliant. With the EPP you can focus on your business and stop worrying about data security.
Seamless Mode
-
Payment form integrated into the checkout page (iframe)
-
No consumer redirection, overlays, or pop-ups
-
Customization with Payment Page Designer
-
PCI DSS SAQ A
Use Seamless Mode to display the WPP v2 payment form as a fully integrated part of your checkout page. Without redirects to external pages (except for credit card 3D Secure verification), overlays, or pop-ups, the payment form appears native to your website but is still being hosted by Wirecard.
Use the Payment Page Designer to customize the payment form: set colors, fonts, logos and more for a cohesive look that meets your preferences and fits your merchant branding.
Wirecard hosts all sensitive data - you only need to meet the requirements of SAQ A to be fully PCI DSS compliant. With Seamless Mode you can focus on your business and stop worrying about data security.
| Currently, Seamless Mode is only available for credit card payments. |
Redirects and IPNs
Configuring the Redirect Pages
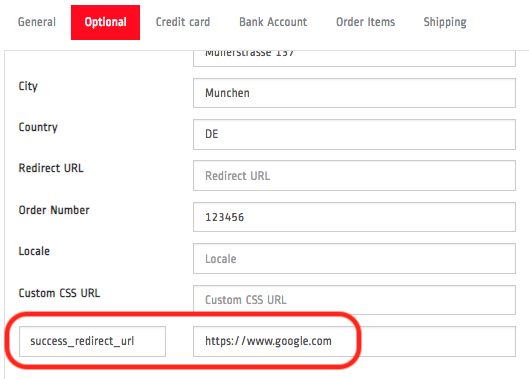
During and after the payment process, the consumer is redirected to a corresponding page (e.g. success page upon a successful payment). You can set the URLs for 'successful', 'failed' and 'canceled' page redirects. Each type of redirect must be defined on at least one level. There are multiple ways of how you can do this:
-
Default database URLs
The default values for redirect URLs are configured during account setup (merchant configuration) and saved into the database. They are then loaded from the database each time you send a payment request (which means you do not have to send them in the request).
| If you need to change the default values, contact merchant support. |
-
Specifying redirect URLs in the payment request
| Any redirect URLs which are sent in a payment request override their respective database defaults. |
You can overwrite the default values by specifying the redirect links in the payment request:
| Field (NVP) | Field (JSON) | Required | Data Type | Size | JSON Parent | Description |
|---|---|---|---|---|---|---|
success_redirect_url |
success-redirect-url |
N |
String |
2000 |
payment ({ }) |
The URL to which the consumer is redirected after a successful payment. |
fail_redirect_url |
fail-redirect-url |
N |
String |
2000 |
payment ({ }) |
The URL to which the consumer is redirected after an unsuccessful payment. |
cancel_redirect_url |
cancel-redirect-url |
N |
String |
2000 |
payment ({ }) |
The URL to which the consumer is redirected after they cancel a payment. |
If you have no database defaults, you must include them in the
request. Certain payment methods also require a specific redirect field
(⇒ redirect-url) to be present in the request.
redirect-url field
redirect-url overrides the database defaults for successful, failed and canceled redirects.
Do not confuse this field with payment-redirect-url, which contains the payment URL.
|
redirect-url covers all redirection options, i.e. regardless of
whether the payment succeeds, fails or the consumer cancels, they are
redirected to the URL specified in redirect-url:
| Field (NVP) | Field (JSON) | Required | Data Type | Size | JSON Parent | Description |
|---|---|---|---|---|---|---|
redirect_url |
redirect-url |
N |
String |
256 |
payment ({ }) |
The URL to which the consumer is redirected after a successful, failed or canceled payment if there are no alternatives available. |
redirect-url is only used as a fallback if there is
no success-redirect-url, cancel-redirect-url or fail-redirect-url defined
in the database or request.
pending-redirect-url field
Pending URL is a special variation of success-redirect-url. Certain
payment methods require additional processing: even if the initial
request is successful, the process is not complete yet.
In this specific situation, Wirecard Payment Gateway returns a
pending-debit transaction type in the response: the payment is
processed, but its current state is not final. Since this is not the
final response, the consumer is redirected to the pending-redirect-url
instead of the usual success-redirect-url.
| Field (NVP) | Field (JSON) | Required | Data Type | Size | JSON Parent | Description |
|---|---|---|---|---|---|---|
pending_redirect_url |
pending-redirect-url |
N |
String |
256 |
payment ({ }) |
The URL to which the consumer is redirected when the response returns a pending transaction type. |
Recap
There are 3 levels for each type (canceled, successful, failed) of redirection:
-
Redirect fields sent in the request (
success-redirect-url,fail-redirect-urlorcancel-redirect-url). -
The
redirect-urlfield - covering all of the three options - used as a fallback if the above is not defined. -
The third level is defined in merchant configuration (database default), set up during merchant configuration.
pending-redirect-url does not fit into these categories since it is
a specific variation of the success-redirect-url. It is used when a
payment request is successfully registered, but the response returns
a pending-xx transaction type, pending further processing (e.g.
the payment is finished at a later time, or there is a delay).
When the payment is processed, the consumer is redirected to
the success-redirect-url page. pending-redirect-url can be sent in
the request, or have a default value in the database like the others.
The order of precedence starts at the top, i.e. if the first level redirects are not defined, the second level is checked. You need to define at least one level for each redirect, e.g. if you have no database defaults set, you must include the redirects in the request.
Successful, failed and canceled redirects all POST payment response data to the redirection URL target.
Here is an example payment request with defined redirects. You can substitute them for any of the redirects found here (or add more):
{
  "payment": {
    "merchant-account-id": {
      "value": "61e8c484-dbb3-4b69-ad8f-706f13ca141b"
    },
    "request-id": "{{$guid}}",
    "transaction-type": "auto-sale",
    "requested-amount": {
      "value": 10.1,
      "currency": "EUR"
    },
    "success-redirect-url": "https://demoshop-test.wirecard.com/demoshop/#/success",
    "fail-redirect-url": "https://demoshop-test.wirecard.com/demoshop/#/error",
    "cancel-redirect-url": "https://demoshop-test.wirecard.com/demoshop/#/cancel"
  }
}
Configuring IPNs through WPP v2 requests
| This is only an example of how to configure extra IPNs through a WPP v2 payment request. For information regarding automatic IPNs and other configuration options head over here. |
You can set up additional IPNs by indicating them in a request. These are sent only per request (payment) and are not saved in your merchant configuration:
{
  "payment": {
    "merchant-account-id": {
      "value": "7a6dd74f-06ab-4f3f-a864-adc52687270a"
    },
    "request-id": "{{$guid}}",
    "requested-amount": {
      "value": "1.01",
      "currency": "EUR"
    },
    "account-holder": {
      "first-name": "John",
      "last-name": "Dao"
    },
    "transaction-type": "auto-sale",
    "notifications": {
      "format": "application/json",
      "notification": [
        {
          "url": "https://www.yourdomain.com/notification-target"
        },
        {
          "url": "https://www.yourdomain.com/success-notification-target",
          "transaction-state": "success"
        },
        {
          "url": "https://www.yourdomain.com/failed-notification-target",
          "transaction-state": "failed"
        },
        {
          "url": "https://www.yourdomain.com/success-notification-target2",
          "transaction-state": "success"
        }
      ]
    }
  }
}merchant_account_id=00f0b5ef-1241-4ab9-9eb1-8317b3dd9410
request_id=e344681d-f002-45e0-83e4-345f9939221f
transaction_type=authorization
requested_amount=37.80
requested_amount_currency=EUR
ip_address=127.0.0.1
locale=en
notifications_format=application/json
notification_transaction_state=success
notification_url=https://www.yourdomain.com/success-notification-target
notification_transaction_state_1=success
notification_url_1=https://www.yourdomain.com/success-notification-target
notification_transaction_state_2=failed
notification_url_2=https://www.yourdomain.com/failed-notification-target
notification_url_3=https://www.yourdomain.com/notification-target
request_time_stamp=20180604074549
request_signature_v2=WAUTH+SFMyNTYKY3VzdG9tX2Nzc191cmw9CnJlcXVlc3RfdGltZV9zdGFtcD0yMDE4LTA2LTA0VDA5OjQ1OjQ4KzAyOjAwCm1
lcmNoYW50X2FjY291bnRfaWQ9MDBmMGI1ZWYtMTI0MS00YWI5LTllYjEtODMxN2IzZGQ5NDEwCnJlcXVlc3RlZF9hbW91bnRfY3VycmVuY3k9RVVSCmlwX
2FkZHJlc3M9MTI3LjAuMC4xCnRyYW5zYWN0aW9uX3R5cGU9YXV0aG9yaXphdGlvbgpyZXF1ZXN0X2lkPWUzNDQ2ODFkLWYwMDItNDVlMC04M2U0LTM0NWY
5OTM5MjIxZgpyZXF1ZXN0ZWRfYW1vdW50PTM3LjgwCnJlZGlyZWN0X3VybD0K.qzVwTDrCL%2F6zWXmV4f5KD9jXdV4K1v6c7WDQYtMx9Gc%3DWPP v2 Features
WPP v2 features support convenient customization of the payment and checkout process.
Add fields in the initial POST request or use Payment Page Designer to enable/disable features based on what you want for your business. Set default values during merchant configuration for simplified payment requests.
Read about individual features by clicking on the respective link below:
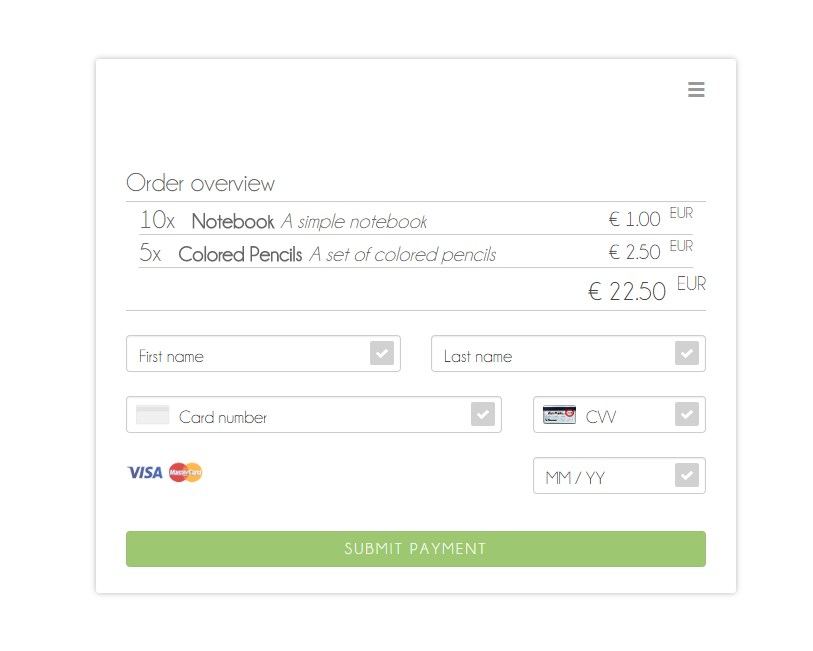
Order Overview
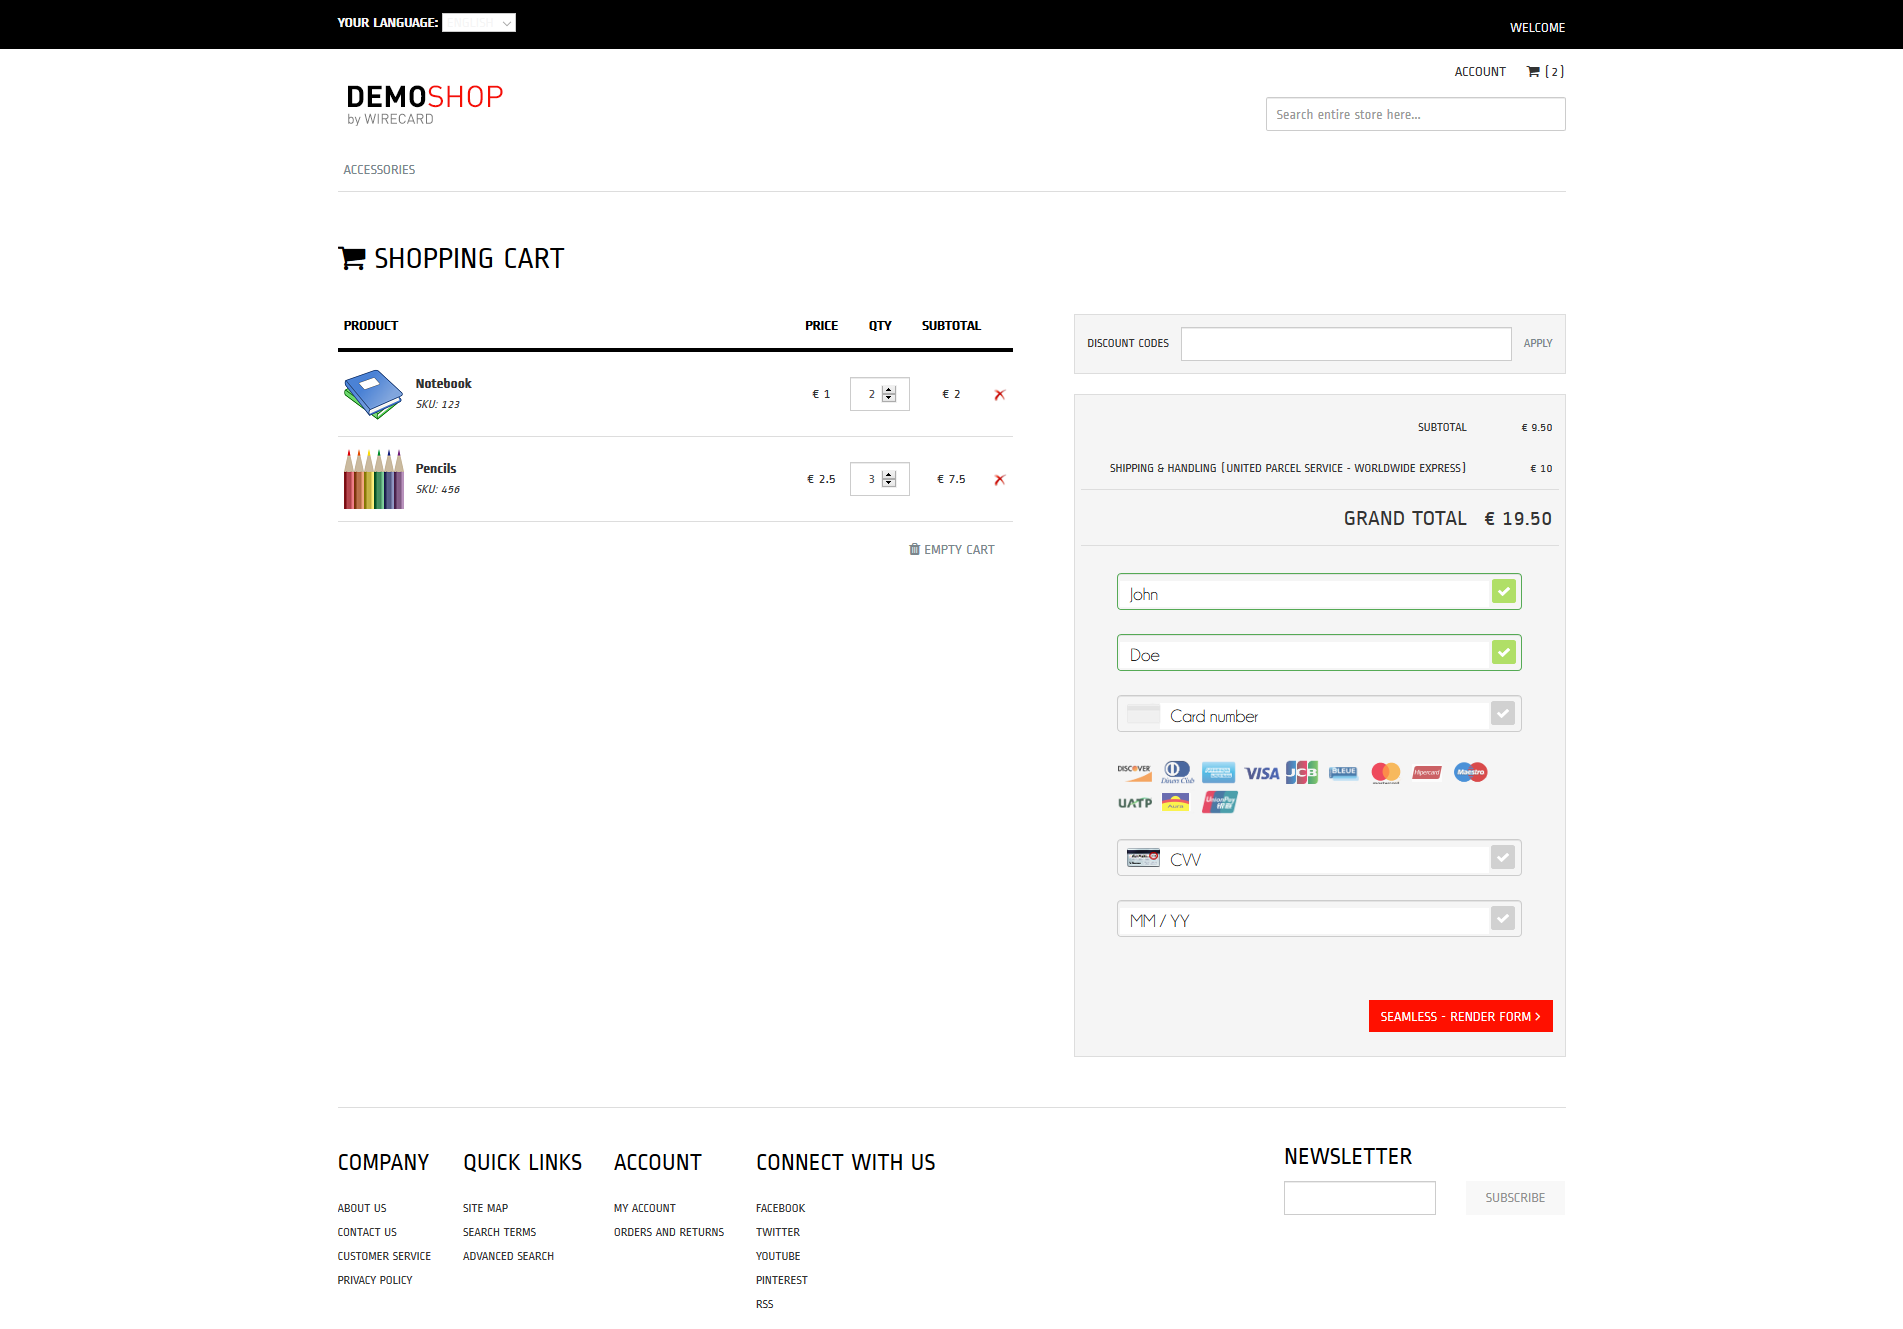
Providing shopping cart details within the payment page enhances your customer experience because consumers are more likely to feel confident with the purchase. WPP v2 features an order overview, toggled on and off using a single variable. Whereas most payment pages only show the order total, but not the specific items, WPP v2 offers both.
This helps with a number of situations merchants face:
-
Avoiding abandoned shopping carts because customers are unsure what they are paying for
-
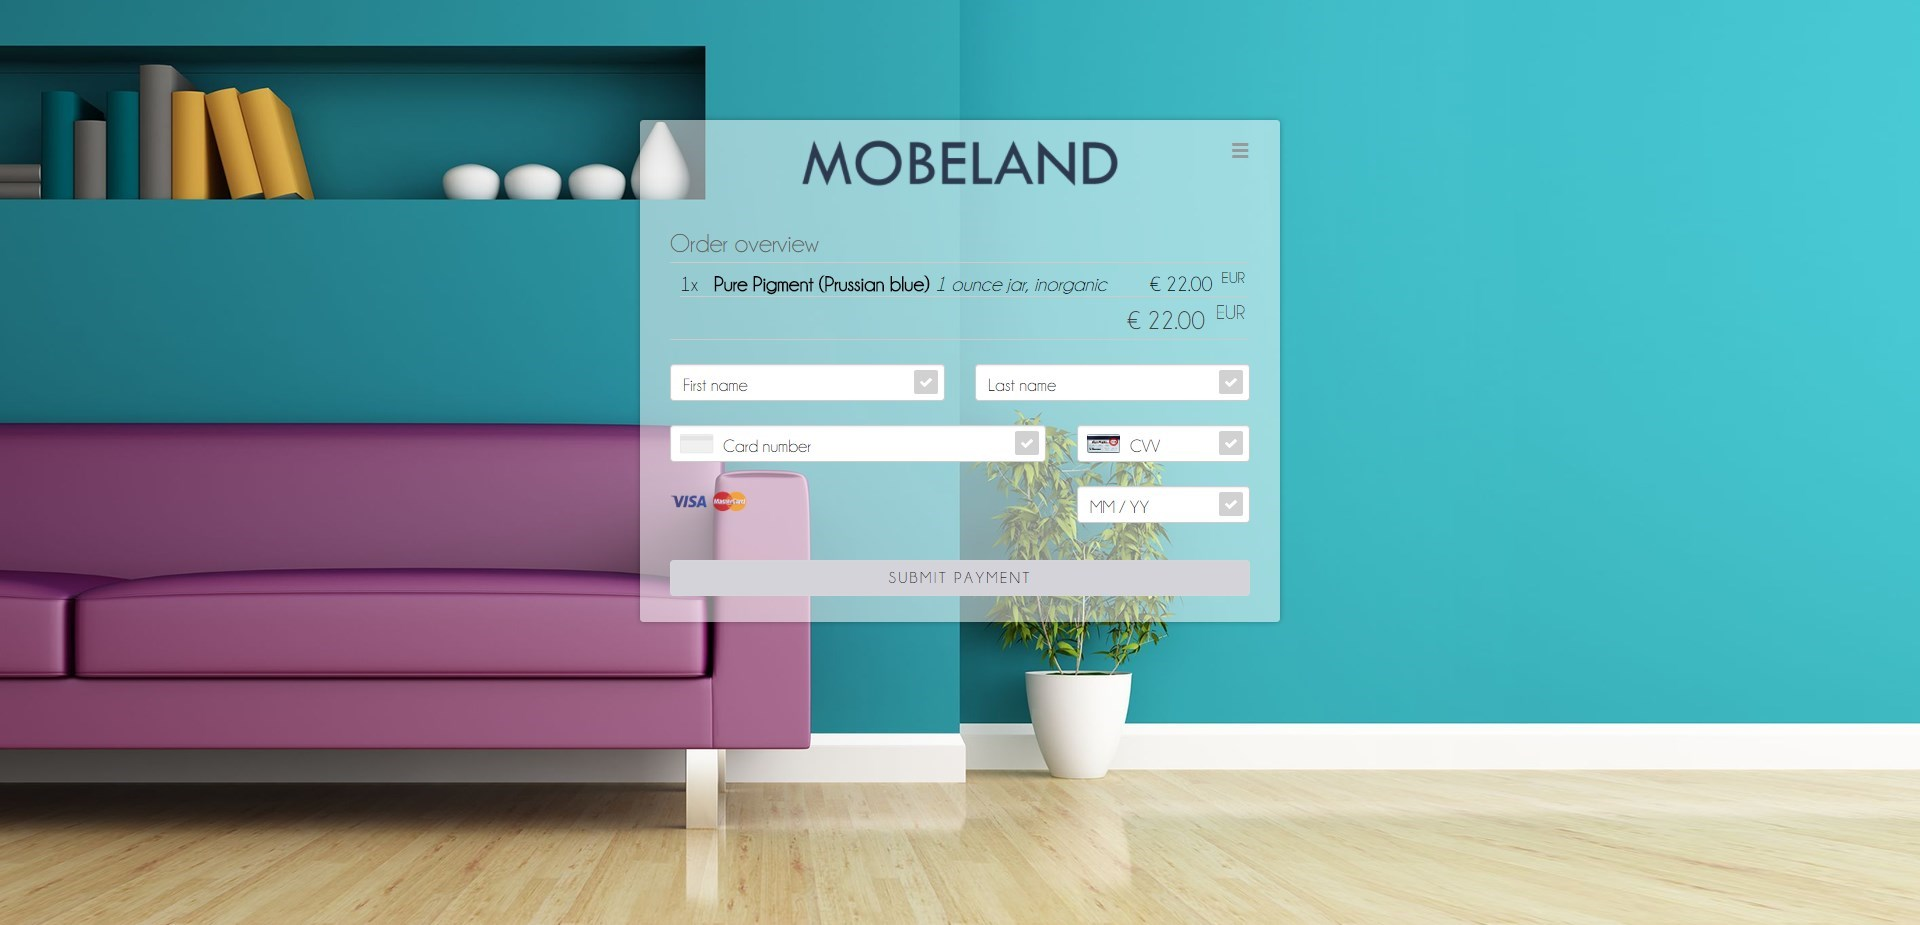
Postponed payments (concert reservations, football tickets, etc.), where it is easy to forget what one ordered weeks or even months before
-
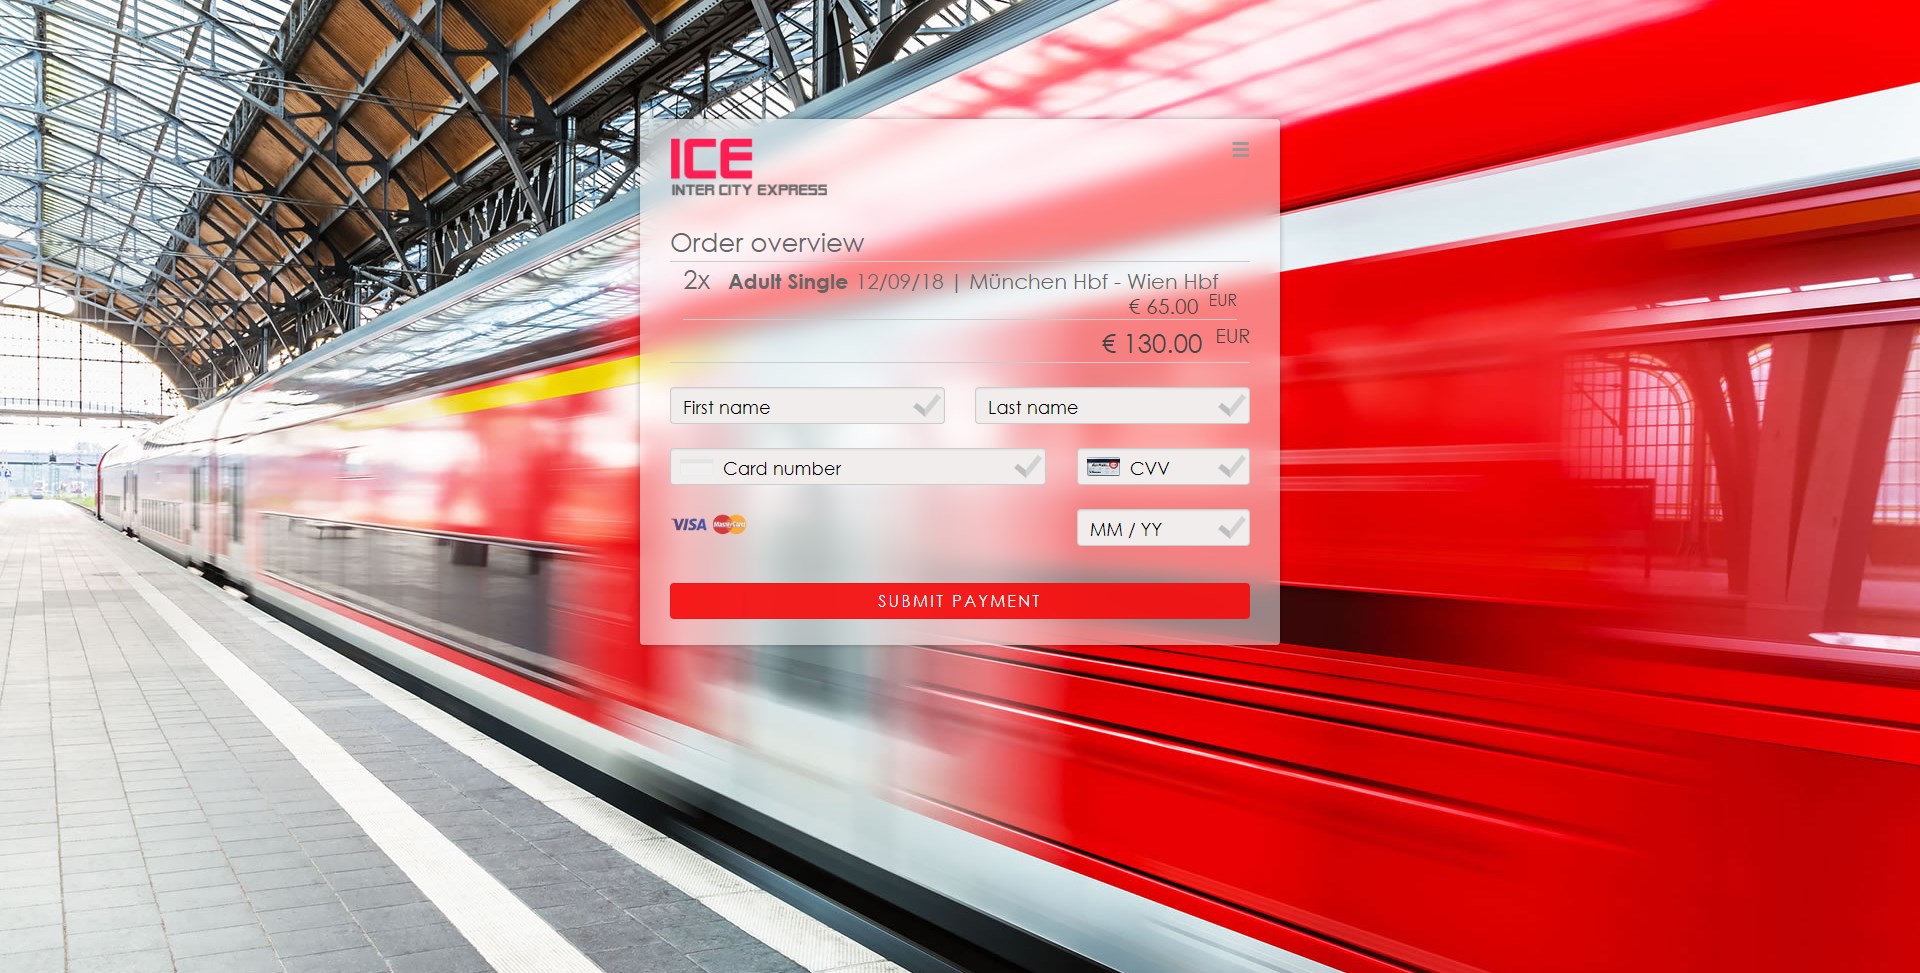
Important & "quality of life" information (flight/train numbers, trip time, etc.) and more
|
To enable order overview for a payment:
Add the |
| Field (NVP) | Field (JSON) | Data Type | JSON Parent | Description |
|---|---|---|---|---|
wpp_options_order_overview |
|
Boolean |
options (\{ }) |
Indicates whether order items are shown on the payment form. |
Example Request w/ order-overview (
order-overview is at the end under options) |
|
The default value for order-overview is false. You can also enable
order overview as a theme option in Payment Page Designer.
The above shows how to enable the order overview, but not how to record the actual order items in the request.
See the examples below for NVP & JSON code samples for an order of 10 notebooks and 5 sets of colored pencils. All fields related to order items are optional, so it is up to you which ones you include (or leave out).
NVP Example For Detailing Order Items
JSON Example For Detailing Order Items
|
|
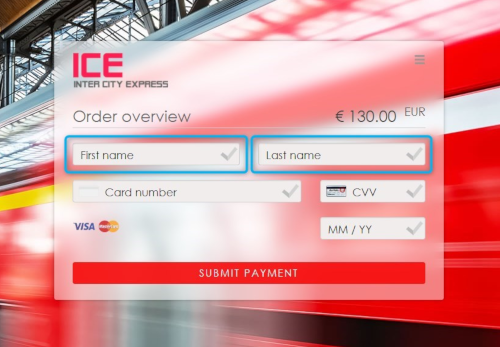
Cardholder Name
Some merchants prefer to use a single field instead of 'First Name' and 'Last Name'. As with order overview, you can set these options using a single field in the request.

|
To control the behavior of name field(s) on the payment form:
Add the |
| Field (NVP) | Field (JSON) | Data Type | Values | JSON Parent | Description |
|---|---|---|---|---|---|
wpp_options_cardholder |
cardholder |
Boolean |
|
options (\{ }) |
Indicates the type of name field(s) used in the payment form or if they are enabled at all. |
There are three options:
-
Show both the First name & the Last name field on the payment page:
Set the value ofcardholdertonames. This is the default option, so you do not need to do anything for this to happen unless you change the default. -
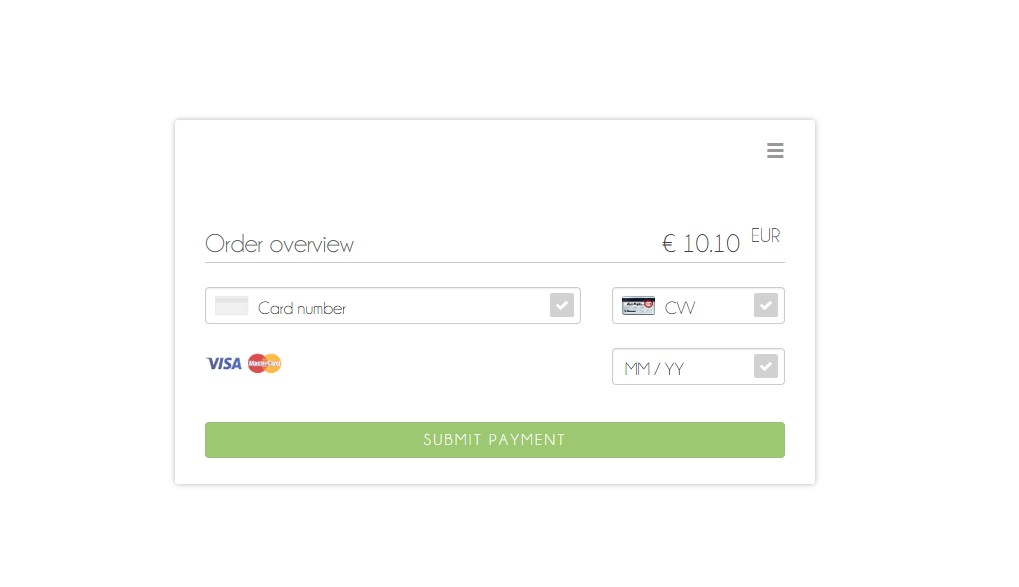
Show the Cardholder name field (instead of First name & Last name) on the payment page:
Set the value ofcardholdertocardholder. -
Only show card information on the payment page (no names):
Set the value ofcardholdertonone.
Cardholder name renders the value from the last-name field; i.e. if
you send the example request below with cardholder set to
cardholder, only "Doe" shows.
Example request w/ cardholder (
cardholder is at the end under options) |
|
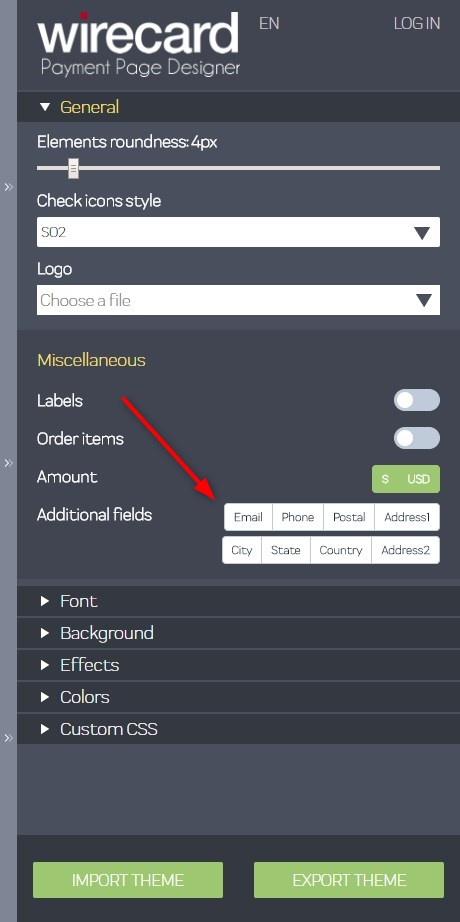
Additional Fields
Billing & shipping fields are not showing in the payment form by default. However, you may enable these fields to show in the payment form:
-
Email
-
Phone
-
Address 1
-
Address 2
-
City
-
State
-
Country
-
Postal Code
| These fields are available for credit card transactions only. |

To show these fields in the form, you have two options:
Click the button(s) of the field you want to show in the Designer menu, then save the theme. WPP v2 then shows the saved field selection each time it loads a payment page with that theme.
Add the CSS class of the field you want to show to the Payment Page Designer Custom
CSS Editor and set its display property to block.
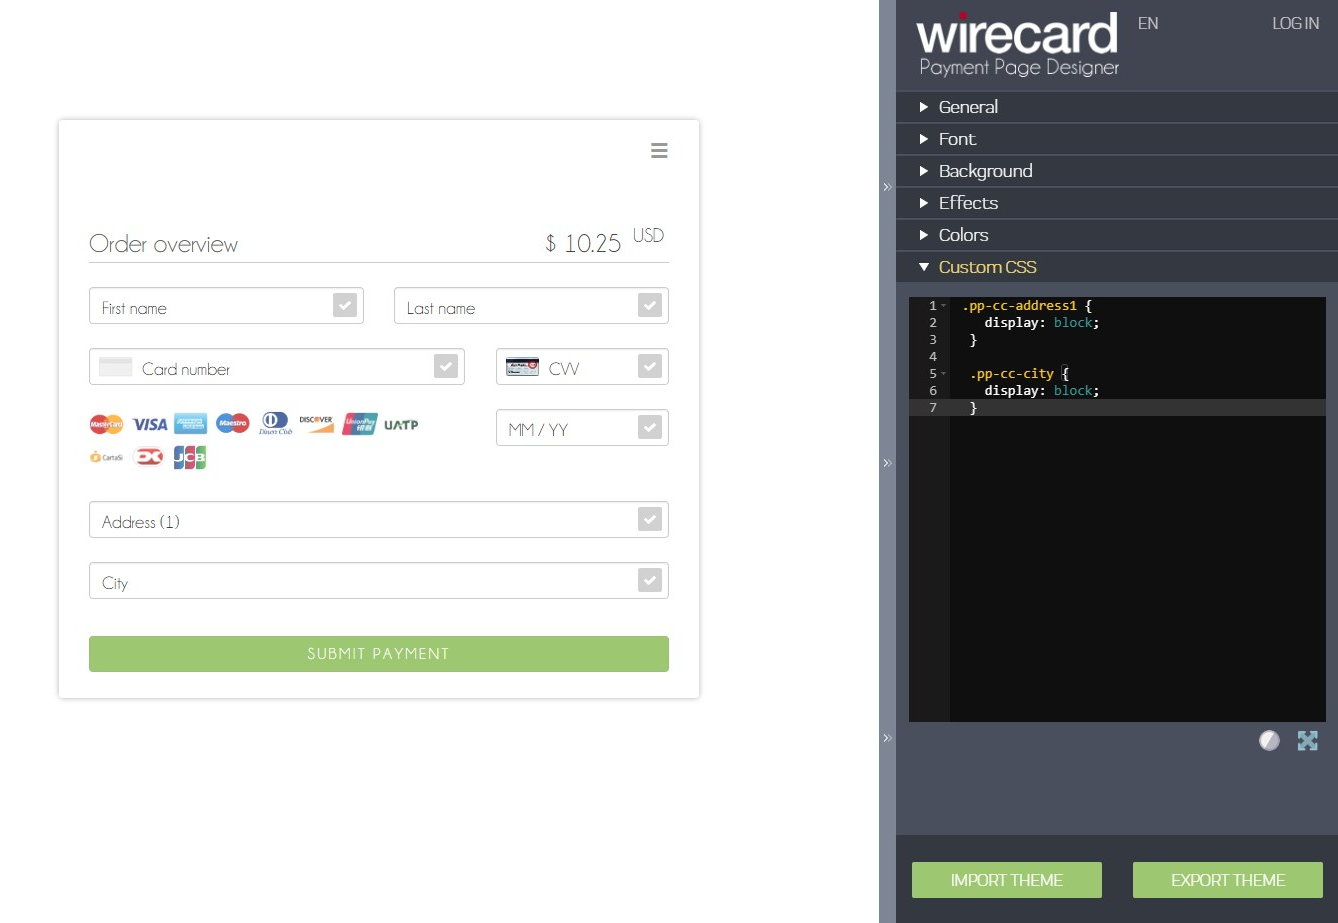
For example:
.pp-cc-address1 {
    display: block;
 }

 .pp-cc-city {
    display: block;
 }
Since the default value of display property for these fields
is none, as soon as you change it to block they become visible.
These CSS settings are a part of the theme and are loaded at any time
that you use that particular theme.
Here is a list of the CSS element names for the hidden fields:
.pp-cc-email
.pp-cc-phone
.pp-cc-address1
.pp-cc-address2
.pp-cc-city
.pp-cc-state
.pp-cc-country
.pp-cc-postal-code
Pay by Link via API
WPP v2 offers the option to configure the expiration time & date of a
payment URL (payment-redirect-url). By adding
the hyperlink-expiration-time-stamp field to a normal payment request,
you can set the time & date when the payment URL expires: This allows
for using such URLs in different scenarios than instant payment, e.g.
sending the payment URL as a part of a newsletter/email, MOTO (Mail
Order/Telephone Order) payments, etc.
The maximum allowed value is one month in the future, e.g. if the link is created on 01/05/2020, the latest date for the expiration stamp is 01/06/2020.
| You can use Pay by Link via API with credit card payments or alternative payment methods; both are supported. |
Payment links with an expiration stamp redirect to a Hosted Payment Page. You remain fully PCI SAQ-A compliant using these links.
|
To set the expiration stamp for a payment link:
Add the |
| Field (NVP) | Field (JSON) | Data Type | JSON Parent | Description |
|---|---|---|---|---|
|
|
|
|
Indicates the expiration time & date of the respective payment hyperlink. |
hyperlink-expiration-time-stamp is at the end): {
"payment":{
"merchant-account-id":{
"value":"7a6dd74f-06ab-4f3f-a864-adc52687270a"
},
"request-id":"{{$guid}}",
"transaction-type":"authorization",
"requested-amount":{
"value":10.1,
"currency":"EUR"
},
"account-holder":{
"first-name":"John",
"last-name":"Doe"
},
"payment-methods":{
"payment-method":[
{
"name":"creditcard"
}
]
},
"success-redirect-url": "https://demoshop-test.wirecard.com/demoshop/#/success",
"fail-redirect-url": "https://demoshop-test.wirecard.com/demoshop/#/error",
"cancel-redirect-url": "https://demoshop-test.wirecard.com/demoshop/#/cancel",
"hyperlink-expiration-time-stamp": "2018-11-01T09:00:00.645Z"
}
}-
By specifying the
hyperlink-expiration-time-stampvalue in the request, you set the expiration time & date for the payment URL (default value is 30 minutes). -
Each payment hyperlink can only be used once.
-
Specify redirect URLs in the request if you need to redirect your customers to a different page than your database defaults (or you have no defaults set). See the Configuring the Redirect Pages section for more details
-
The stamp uses ISO 8601 format with timezone, e.g.
2018-06-22T10:15:30+01:00. -
The latest date for the expiration stamp is one month from the initial request creation.
Max Retries
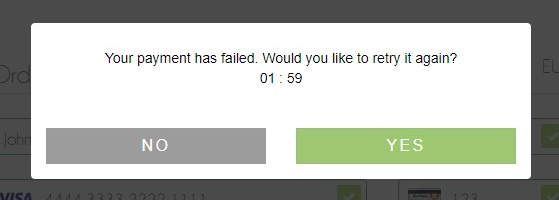
The Max Retries feature allows consumers to try and resubmit the payment again if it fails. It works with all payment methods.
|
An example situation:
A consumer attempts to pay with their credit card, but the payment fails. Payment page prompts the consumer whether they would like to retry the payment. They can resubmit the card information or select a different payment method altogether (depending on the configuration). |
|
To enable Max Retries for a transaction:
Add the |
| Field (NVP) | Field (JSON) | Data Type | JSON Parent | Description |
|---|---|---|---|---|
wpp_options_max_retries |
max-retries |
Numeric |
options (\{ }) |
Indicates whether a consumer can retry the payment if it fails (as well as how many times). |
The rules for configuring Max Retries are simple:
-
If the value is less than 0, consumers have unlimited retries for failed payments.
-
If the value is exactly 0, consumers cannot retry payments: They are redirected to the
fail-redirect-urlpage immediately. -
If the value is greater than 0, that same value is the number of retries allowed; e.g. if
max-retriesvalue is2, consumers are redirected to thefail-redirect-urlonly after two unsuccessful attempts. -
Max Retries is disabled by default.
 {
   "payment":{
      "merchant-account-id":{
         "value":"7a6dd74f-06ab-4f3f-a864-adc52687270a"
      },
      "request-id":"{{$guid}}",
      "transaction-type":"purchase",
      "requested-amount":{
         "value":10.1,
         "currency":"EUR"
      },
      "payment-methods":{
         "payment-method":[
            {
               "name":"creditcard"
            }
         ]
      },
    "success-redirect-url": "https://demoshop-test.wirecard.com/demoshop/#/success",
    "fail-redirect-url": "https://demoshop-test.wirecard.com/demoshop/#/error",
    "cancel-redirect-url": "https://demoshop-test.wirecard.com/demoshop/#/cancel"
   },
   "options": {
        "max-retries": -1
  }
}
Auto-Sale
Auto-sale is a pseudo transaction type, which has been created for the purpose of offering merchants and easier way to integrate the standard and most widely used "SALE" transactions. Auto-sale does not exist as an individual transaction type: it is only a place-holder which is used by Wirecard Payment Gateway to decide which transaction type should be used for a specific transaction. When using auto-sale, you are not required to send a specific transaction-type for each credit card or alternative payment method request.
Your merchant account is automatically configured for the default
auto-sale settings. If you send a request with auto-sale as the transaction type, these
are the values used:
| Payment method | Default transaction type |
|---|---|
|
|
|
|
|
|
|
|
|
|
However, the transaction is not registered as auto-sale in the database, but as the default transaction type. Look at example request
below:
{
   "payment":{
      "merchant-account-id":{
         "value":"7a6dd74f-06ab-4f3f-a864-adc52687270a"
      },
      "request-id":"{{$guid}}",
      "transaction-type":"auto-sale",
      "requested-amount":{
         "value":10.1,
         "currency":"EUR"
      },
      "payment-methods":{
         "payment-method":[
            {
               "name":"creditcard"
            }
         ]
      },
    "success-redirect-url": "https://demoshop-test.wirecard.com/demoshop/#/success",
    "fail-redirect-url": "https://demoshop-test.wirecard.com/demoshop/#/error",
    "cancel-redirect-url": "https://demoshop-test.wirecard.com/demoshop/#/cancel"
   }
}
Although the transaction-type is auto-sale, the request is actually
sent as purchase (or any other default value you set for credit card
payments). The behavior is the same for all payment methods.
You can reconfigure the default auto-sale settings for every payment
method upon request. As this requires changing your Merchant Account
configuration, you need to
contact Merchant Support
for extended configuration options.
You can also configure auto-sale options for a specific currency. You
can have multiple default transaction types based on which currency is
used, e.g. credit card payments in EUR use authorization as the
default type, whereas USD payments are sent as purchase. Again, this
is only possible by changing your Merchant Account configuration (contact Merchant Support).
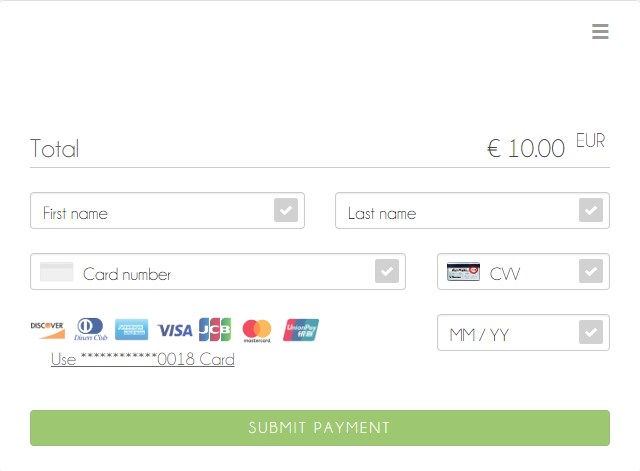
My Favorite Payment
My Favorite Payment allows you to streamline the payment process for your returning consumers by using card tokens which are created during each card payment. If you include a card token (from a previous transaction) in any future payment request, the consumer only needs to input their CVV instead of filling out the entire card form.
There is also an option to use a different card: Consumers can switch between the two options freely without leaving the session.
|
|
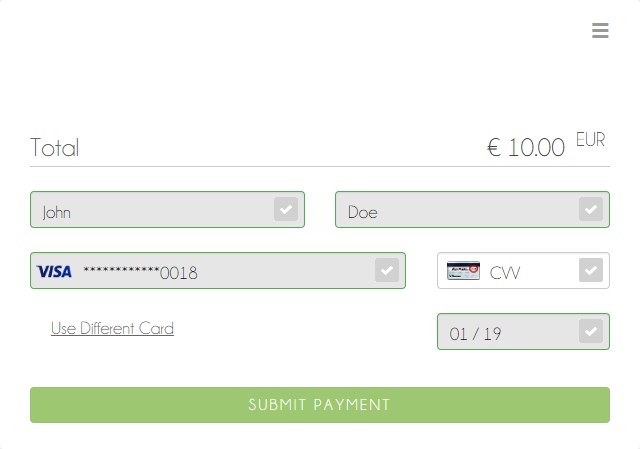
Card information is tokenized and returned as the token-id field in
the response automatically during a card payment.
Adding the token-id field with a token value from a previous payment
(e.g. "token-id": "4242796444090018") to the payment request
prepopulates the respective fields on the card form with the tokenized
information when payment page loads.
 {
   "payment":{
      "merchant-account-id":{
         "value":"7a6dd74f-06ab-4f3f-a864-adc52687270a"
      },
      "request-id":"{{$guid}}",
      "transaction-type":"authorization",
      "requested-amount":{
         "value":10,
         "currency":"EUR"
      },
      "payment-methods":{
         "payment-method":[
            {
               "name":"creditcard"
            }
         ]
      },
      "card-token" : {
      "token-id" : "4242796444090018"
      },
    "success-redirect-url": "https://demoshop-test.wirecard.com/demoshop/#/success",
    "fail-redirect-url": "https://demoshop-test.wirecard.com/demoshop/#/error",
    "cancel-redirect-url": "https://demoshop-test.wirecard.com/demoshop/#/cancel"
   }
}
Customized Display Text
Customized Display Text is an optional feature available for two of our Wirecard Payment Page v2 integration options:
-
the Hosted Payment Page (HPP) and
-
the Embedded Payment Page (EPP).
Customized Display Text allows you to personalize your checkout process with a brief message to your consumers.
If you want to use this feature, add customized-display-text in the initial POST request and insert a short text (see example request below).
The inserted text then appears on the payment page (for HPP) or in the iframe (EPP).
By default, payment page and iframe display the first four lines of your text.
If your text is longer than four lines, consumers can expand the field using the arrows at the bottom.
Format your text with any of these three HTML formatting options:
-
<b> bold </bold>,
-
<i> italic </i>,
-
<br> line break.
| Customized Display Text is a single-language feature: the text will always be displayed in the same language. |
Use the following test credentials to test Customized Display Text:
URL (Endpoint) |
|
|---|---|
Merchant Account ID (MAID) |
7a6dd74f-06ab-4f3f-a864-adc52687270a |
Username |
70000-APIDEMO-CARD |
Password |
ohysS0-dvfMx |
| Field (JSON) | Data Type | Size | JSON Parent | Description |
|---|---|---|---|---|
|
String |
1024 |
options ({ }) |
Includes a customized display text on the payment page / in the iframe. For Hosted and Embedded Payment Page. |
{
    "payment": {
        "merchant-account-id": {
            "value": "7a6dd74f-06ab-4f3f-a864-adc52687270a"
        },
        "request-id": "{{$guid}}",
        "transaction-type": "purchase",
        "requested-amount": {
            "value": 1.95,
            "currency": "EUR"
        },
        "payment-methods": {
            "payment-method": [
                {
                    "name": "creditcard"
                }
            ]
        },
        "success-redirect-url": "https://demoshop-test.wirecard.com/demoshop/#/success",
        "cancel-redirect-url": "https://demoshop-test.wirecard.com/demoshop/#/cancel",
        "fail-redirect-url": "https://demoshop-test.wirecard.com/demoshop/#/error"
    },
    "options": {
        "customized-display-text": "Dear Customer,<br>Thank you for shopping at <i>The Magic Store</i>.<br><br>We are now processing your order and will ship it as soon as possible.<br> Your order number is <b>999999</b>.<br> Your customer number is <b>111111</b>.<br><br>Thanks for shopping with us. Please visit us again soon!"
    }
}
Order and Filter Payment Methods
This Order and Filter option allows you to display the available payment methods in your preferred order. If you use this option, only the payment methods defined are displayed. All the other payment methods are ignored.
This option is available for all of our Wirecard Payment Page v2 (WPP v2) integration options:
-
the Hosted Payment Page (HPP),
-
the Embedded Payment Page (EPP) or
-
the Seamless integration.
-
Include the
payment-method-order-and-filterfield in the payment request. -
Add the payment method names to the JSON array in your preferred order. Separate the payment method names with a comma.
If you don’t want to sort all of your payment methods manually, you have the option to use the asterisk ( * ) as a placeholder.
Enter your preferred payment methods and then the asterisk, e.g. ["creditcard", "paypal", "*"]
As a result, WPP v2 lists your preferred payment methods first, followed by all of your other payment methods.
|
Misspellings or unavailable payment methods are ignored. WPP v2 displays the full list of available payment methods instead. |
The Order and Filter option is available in JSON only. You can send this option with each request.
Use the following credentials to test the Order and Filter option:
URLs (Endpoints) |
|
|---|---|
Merchant Account ID (MAID) |
ab62ea6e-ba97-48ef-b3bc-bf0319e09d78 |
Username |
70000-APITEST-AP |
Password |
qD2wzQ_hrc!8 |
Secret Key |
c50a8e09-0648-4d2c-b638-2c14fc7606bc |
| Field | Data Type | Parent | Description |
|---|---|---|---|
|
Array |
options (\{ }) |
Displays the available payment methods in the order specified in this field. |
{
  "payment": {
      "merchant-account-id": {
          "value": "ab62ea6e-ba97-48ef-b3bc-bf0319e09d78"
      },
      "request-id": "{{$guid}}",
      "requested-amount": {
          "value": "1.01",
          "currency": "EUR"
      },
      "account-holder": {
          "first-name": "Paul",
          "last-name": "Peterson"
      },
      "transaction-type": "auto-sale"
  },
  "options": {
      "payment-method-order-and-filter": ["creditcard", "paypal", "*" ]
  }
}
Limit Credit Card Brands
Use the Limit Credit Card Brands option to display your preferred credit card brands. Display, for example, a different set of credit card brands to consumers in different regions in the world.
This option is available for all of our Wirecard Payment Page v2 (WPP v2) integration options:
-
the Hosted Payment Page (HPP),
-
the Embedded Payment Page (EPP) or
-
the Seamless integration.
-
Include the
credit-card-brand-filterarray in the payment request. -
Add the credit card brand names to the JSON array in your preferred order. Separate the credit card brand names with a comma.
-
As a result, WPP v2 displays only the credit card brands you added to the array.
| See our supported credit card brands. |
The Limit Credit Card Brands option is available in JSON only. You can send the Limit Credit Card Brands option with each request.
| Field | Data Type | Parent | Description |
|---|---|---|---|
|
Array |
options (\{ }) |
Displays the credit card brands specified in this field. |
Use the test credentials we provide for Credit Card and send the sample below.
{
   "payment": {
       "merchant-account-id": {
           "value": "7a6dd74f-06ab-4f3f-a864-adc52687270a"
       },
       "request-id": "{{$guid}}",
       "transaction-type": "purchase",
       "requested-amount": {
           "value": 10,
           "currency": "EUR"
       },
      "ip-address": "127.0.0.1",
       "success-redirect-url": "https://demoshop-test.wirecard.com/demoshop/#/success",
      "fail-redirect-url": "https://demoshop-test.wirecard.com/demoshop/#/error",
      "cancel-redirect-url": "https://demoshop-test.wirecard.com/demoshop/#/cancel"
   },
   "options": {
      "credit-card-brand-filter":  ["visa", "mastercard"]
   }
}
Payment Page Designer
-
Large selection of fonts, colors, effects, backgrounds and logos
-
Creation of themes
-
Responsive and code-free design
-
Possibility to enable/disable WPP v2 Features
-
Live preview
Live demo - try our Payment Page Designer now.
Use the Wirecard Payment Page Designer (PPD) to customize the Hosted Payment Page and Embedded Payment Page, as well as the Seamless interface: set background, colors, fonts, logos and more for a cohesive look that meets your preferences and fits your merchant branding. You can then use your newly created themes right away or export and import them for further editing.
Customize your Wirecard Payment Page v2
Open the Payment Page Designer.
-
Device Preview in the upper-left corner
-
Live Preview in the center
-
Payment Page Designer menu on the right
Device Preview
Click the unfold button in the upper-left corner to open the Device Preview menu.
Select either Desktop preview, Tablet preview or Mobile preview to adjust the Live Preview accordingly.
Live Preview
The Live Preview simulates the Wirecard Payment Page v2 form. It changes as soon as you
-
change the device in the Device Preview.
-
modify the settings in the Payment Page Designer menu.
-
English (EN)
-
German (DE)
-
French (FR)
Click Login to access the Wirecard Payment Page v2 design manager menu.
The Payment Page Designer menu is divided into eight sections:
The Live Preview changes depending on your selection in the Preview mode:
-
Payment displays the payment form according to your settings.
-
Grid displays all available payment methods.
-
Processing displays the Spinner.
-
Spinner is the process indicator presented to the consumer while waiting during the payment process.
-
Expand the General section to:
-
Customize the appearance of the payment form and its input fields (e.g. roundness and icons).
-
Select a predefined Spinner.
-
Upload a personalized Spinner. The uploaded file must be an animated gif.
-
Upload your logo.
-
Max. file size: 300 kB
-
Logo size: between 30x30 px and 1200x900 px
-
Once you upload a logo you can change the position and/or size.
-
-
Upload a background picture.
-
Max. file size: 1024 kB
-
Logo size: between 1000x768 px and 2651x1441 px
-
Expand the Miscellaneous section to:
-
Display or hide the consumer’s order items.
-
Display the card data in either one or three input fields.
-
Switch between labels and/or placeholders to display the names of the input fields. You can cancel the Placeholder selection only if Label is selected and vice versa.
-
Switch between currency symbol and/or currency name (ISO 4217 code) for the Amount format. You can cancel the currency symbol selection only if the currency name is selected and vice versa.
-
Add further input fields (Card form fields) for additional consumer information (e.g. address, email, phone).
-
Determine where you want to place the CANCEL PAYMENT button. By default, it is displayed as a command in the hamburger menu.
-
Display a secure SSL encryption/payment badge. Click the Secure Badge list and select either No Secure Badge or one of the six available badge types. Note that Security Badge Type 5 is presented in a white font and is only visible on darker backgrounds.
Expand the Font section to:
-
Select a predefined font for buttons and input fields.
-
Upload a font of your choice.
-
Adapt the font size and style.
|
Upload only one font at a time in the Web Open Font Format (.woff, .woff2 file extensions). The uploaded font then appears as a custom font in the Text and buttons and Input fields lists. |
Expand the Colors section to change the color of:
-
Buttons (click Primary Color)
-
CANCEL PAYMENT button (click Secondary (Dismiss) Color) if button is placed next to the SUBMIT PAYMENT button
-
Entire background (click Page Background Color)
-
Wirecard Payment Page v2 form (click Content Background Color)
-
Input fields
-
Other payment form elements such as the horizontal line, the Spinner and the hamburger button (click Menu Icons Color)
Expand the Effects section to change the intensity of:
-
Wirecard Payment Page v2 shadow
-
Wirecard Payment Page v2 shadow color
| Blur Effect and Opacity can only be used if you have uploaded a logo or a background picture in the General section, or defined a Color. |
Expand the Custom CSS to further personalize your style sheet and save it (i.e. export it to a theme).
Expand the Payment request section to change the values of a potential payment request (e.g. requested-amount.value, requested-amount.currency, order-item.name, order-item.description). The Live Preview displays your modifications immediately.
If the order items are not visible, display them using the Miscellaneous section.
Click Export theme to save your settings as a .json file.
Click Import theme to customize your saved themes.
Manage your Themes and Translations
Use the WPP v2 design manager menu to edit and organize your themes and translations.
-
Open the Payment Page Designer.
-
Click Login.
-
Use your credentials provided by Merchant Support to access the WPP v2 design manager menu.
| Make sure that only one user is editing a theme. If two users edit a theme at the same time, some changes might get lost. |
| A session timeout requires a relogin to the WPP v2 design manager menu after 60 minutes of inactivity. |
The WPP v2 design manager menu is divided into two sections:
-
Translations
-
Themes
Expand the Translations section to:
-
Import a translation file. The translation file must be available in .json format.
-
Export the default translation file. The default translation file is exported to a .json file.
Edit the default translation file and import it as a new translation file. -
Edit imported translations.
-
Edit the translation file name. Double-click the file name or click the Edit button.
-
Edit the translations. Click Export to export the translations to a .json file.
-
Delete the translation file.
-
You can modify the translations to e.g.:
-
Meet local variations such as US or UK English.
-
Change button names.
| You can only edit the languages available in the default translation file. You cannot add further languages. |
Expand the Themes section to:
-
Create a new theme.
-
Import a theme. The theme file must be available in .json format.
-
Edit a theme.
-
Set the default theme.
-
Delete a theme.
| Click the Theme preview button on the right of the theme name to see a preview. The theme is displayed as a .jpg and can be downloaded. |
Click the theme name to expand the theme’s properties to:
-
Edit the theme name. Double-click the theme name or click the Edit button.
-
Select a translation file.
-
Set the theme as default. The default theme is used for payment processes if not indicated otherwise in the request.
The default theme can be identified by the asterisk symbol. -
Activate or deactivate the theme. Only activated themes can be used in the request.
Active themes can be identified by the tick symbol. -
Change the theme settings. Click Style it to open the theme in the Payment Page Designer menu.
You can toggle between the Payment Page Designer and the WPP v2 design manager menu. Use BACK TO DESIGNER to switch to the Payment Page Designer menu. Use MANAGE in the Payment Page Designer menu to return to the WPP v2 design manager menu. If Style it is unavailable in the WPP v2 design manager menu, the theme is already open in the Payment Page Designer menu. -
Save your changes. Save is available only if changes have been made.
-
Export the theme to a .json file.
-
Delete the theme.
| Field Name | Data Type | JSON Parent | Description |
|---|---|---|---|
theme |
String |
options ({ }) |
The name of the PPD theme used for a specific payment process. |
{
   "payment":{
      "merchant-account-id":{
         "value":"7a6dd74f-06ab-4f3f-a864-adc52687270a"
      },
      "request-id":"{{$guid}}",
      "transaction-type":"purchase",
      "requested-amount":{
         "value":10.1,
         "currency":"EUR"
      },
      "payment-methods":{
         "payment-method":[
            {
               "name":"creditcard"
            }
         ]
      }
   },
   "options": {
        "theme": "test-theme"
  }
}
WPP v2 Security
WPP v2 Security Flow
All WPP v2 integrations share a common backend-to-backend JSON workflow for the payment process:
Payment Processing with HPP and EPP |
|---|
|
Payment Processing with Wirecard Payment Page v1 |
|
As part of this workflow:
-
The initial request is secured by basic access authentication (basic header with base64-encoded credentials).
-
The final payment response is base64-encoded and signed by HMAC SHA-256. This allows you to verify the authenticity of the final payment response.
| For more information regarding WPP v2 integration-specific payment processes, see HPP Integration, EPP Integration and Integrating WPP v2 in Seamless Mode. |
Response Verification
For WPP v2, response verification is optional but highly recommended.
Response verification requires:
-
the Secret Key you receive during merchant configuration.
-
the field entries
response-base64,response-signature-base64andresponse-signature-algorithmsent as form data with the final payment response
You can find the required form data included in the final payment response sent to the redirect target in your shop.
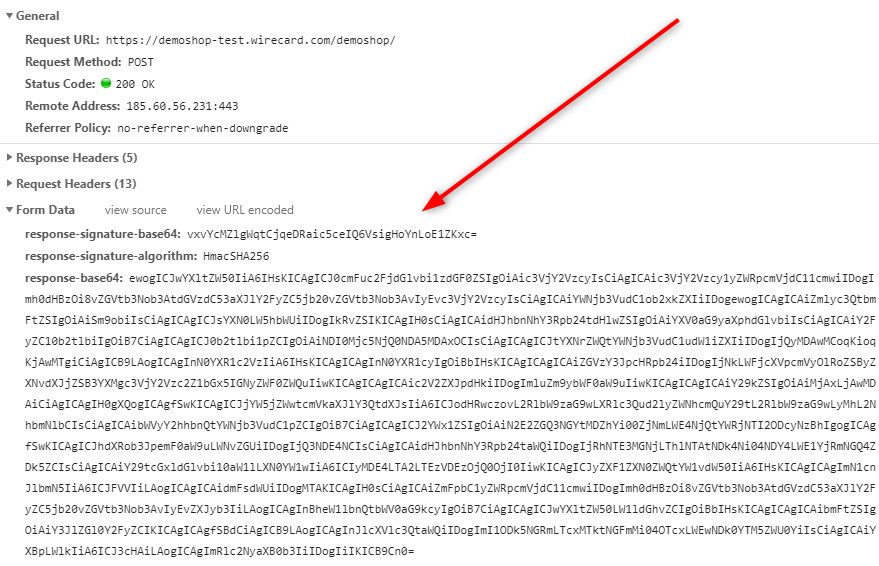
| Name | Description |
|---|---|
|
Base64-encoded signature against which to verify the calculated security response signature. |
|
"HmacSHA256" specifying the type of the message authentication code. |
|
Final response containing the payment data in a base64 encoded JSON format. |
To verify the response, calculate the security response signature and check it against the signature data you receive with the final payment response.
We provide ready-made response verification examples for Java, PHP and C# below.
| If the response signature verification fails, do not accept the payment and contact Merchant Support. |
import javax.crypto.Mac;
import javax.crypto.spec.SecretKeySpec;
import javax.xml.bind.DatatypeConverter;

...

private String merchantSecretKey = "merchantSecretKey";

public boolean isValidSignature(String responseBase64, String responseBase64Signature, String responseSignatureAlgorithm) throws Exception {
    Mac mac = Mac.getInstance(responseSignatureAlgorithm);
    mac.init(new SecretKeySpec(merchantSecretKey.getBytes("UTF-8"), responseSignatureAlgorithm));
    return responseBase64Signature != null && responseBase64Signature.equals(DatatypeConverter.printBase64Binary(mac.doFinal(responseBase64.getBytes("UTF-8"))));
}<?php
/**
* @param string $responseBase64
* @param string $signatureBase64
* @return bool
*/
function isValidSignature($responseBase64, $signatureBase64, $merchantSecreyKey)
{
$signature = hash_hmac('sha256', $responseBase64, $merchantSecreyKey, true);
return hash_equals($signature, base64_decode($signatureBase64));
} …
using
System.Linq;
using
System.Security.Cryptography;
using
System.Text;
…
String merchantSecretKey = "key";
Boolean isValidSignature(String responseBase64, String signatureBase64,
String responseSignatureAlgorithm)
{
if (responseBase64 == null || signatureBase64 == null || responseSignatureAlgorithm == null)
{
return false;
}
byte[] response = Encoding.UTF8.GetBytes(responseBase64);
byte[] expectedSignature = Convert.FromBase64String(signatureBase64);
KeyedHashAlgorithm algorithm =KeyedHashAlgorithm.Create(responseSignatureAlgorithm);
algorithm.Key = Encoding.UTF8.GetBytes(merchantSecretKey);
algorithm.Initialize();
byte[] computedSignature = algorithm.ComputeHash(response);
Boolean result = computedSignature.SequenceEqual(expectedSignature);
return result;
}Merchants Integrated with NVP
Requests in the legacy NVP format are secured by a HMAC SHA-256 (Sig. v2) or SHA-256 (Sig. v1) signature. For merchants using this format, signature calculation is mandatory. Based on which version you are using, see the Signature v2 or Signature v1 pages.
The signature is only used with requests sent to the Wirecard Payment Gateway endpoint, e.g.
https://wpp-test.wirecard.com/api/payment/, using the legacy NVP format
( for returning merchants).This does not apply to the JSON flow. |
Browsers and Languages
Browsers
| Browser | Versions | OS | OS Version | Supported |
|---|---|---|---|---|
Chrome |
62.0.3202 - latest version |
Windows |
7 / 8 / 8.1 / 10 |
✅ |
Firefox |
47.0 - latest version |
7 / 8 / 8.1 / 10 |
✅ |
|
Opera |
48.0 - latest version |
7 / 8 / 8.1 |
✅ |
|
Edge |
40.15063 - latest version |
10 |
✅ |
|
Safari |
11.0 - latest version |
macOS |
- |
✅ |
| OS | Version | Supported |
|---|---|---|
Android |
4 - latest version |
✅ |
iOS |
5.1. - latest version |
✅ |
Languages
At the moment, WPP v2 supports the following languages:
| Code | English Name |
|---|---|
en |
English |
de |
German |
ar |
Arabic |
bs |
Bosnian |
bg |
Bulgarian |
zh |
Chinese |
hr |
Croatian |
cs |
Czech |
da |
Danish |
nl |
Dutch |
et |
Estonian |
fi |
Finnish |
fr |
French |
el |
Greek |
he |
Hebrew |
hi |
Hindi |
hu |
Hungarian |
it |
Italian |
ja |
Japanese |
ko |
Korean |
lv |
Latvian |
lt |
Lithuanian |
mk |
Macedonian |
no |
Norwegian |
pl |
Polish |
pt |
Portuguese |
ro |
Romanian |
ru |
Russian |
sr |
Serbian |
sk |
Slovak |
sl |
Slovenian |
es |
Spanish |
sv |
Swedish |
tr |
Turkish |
uk |
Ukrainian |
WPP v2 Worfklow

Wirecard Payment Page v1 
|
Development of Wirecard Payment Page v1 is discontinued.
|
Wirecard Payment Page v1 handles the payment method selection as well as the collection of payment details or consumer redirects to alternative payment provider sites. With this solution, the merchant is only required to conform to a limited PCI scope (self-questionnaire A).
Wirecard Payment Page v1 ![]() is available in three formats:
is available in three formats:
-
Hosted Payment Page (HPP)
-
Embedded Payment Page (EPP)
-
Seamless Integration
Hosted Payment Page
Introduction
The Hosted Payment Page (HPP) integration redirects the consumer from the merchant’s site to the payment page along with information about the transaction and a secure digital signature.
The payment page integration requires the function call (along with
information about the transaction and a secure digital signature) of the
provided JavaScript library. The URL for the library varies depending on
the installation domain, i.e. https://www.somedomain.com/engine/hpp/paymentPageLoader.js
| Please contact merchant support for the exact URL. |
Credit Card Payment
Merchants using HPP can offer credit card payments via a hyperlink from their own newsletter.
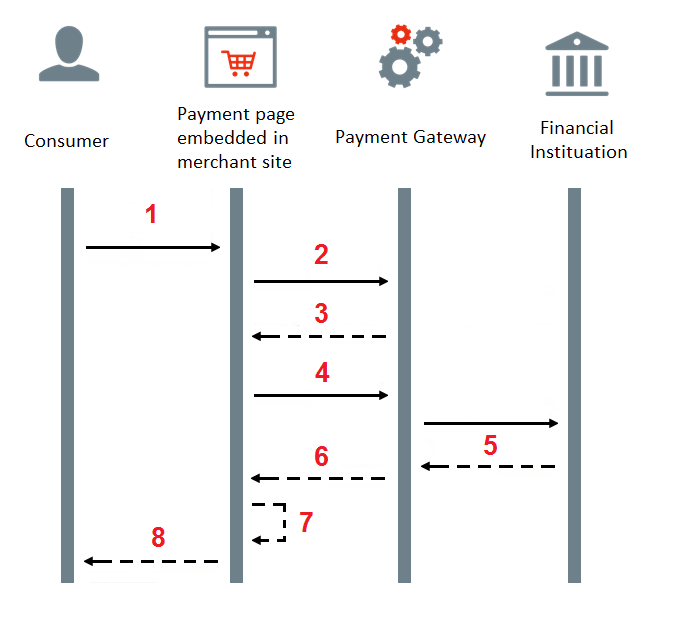
Hosted Payment Page Workflow
The Hosted Payment Page (HPP) provides a generic workflow available for various payment methods.
| The following workflow mainly describes the flow of a credit card payment. For alternative payment methods (e.g. PayPal), there will be an additional re-direct to a provider. |

-
Consumer checks out with the purchased goods/services.
-
Merchant system redirects to the Hosted Payment Page URL with a digitally signed payment request.
-
Wirecard Payment Gateway validates the signature and returns the list of payment methods for which the merchant has been configured with the associated redirect URL.
-
The Hosted Payment Page displays the payment methods from which the consumer may choose. Depending on the chosen payment method and the respective specifics of this payment method, the Hosted Payment Page then displays the relevant input fields.
This payment method selection may optionally be skipped based on the merchant’s account configuration. -
The Hosted Payment Page posts the payment transaction to the Wirecard Payment Gateway.
-
Wirecard Payment Gateway processes the payment with the respective financial institution.
-
Wirecard Payment Gateway returns the final response to the payment page, which is a digitally signed response message.
-
The payment page posts the digitally signed response back to the merchant’s success or failure URL.
-
Optionally, the merchant’s system validates the signature, and decodes the response message.
-
Finally, the consumer (the consumer’s browser) is redirected to the merchant’s success or failure shop page by the payment page response.
Embedded Payment Page
Introduction
With this type of integration, the payment page is displayed in overlay directly on the merchant’s checkout page. Redirection is not needed to select a payment method or to enter payment details. This type of integration allows for a more comfortable consumer’s experience. The consumer feels as though the payment page is still an integral part of the merchant’s site.
The Embedded Payment Page (EPP) integration is the same as for the Hosted Payment Page - it involves a (different) function call from the same JavaScript library.
Embedded Payment Page Workflow
The following image shows the Embedded Payment Page workflow.
-
Consumer checks out with the purchased goods/services.
-
Wirecard Payment Gateway validates the signature and returns the list of payment methods for which the merchant has been configured with the associated redirect URL.
-
The payment page displays the payment methods from which the consumer may choose. Depending on the chosen payment method and the respective specifics of this payment method, the payment page then displays the relevant input fields.
This payment method selection may optionally be skipped based on the merchant’s account configuration. -
The payment page posts the payment transaction to the Wirecard Payment Gateway.
-
The Wirecard Payment Gateway processes the payment with the respective financial institution.
-
The Wirecard Payment Gateway returns the final response to the payment page, which is a digitally signed response message.
-
The payment page posts the digitally signed response back to the merchant’s success or failure URL.
-
Optionally, the merchant’s system validates the signature, and decodes the response message. Finally, the consumer (the consumer’s browser) is redirected to the merchant’s cancel or processing page and then onto success or failure page by the pPayment page response.
Seamless Integration
Seamless integration provides a possibility to incorporate Wirecard’s payment form into the merchant’s checkout page for merchants who want to
-
avoid browser redirects to Wirecard Payment Pages and back to the shop during the checkout process.
-
take care of payment selection process and fully control the look and feel of the payment form themselves.
-
provide a more sophisticated checkout flow that includes first collecting payment data and then allowing the consumer to review the order one more time before confirming the payment.
This approach provides a seamless shopping experience for web-shoppers, while the technical solution categorizes the merchant into the least demanding PCI-DSS category. The main advantages of the Seamless solution are:
-
Seamless user experience - the payment form appears as an integral part of merchant’s checkout page.
-
Possibility to decouple entering payment data from the actual payment - it is possible to display a summary page in between.
-
No in-browser redirects, no external processing pages, no pop-up windows. The only redirect to an external page will happen if credit card payment requires 3D-Secure verification.
-
Only the simple Self-Assessment-Questionnaire "A" (SAQ-A) is required for the merchant to be PCI-DSS compliant.
Seamless Integration Workflow
To ensure a seamless and PCI compliant integration, Wirecard serves the complete payment form as an HTML iFrame, which ensures that attacker or malicious scripts will not have access to data entered on the merchant’s page. The form is then submitted directly to Wirecard Payment Gateway over a secure TLS channel, so the data is securely transported. The high-level diagram below shows the checkout flow with the optional order summary page between the payment data collection page and the actual payment:
Payment Methods
For Wirecard Payment Page v1. ![]()
-
SEPA Direct Debit. See differences between B2B and B2C.
Payment Page Security
For Wirecard Payment Page v1. ![]()
As payment information is exchanged between the merchant’s system, the consumer’s browser, and Wirecard Payment Gateway, it is important that the data exchange safeguards against man-in-the-middle attacks.
The Hosted Payment Page (HPP), Embedded Payment Page (EPP), and Seamless integration use a digital SHA-256 signature for all message exchanges. This digital signature is a mathematical scheme for demonstrating the authenticity of a digital message or document. A valid digital signature lets a recipient know that the message was created by a known sender, and that it was not altered, while transmitting.
There are two types of signatures
-
Request Signature
-
Response Signature
Secret Key Exchange
To ensure the authenticity of the request and response messages, it is required that a Secret Key is shared with the merchant.
The Secret Key is used in generation of the request_signature and
response_signature fields.
| It is important that the Secret Key is never shared with anyone and is protected within the Merchant Website (only used in server side code for generating the request signature or validating the response signature). |
The Secret Key will be communicated at the time of Merchant Account setup. Please contact your support representative if you did not receive a Secret Key or require Secret Key regeneration.
Digital Signature
Hosted Payment Page uses a digital SHA-256 signature for all message exchanges. The signature is a mathematical scheme for demonstrating the authenticity of a digital message or document. A valid digital signature gives a recipient reason to believe that the message was created by a known sender, and that it was not altered in transit.
Signatures
Please contact Wirecard´s Merchant Support to obtain the secret key used to sign Payment Page requests.
When the merchant creates the JavaScript data, the following values
-
are to be concatenated,
-
leading and trailing spaces removed, and
-
SHA-256 signature follows the combined string.
| Please note that the order of the fields is important. Also note, the same values used in the request signature must be placed into the client side data (with the exception of the secret key). |
-
request_time_stamp -
request_id -
merchant_account_id -
transaction_type -
requested_amount -
requested_amount_currency -
redirect_url(optional) -
custom_css_url(optional) -
ip_address(optional) -
[secretkey]
| If an optional field is used in the request data, it is mandatory in the request signature. |
The SHA-256 hash value is then presented on the merchants client side
form as request_signature field.
An example of request signature generation is as follows:
request_time_stamp              = '20190430123012'
request_id                      = 'order-12345'
merchant_account_id             = 'b19fb056-d8da-449b-ac85-cfbfd0558914'
transaction_type                = 'purchase'
requested_amount                = '1.01'
requested_amount_currency       = 'USD'
redirect_url                    = 'https://test.com'
custom_css_url                  = 'https://test.com/custom.css'
ip_address                      = '127.0.0.1'
hyperlink_expiration_time_stamp = '2020-04-07T13:20:00+02:00'
secret_key                      = 'efabf47b-e43b-4785-873f-1c5bc65b7cd2'


Pre SHA-256 string
20120430123012order-12345b19fb056-d8da-449b-ac85-cfbfd0558914purchase1.01USDhttps://test.comhttps://test.com/custom.css127.0.0.1efabf47b-e43b-4785-873f-1c5bc65b7cd2Within the response message the following values
-
are concatenated,
-
leading and trailing space removed, and
-
SHA-256 signature follows the combined string.
Response signature calculation is very similar to request signature calculation. String of the concatenated fields is hashed with SHA256 so the algorithm is very same as already explained above. There are just different fields in different order concatenated. Use the following fields in this exact order only when creating the "string to hash":
-
merchant_account_id -
transaction_id -
request_id -
transaction_type -
transaction_state -
completion_time_stamp -
token_id -
masked_account_number -
ip_address -
authorization_code -
[secretkey]
If the particular field is missing in response then the empty string should be used instead of this field.
Below you find code samples in various programming languages that you can use in your shop system. These samples take care of generating digital request signature.
$request_signature = hash('sha256', trim($request_time_stamp . $request_id . $merchant_account_id . $transaction_type . $requested_amount . $request_amount_currency . $redirect_url . $ip_address . $secret_key));public static string GetSHA256(string text) {
byte[] hashValue;
byte[] message = Encoding.UTF8.GetBytes(text);
SHA256Managed hashString = new SHA256Managed();
string hex = "";
hashValue = hashString.ComputeHash(message);
foreach( byte x in hashValue)
{
hex += String.Format("{0:x2}", x);
}
return hex.Trim();
}private static String tosha256(String... fields) {
StringBuffer sb = null;
try {
MessageDigest md = MessageDigest.getInstance("SHA-256");
sb = new StringBuffer();
for (String field : fields) {
sb.append(field.trim());
}
md.update(sb.toString().getBytes("utf-8"));
byte[] mdbytes = md.digest();
return DatatypeConverter.printHexBinary(mdbytes);
} catch (NoSuchAlgorithmException e) {
sb = null;
} catch (UnsupportedEncodingException e) {
sb = null;
}
return sb == null ? null : sb.toString();
}import java.security.MessageDigest;
...
def messageDigest = MessageDigest.getInstance("SHA256");
def secret_key = 'XXXXXXXXXXXXXXXXXXXXXX';
def stringToHash = time_stamp + request_id + merchant_account_id + transaction_type + requested_amount + requested_amount_currency + redirect_url + ip_address + secret_key;
messageDigest.update( stringToHash.trim().getBytes() );
def shaHex = new BigInteger(1, messageDigest.digest()).toString(16);Signature v2
The signature consists of two parts:
-
The signature’s payload - the actual information you are sending in the message,
-
and its calculated value - the generated numeric cipher used for authentication
Both are Base64 URL safe encoded and separated by a period.
SFMyNTYKcmVxdWVzdF90aW1lX3N0YW1wPTIwMTYtMDctMjdUMTQ6MzM6NDkrMDI6MDAKbWVyY2hhbnRfYWNjb3VudF9pZD05ODczYWM2NS02ZjI4LTRiNzUtYWU1NS05ZDU0OWNmNTcwZTM.2VTPD7hAiCW-NdDaUqN7pjwizuwHvirVEs1HdGU-iz0
For mobile:
The signature is included in Authorization header of HTTP request
that contains the authorization scheme and body.
Authorization: SFMyNTYKcmVxdWVzdF90aW1lX3N0YW1wPTIwMTYtMDctMjdUMTQ6MzM6NDkrMDI6MDAKbWVyY2hhbnRfYWNjb3VudF9pZD05ODczYWM2NS02ZjI4LTRiNzUtYWU1NS05ZDU0OWNmNTcwZTM.2VTPD7hAiCW-NdDaUqN7pjwizuwHvirVEs1HdGU-iz0
For seamless and HPP/EPP:
The value is then presented on the merchant’s client side form as
request_signature_v2 field.
WAUTH SFMyNTYKcmVxdWVzdF90aW1lX3N0YW1wPTIwMTYtMDctMjdUMTQ6MzM6NDkrMDI6MDAKbWVyY2hhbnRfYWNjb3VudF9pZD05ODczYWM2NS02ZjI4LTRiNzUtYWU1NS05ZDU0OWNmNTcwZTM.2VTPD7hAiCW-NdDaUqN7pjwizuwHvirVEs1HdGU-iz0
Currently the scheme is WAUTH and the body consists from signature
payload and calculated value,
both Base64 URL safe encoded and
separated with a period.
| In the future another schema with different body formats could be added. |
The signature’s payload contains:
-
The name of the algorithm which is used to calculate the signature,
-
and other fields, in name-value pair format, separated by a new line
\n
algorithmName\n
field1=value1\n
field2=value2\n
…
fieldX=valueX
| Field | Cardinality | Details |
|---|---|---|
request_time_stamp |
M |
e.g. |
merchant_account_id |
M |
e.g. |
request_id |
M |
e.g. |
transaction_type |
M |
e.g. |
requested_amount |
M |
e.g. |
requested_amount_currency |
M |
e.g. |
redirect_url |
O |
e.g. |
custom_css_url |
O |
e.g. |
ip_address |
O |
e.g. |
Fields with cardinality M in the table above are required for the calculation of the signature, so you always include them in the signature’s payload. The use of the other fields depends on your needs. The algorithm’s name has to be put in the payload first, but all of the other fields can be specified in any order.
Some of the information you enter in the fields has been standardized by ISO (International Organization for Standardization) to avoid confusion. We recommend you follow these standards (the examples provided here do).
You can learn more about the standards for date and time and currencies on the provided links.
The currently supported algorithm is the HS256 hash-based message authentication code with SHA-256 cryptographic hash function.
HS256
request_time_stamp=2019-03-23T09:14:51Z
merchant_account_id=33f6d473-3036-4ca5-acb5-8c64dac862d1
request_id=A7B51ED4-9EB0-48D1-82AA-2145A7792C6B
transaction_type=authorization
requested_amount=1.01
requested_amount_currency=EUR
redirect_url=https://www.shop.com/redirect
custom_css_url=https://www.shop.com/custom.css
ip_address=127.0.0.1
SFMyNTYKcmVxdWVzdF90aW1lX3N0YW1wPTIwMTctMDMtMjNUMDk6MTQ6NTFaCm1lcmNoYW50X2FjY291bnRfaWQ9MzNmNmQ0NzMtMzAzNi00Y2E1LWFjYjUtOGM2NGRhYzg2MmQxCnJlcXVlc3RfaWQ9QTdCNTFFRDQtOUVCMC00OEQxLTgyQUEtMjE0NUE3NzkyQzZCCnRyYW5zYWN0aW9uX3R
5cGU9YXV0aG9yaXphdGlvbgpyZXF1ZXN0ZWRfYW1vdW50PTEuMDEKcmVxdWVzdGVkX2Ftb3VudF9jdXJyZW5jeT1FVVI=.HZKtk+UfuA9IV6082jR+OLuZUZnlpSKW6lNFgZX2BEk=
You calculate the signature’s value from the payload, using the Secret
key and the specified algorithm in algorithmName.
public String generateSignatureV2() {
   Map<String, String> map = new HashMap<>();
   map.put("request_time_stamp", "2019-07-26T11:02:32+02:00"); // yyyy-MM-dd'T'HH:mm:ssXXX
   map.put("request_id", "ec1c6f40-9811-4c31-936a-5e4ca9ba9003");
   map.put("merchant_account_id", "61e8c484-dbb3-4b69-ad8f-706f13ca141b");
   map.put("transaction_type", "purchase");
   map.put("requested_amount", "1.05");
   map.put("requested_amount_currency", "EUR");

   return toHmacSha256(map, "e94f5232-1171-4f03-a59e-67e3f2e7d374");
 }

 private String toHmacSha256(Map<String, String> fields, String secret) {
   Charset charset = Charset.forName("UTF-8");

   StringBuilder builder = new StringBuilder("HS256\n");
   for (Map.Entry<String, String> field : fields.entrySet()) {
     builder.append(field.getKey());
     builder.append("=");
     builder.append(field.getValue());
     builder.append("\n");
   }
   byte[] data = builder.toString().getBytes(charset);
   byte[] key = secret.getBytes(charset);
   byte[] sign = sign(key, data);
   return new StringBuilder()
        .append(DatatypeConverter.printBase64Binary(data))
        .append(".")
        .append(DatatypeConverter.printBase64Binary(sign))
        .toString();
 }

 public byte[] sign(byte[] key, byte[] data) {
   try {
     Mac mac = Mac.getInstance("HmacSHA256");
     mac.init(new SecretKeySpec(key, "HmacSHA256"));
     byte[] signature = mac.doFinal(data);
     return signature;
   } catch (NoSuchAlgorithmException | InvalidKeyException e) {
      return null;
    }
}<?php
function generateSignatureV2()
{
$data = [];
$data["custom_css_url"] = "";
$data["request_time_stamp"] = "2019-07-26T11:02:32+02:00";
$data["merchant_account_id"] = "61e8c484-dbb3-4b69-ad8f-706f13ca141b";
$data["requested_amount_currency"] = "EUR";
$data["ip_address"] = "127.0.0.1";
$data["transaction_type"] = "purchase";
$data["request_id"] = "ec1c6f40-9811-4c31-936a-5e4ca9ba9003";
$data["requested_amount"] = "1.05";
$data["redirect_url"] = "";
return toSha256($data, "e94f5232-1171-4f03-a59e-67e3f2e7d374");
}
function toSha256($fields, $secret): string
{
array_walk($fields, function (&$item, $key) {
$item = "$key=$item";
});
$data = "HS256\n".implode("\n", $fields)."\n";
return base64_encode($data) . '.' . base64_encode(sign($data, $secret));
}
function sign($data, $secret)
{
$sig = hash_hmac('sha256', $data, $secret, true);
return $sig;
}
echo generateSignatureV2();using System;
using System.Collections.Generic;
using System.Security.Cryptography;
using System.Text;
namespace SignatureGenerator
{
class MainClass
{
public static Queue<Tuple<string, string>> CreatePaymentValues()
{
Queue<Tuple<string, string>> values = new Queue<Tuple<string, string>>();
values.Enqueue(Tuple.Create("request_time_stamp", "2019-03-23T09:14:51Z"));
values.Enqueue(Tuple.Create("merchant_account_id", "33f6d473-3036-4ca5-acb5-8c64dac862d1"));
values.Enqueue(Tuple.Create("request_id", "A7B51ED4-9EB0-48D1-82AA-2145A7792C6B"));
values.Enqueue(Tuple.Create("transaction_type", "authorization"));
values.Enqueue(Tuple.Create("requested_amount", "1.01"));
values.Enqueue(Tuple.Create("requested_amount_currency", "EUR"));
return values;
}
public static byte[] BuildPayload(Queue<Tuple<string, string>> nameValues)
{
StringBuilder sb = new StringBuilder("HS256");
foreach (Tuple<string, string> nameValue in nameValues)
{
sb.Append(Environment.NewLine);
sb.Append(nameValue.Item1);
sb.Append("=");
sb.Append(nameValue.Item2);
}
string payload = sb.ToString();
return Encoding.ASCII.GetBytes(payload);
}
public static byte[] SignPayload(byte[] body, byte[] key)
{
using (HMACSHA256 hmac = new HMACSHA256(key))
{
byte[] hash = hmac.ComputeHash(body);
return hash;
}
}
public static string FormatSignature(byte[] body, byte[] hash)
{
StringBuilder sb = new StringBuilder();
sb.Append(Convert.ToBase64String(body));
sb.Append(".");
sb.Append(Convert.ToBase64String(hash));
string signature = sb.ToString();
return signature;
}
#pragma warning disable RECS0154 // Parameter is never used
public static void Main(string[] args)
#pragma warning restore RECS0154 // Parameter is never used
{
byte[] secretKey = Encoding.ASCII.GetBytes("9e0130f6-2e1e-4185-b0d5-dc69079c75cc");
byte[] payload = BuildPayload(CreatePaymentValues());
byte[] hash = SignPayload(payload, secretKey);
string signature = FormatSignature(payload, hash);
Console.WriteLine("WAUTH {0}", signature);
}
}
}The signature’s expiration period is 30 minutes by default (configurable). The expiration check uses the timestamp from the payload for reference.
To check the signature you send in your payment request, Wirecard Payment Gateway calculates it in the same fashion and compares it to the value in the request. Then it calculates a new signature for the payment response — using fields from that response in the payload this time — for you to be able to verify that it was not interfered with by a 3rd party.
As a result, verifying this response signature on your side follows the
same process like when you calculate it for your payment request, but
the signature’s payload fields come from the response you receive. After
you calculate the value, compare it to the one found in the response (in
the response_signature_v2 field).
To recap, in order to verify the response signature you calculate it based on the payment response you receive from Wirecard Payment Gateway (following the same steps as when calculating it for a payment request , but with a different payload). Then you compare the two values.
The response signature is found in the response_signature_v2 field.
country=DE&merchant_account_resolver_category=&response_signature=65b8c66e85d344af2f88d7474e5dcb7d612a67273806c0b053ae5b19fcc165a9&city=Berlin&group_transaction_id=&provider_status_code_1=&response_signature_v2=SFMyNTYKdHJhbnNhY3Rpb25faWQ9ZGUyMDk3ZDktYjliNi00ZGUyLTg0MTAtNDZlYWZiMjdhNzRiCmNvbXBsZXRpb25fdGltZXN0YW1wPTIwMTgwMTI0MDk1NzE1Cm1hc2tlZF9hY2NvdW50X251bWJlcj00NDQ0MzMqKioqKioxMTExCnRva2VuX2lkPTQwNjIzMzIxNDg3MDExMTEKYXV0aG9yaXphdGlvbl9jb2RlPTE1MzYyMAptZXJjaGFudF9hY2NvdW50X2lkPWZmMzllNmZkLTM1ZjQtMTFlNS05ZTliLWY4MTY1NDYzMjMyOAp0cmFuc2FjdGlvbl9zdGF0ZT1zdWNjZXNzCmlwX2FkZHJlc3M9MTI3LjAuMC4xCnRyYW5zYWN0aW9uX3R5cGU9cHVyY2hhc2UKcmVxdWVzdF9pZD04YjNjMDBlMS01NmViLTM3ZTQtNDc4Yi1mZGM3ODUyZTNkYWYK.swLVerxpdEb468tFXEr3VDriima0rFG97XDHFyt7F4A%3D&requested_amount=224&completion_time_stamp=20190524095715&provider_status_description_1=&token_id=4062332148701111&authorization_code=153620&merchant_account_id=ff39e6fd-35f4-11e5-9e9b-f81654632328&provider_transaction_reference_id=&street1=Mullerstrasse+137&state=Berlin&first_name=John&email=john%40doe.com&transaction_id=de2097d9-b9b6-4de2-8410-46eafb27a74b&provider_transaction_id_1=&status_severity_1=information&last_name=Doe&ip_address=127.0.0.1&transaction_type=purchase&status_code_1=201.0000&masked_account_number=444433******1111&status_description_1=3d-acquirer%3AThe+resource+was+successfully+created.&phone=%2B421123456789&transaction_state=success&requested_amount_currency=EUR&postal_code=13353&request_id=8b3c00e1-56eb-37e4-478b-fdc7852e3daf
You only work with response_signature_v2. Do not
confuse response_signature_v2 with response_signature. Both are sent
in the response, but the response_signature field contains the
legacy Signature v1 response signature.
|
HS256
transaction_id=de2097d9-b9b6-4de2-8410-46eafb27a74b
completion_timestamp=20190524095715
masked_account_number=444433******1111
token_id=4062332148701111
authorization_code=153620
merchant_account_id=ff39e6fd-35f4-11e5-9e9b-f81654632328
transaction_state=success
ip_address=127.0.0.1
transaction_type=purchase
request_id=8b3c00e1-56eb-37e4-478b-fdc7852e3daf
Again, you calculate the signature’s value from the payload, using the
Secret Key (e94f5232-1171-4f03-a59e-67e3f2e7d374) and the specified
algorithm (HS256).
public String generateSignatureV2() {
   Map<String, String> map = new HashMap<>();
   map.put("transaction_id", "de2097d9-b9b6-4de2-8410-46eafb27a74b");
   map.put("completion_time_stamp", "20190524095715");
   map.put("masked_account_number", "444433******1111");
   map.put("token_id", "4062332148701111");
   map.put("authorization_code", "153620");
   map.put("merchant_account_id", "ff39e6fd-35f4-11e5-9e9b-f81654632328");
   map.put("transaction_state", "success");
   map.put("ip_address", "127.0.0.1");
   map.put("transaction_type", "purchase");
   map.put("request_id", "8b3c00e1-56eb-37e4-478b-fdc7852e3daf");

   return toHmacSha256(map, "e94f5232-1171-4f03-a59e-67e3f2e7d374");
 }

 private String toHmacSha256(Map<String, String> fields, String secret) {
   Charset charset = Charset.forName("UTF-8");

   StringBuilder builder = new StringBuilder("HS256\n");
   for (Map.Entry<String, String> field : fields.entrySet()) {
     builder.append(field.getKey());
     builder.append("=");
     builder.append(field.getValue());
     builder.append("\n");
   }
   byte[] data = builder.toString().getBytes(charset);
   byte[] key = secret.getBytes(charset);
   byte[] sign = sign(key, data);
   return new StringBuilder()
        .append(DatatypeConverter.printBase64Binary(data))
        .append(".")
        .append(DatatypeConverter.printBase64Binary(sign))
        .toString();
 }

 public byte[] sign(byte[] key, byte[] data) {
   try {
     Mac mac = Mac.getInstance("HmacSHA256");
     mac.init(new SecretKeySpec(key, "HmacSHA256"));
     byte[] signature = mac.doFinal(data);
     return signature;
   } catch (NoSuchAlgorithmException | InvalidKeyException e) {
      return null;
    }
}<?php
function generateSignatureV2()
{
$data = [];
$data["transaction_id"] = "de2097d9-b9b6-4de2-8410-46eafb27a74b";
$data["completion_time_stamp"] = "20190524095715";
$data["masked_account_number"] = "444433******1111";
$data["token_id"] = "4062332148701111";
$data["authorization_code"] = "153620";
$data["merchant_account_id"] = "ff39e6fd-35f4-11e5-9e9b-f81654632328";
$data["transaction_state"] = "success";
$data["ip_address"] = "127.0.0.1";
$data["transaction_type"] = "purchase";
$data["request_id"] = "8b3c00e1-56eb-37e4-478b-fdc7852e3daf";
return toSha256($data, "e94f5232-1171-4f03-a59e-67e3f2e7d374");
}
function toSha256($fields, $secret): string
{
array_walk($fields, function (&$item, $key) {
$item = "$key=$item";
});
$data = "HS256\n".implode("\n", $fields)."\n";
return base64_encode($data) . '.' . base64_encode(sign($data, $secret));
}
function sign($data, $secret)
{
$sig = hash_hmac('sha256', $data, $secret, true);
return $sig;
}
echo generateSignatureV2();using System;
using System.Collections.Generic;
using System.Security.Cryptography;
using System.Text;
namespace SignatureGenerator
{
class MainClass
{
public static Queue<Tuple<string, string>> CreatePaymentValues()
{
Queue<Tuple<string, string>> values = new Queue<Tuple<string, string>>();
values.Enqueue(Tuple.Create("transaction_id", "de2097d9-b9b6-4de2-8410-46eafb27a74b"));
values.Enqueue(Tuple.Create("completion_time_stamp", "20190524095715"));
values.Enqueue(Tuple.Create("masked_account_number", "444433******1111"));
values.Enqueue(Tuple.Create("token_id", "4062332148701111"));
values.Enqueue(Tuple.Create("authorization_code", "153620"));
values.Enqueue(Tuple.Create("merchant_account_id", "ff39e6fd-35f4-11e5-9e9b-f81654632328"));
values.Enqueue(Tuple.Create("transaction_state", "success"));
values.Enqueue(Tuple.Create("ip_address", "127.0.0.1"));
values.Enqueue(Tuple.Create("transaction_type", "purchase"));
values.Enqueue(Tuple.Create("request_id", "8b3c00e1-56eb-37e4-478b-fdc7852e3daf"));
return values;
}
public static byte[] BuildPayload(Queue<Tuple<string, string>> nameValues)
{
StringBuilder sb = new StringBuilder("HS256");
foreach (Tuple<string, string> nameValue in nameValues)
{
sb.Append(Environment.NewLine);
sb.Append(nameValue.Item1);
sb.Append("=");
sb.Append(nameValue.Item2);
}
string payload = sb.ToString();
return Encoding.ASCII.GetBytes(payload);
}
public static byte[] SignPayload(byte[] body, byte[] key)
{
using (HMACSHA256 hmac = new HMACSHA256(key))
{
byte[] hash = hmac.ComputeHash(body);
return hash;
}
}
public static string FormatSignature(byte[] body, byte[] hash)
{
StringBuilder sb = new StringBuilder();
sb.Append(Convert.ToBase64String(body));
sb.Append(".");
sb.Append(Convert.ToBase64String(hash));
string signature = sb.ToString();
return signature;
}
#pragma warning disable RECS0154 // Parameter is never used
public static void Main(string[] args)
#pragma warning restore RECS0154 // Parameter is never used
{
byte[] secretKey = Encoding.ASCII.GetBytes("9e0130f6-2e1e-4185-b0d5-dc69079c75cc");
byte[] payload = BuildPayload(CreatePaymentValues());
byte[] hash = SignPayload(payload, secretKey);
string signature = FormatSignature(payload, hash);
Console.WriteLine("WAUTH {0}", signature);
}
}
}Payment Selection
Wirecard Payment Page v1 ![]() displays the payment method selection screen if the
field
displays the payment method selection screen if the
field payment_method is left out or left empty and more than one
payment method is configured for the merchant in the Wirecard Payment Gateway.
It may be used to display all available payment
methods or the list of displayed payment methods may be narrowed down by
specifying the value of field transaction_type to authorization or
debit.
Automatic Payment Method Selection
The payment page supports automatic selection of payment methods in
order to bypass the payment method selection screen. Set
payment_method in the initial payment request to force the selection
of a specific payment method. You can also specify several payment
methods in the request to offer methods to select.
Prepopulation of Consumer Information
The payment page supports prepopulation of consumer information to reduce or eliminate consumer data entry. Consumer information such as name, order and address information can be sent within the initial payment request. The payment page will use these values as default, which can be manually overridden.
Credit Card Transactions
When processing credit card transactions via the payment page, there is an option to avoid the rendering of the payment page. Subsequent processing redirects such as 3D Secure are automatically handled. To enable SilentPay processing, the merchant must pass the following fields within the initial payment request:
-
account_number -
holder_last_name -
card_type -
card_security_code -
expiration_year -
expiration_month
3D Secure
3D Secure payment can be processed via all the three Payment Page integrations: HPP, EPP or Seamless. The main benefit is a simple credit card payment request. The payment page automatically performs all necessary steps to check 3D enrollment of the card, redirects to the cardholder’s bank and processes a response.
3D Secure 2 is now also available and set to become the prime authentication method for online card payments, thanks to a number of updates that improve not only the security, but also the consumer experience of 3D Secure 1 (3DS).
The workflow remains the same but 3D Secure 2 requires additional fields.
Preconditions
In order to process card payments with a 3D Secure verification, following two preconditions must be met:
-
The initial payment request needs to contain
attempt_three_dattribute set totrue.Field Required Datatype Value Description attempt_three_d
Optional
Boolean
true/false
Indicates that the Transaction Request should proceed with the 3D Secure workflow if the [Card Holder] is enrolled. Otherwise, the transaction proceeds without 3D Secure.
Sample Request<!DOCTYPE html PUBLIC "-//W3C//DTD HTML 4.01 Transitional//EN"> <html> <head> <title> Demo shop </title> <script src="https://api-test.wirecard.com/engine/hpp/paymentPageLoader.js" type="text/javascript"></script> </head> <body> <form> <input id="wirecard_pay_btn" type="button" onclick="pay()" value="Pay Now"> <script type="text/javascript"> function pay() { var requestedData = { merchant_account_id: "61e8c484-dbb3-4b69-ad8f-706f13ca141b", request_id: "c68b9039-968d-1c6b-d9f6-27e9ab2bcb3e", request_time_stamp: "20150226084718", payment_method: "creditcard", transaction_type: "purchase", requested_amount: "2.56", requested_amount_currency: "EUR", locale: "en", attempt_three_d: "true", request_signature: "kg44730486d159df0bc2e8dea22bd175395636a37b0da0ef785" } WirecardPaymentPage.hostedPay(requestedData); } </script> </form> </body> </html> -
The merchant account needs to have 3D Secure transactions enabled (contact Merchant Support for queries).
3D Secure 2 - Additional Request Fields
To create a payment session with Credit Card using 3D Secure 2 authentication, you need to include additional 3D Secure 2 fields in your initial request.
We recommend sending optional fields, such as account-holder phone numbers and shipping.address. If you submit this information, it is more likely that the Issuer authenticates the consumer without requesting Strong Customer Authentication.
|
Need more information on 3D Secure 2? Head to our general introduction to 3D Secure 2 or check out the XML request/response samples for check-enrollment.
| Field | Cardinality | Datatype | Size | Description |
|---|---|---|---|---|
merchant_tokenization_flag |
Mandatory |
Boolean |
Indicator whether or not a card token is stored on merchant side. |
|
card_account_type |
Optional |
String |
2 |
The type of account, e.g. for a multi-account card product.
Otherwise, the field is optional. |
authentication_method |
Optional |
String |
2 |
Type of consumer login in the merchant’s shop. |
authentication_timestamp |
Optional |
YYYY-MM-DDThh:mm:ssZ |
20 |
Date and time (UTC) of the consumer login in the merchant’s shop. Accepted format: |
challenge_indicator |
Optional |
String |
2 |
Indicates whether a challenge is requested for this transaction. |
account_creation_date |
Optional |
Date |
10 |
Registration date of the consumer’s account in the merchant’s shop. Accepted format: |
account_update_date |
Optional |
Date |
10 |
Date that the consumer last made changes to their account in the merchant’s shop. For example,
changes to billing and shipping address, new payment account, new email address. Accepted format: |
account_password_change_date |
Optional |
Date |
10 |
Date that the consumer last changed/reset their password in the merchant’s shop. Accepted format: |
shipping_address_first_use |
Optional |
Date |
10 |
Date that the consumer first used this shipping address in the merchant’s shop. Accepted format: |
transactions_last_day |
Optional |
Numeric |
9 |
Number of transactions (successful, failed, and canceled) that the consumer has attempted in the past 24 hours. Does not include merchant-initiated transactions. |
transactions_last_year |
Optional |
Numeric |
9 |
Number of transactions (successful, failed, and canceled) that the consumer has attempted within the past year. Does not include merchant-initiated transactions. |
card_transactions_last_day |
Optional |
Numeric |
9 |
Number of cards the consumer has attempted to add to their account in the merchant’s shop for card-on-file payments (one-click checkout) in the past 24 hours. |
purchases_last_six_months |
Optional |
Numeric |
9 |
Number of successful orders by the consumer in the merchant’s shop within the past six months. |
suspicious_activity |
Optional |
Boolean |
Indicates if the merchant knows of suspicious activities by the consumer (e.g. previous fraud). |
|
card_creation_date |
Optional |
Date |
10 |
Date that the consumer’s card was added to their account in the merchant’s shop for card-on-file payments
(one-click checkout). Accepted format: |
merchant_crm_id |
Optional |
String |
64 |
Consumer identifier in the merchant’s shop. Requests that contain payment information from the same consumer in the same shop must contain the same string. |
city |
Mandatory |
String |
50 |
City of the consumer’s billing address. |
country |
Mandatory |
String |
2 |
Country of the consumer’s billing address. |
street1 |
Mandatory |
String |
50 |
Line 1 of the street address of the consumer’s billing address. |
street2 |
Optional |
String |
50 |
Line 2 of the street address of the consumer’s billing address. |
street3 |
Optional |
String |
50 |
Line 3 of the street address of the consumer’s billing address. |
postal_code |
Mandatory |
String |
16 |
ZIP/postal code of the consumer’s billing address. |
state |
Optional |
String |
3 |
State/province of the consumer’s billing address. Accepted format: numeric ISO 3166-2 standard. |
Mandatory |
String |
256 |
The consumer’s email address as given in the merchant’s shop. |
|
phone |
Optional |
String |
18 |
Home phone number provided by the consumer. |
mobile_phone |
Optional |
String |
18 |
Mobile phone number provided by the consumer. |
work_phone |
Optional |
String |
18 |
Work phone number provided by the consumer. |
first_name |
Mandatory |
String |
32 |
The first name provided by the consumer as part of the credit card details. |
last_name |
Mandatory |
String |
32 |
The last name provided by the consumer as part of the credit card details. |
shipping_shipping_method |
Optional |
String |
restriction-based enumeration value |
The shipping method chosen by the consumer. Merchants must use the shipping indicator value that applies most accurately to the shipping method. If the consumer checks out two or more items, use the shipping indicator value for physical goods. If all are digital goods, use the shipping indicator value that matches the most expensive item.+ Accepted values are:
|
shipping_city |
Optional |
String |
50 |
City of the consumer’s shipping address. Please provide this field even if billing city is identical. |
shipping_country |
Optional |
String |
2 |
Country of the consumer’s shipping address. Please provide this field even if billing country is identical. Format: ISO 3166-1 alpha-2 country code. |
shipping_street1 |
Optional |
String |
50 |
Line 1 of the street address of the consumer’s shipping address. Please provide this field even if billing address is identical. |
shipping_street2 |
Optional |
String |
50 |
Line 2 of the street address of the consumer’s shipping address. Please provide this field even if billing address is identical. |
shipping_street3 |
Optional |
String |
50 |
Line 3 of the street address of the consumer’s shipping address. Please provide this field even if billing address is identical. |
shipping_postal_code |
Optional |
String |
16 |
ZIP/postal code of the consumer’s shipping address. Please provide this field even if billing address is identical. |
shipping_state |
Optional |
String |
3 |
State/province of the consumer’s shipping address. Accepted format: numeric ISO 3166-2 standard. Enter this field even if the billing address is identical. |
risk_info_delivery_timeframe |
Optional |
String |
2 |
The approximate delivery time. |
risk_info_delivery_mail |
Optional |
String |
254 |
The consumer’s email address used for electronic delivery of digital goods. |
risk_info_reorder_items |
Optional |
String |
2 |
The consumer has previously ordered the same item.
Accepted values are: |
risk_info_availability |
Optional |
String |
2 |
The consumer is placing an order for merchandise that is not yet available and will be released in the future.
Accepted values are: |
risk_info_preorder_date |
Optional |
Date |
10 |
Expected shipping date for pre-ordered goods. Accepted format: |
risk_info_gift_amount |
Optional |
Decimal |
18,2 |
For prepaid and gift card purchase only. The amount paid with a specific gift card. The field allows decimal values (e.g. 10.50). |
risk_info_gift_amount_currency |
Optional |
String |
3 |
For prepaid and gift card purchase only. The ISO 4217 three-digit currency code of the gift card. |
recurring_expire_date |
Optional |
Date |
10 |
For recurring payments. Required only for authentication of the first transaction. Date after which further recurring payments with this card are no longer allowed. Accepted format: |
recurring_frequency |
Optional |
Numeric |
4 |
For recurring payments. Required only for authentication of the first transaction. Indicates the minimum number of days between individual authorizations. |
number_of_installment |
Optional |
Numeric |
3 |
For installment payments. Required only for authentication of the first transaction. Indicates the maximum number of authorizations permitted for installment payments. |
iso_transaction_type |
Optional |
String |
2 |
Identifies the transaction type. The values are derived from ISO 8583.
Accepted values are: |
three_d_version |
Optional |
String |
5 |
Identifies the version of 3D Secure authentication used for the transaction.
Accepted values are: |
three_d_ds_transaction_id |
Optional |
String |
36 |
Unique transaction identifier assigned by the Directory Server to identify a single transaction. Required for external 3D Secure servers not provided by Wirecard. Format: see IETF RFC 4122. |
three_d_riid |
Optional |
String |
2 |
For 3D Secure 2.2. Indicates the type of 3RI request. |
The 3D Secure Workflow of the Payment Page
The workflow of 3D secure behaves almost identical for HPP, EPP and Seamless.
Two differences can be observed. One after a successful check of a card enrollment and another one after a successful authentication check.
See workflow graphic for details.
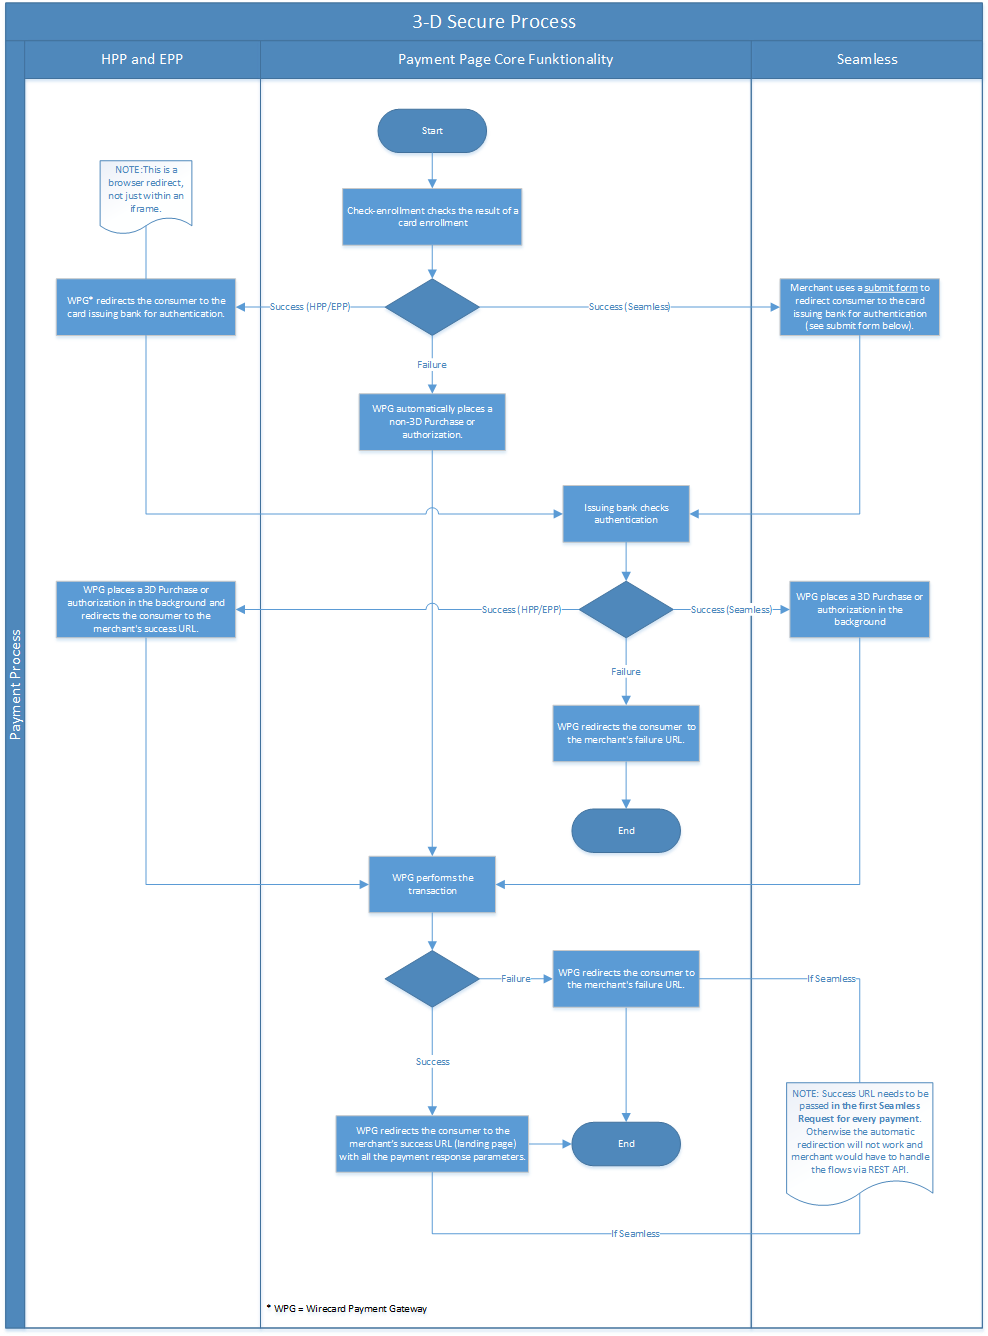
<form action="{acs_URL}" method="post" enctype="application/x-www-form-urlencoded" id="acsform">
    <input type="hidden" name="PaReq" value="{pareq}"/>
    <input type="hidden" name="TermUrl" value="https://api-test.wirecard.com/engine/rest/hpp/acs/{transaction_id}/"/>
    <input type="hidden" name="MD" value="merchant_account_id={MAID}&transaction_type=purchase&nonce3d={nonce3d}"/>
</form>| Values in curly brackets {} are variables which you need to replace with the values of the response. |
Browsers and Languages
Languages
Based on the consumer’s browser language settings, the Hosted Payment Page, Embedded Payment Page, and Seamless Integration set the appropriate language automatically. The following table shows the supported languages:
| Code | English Name | Local Name |
|---|---|---|
ar |
Arabic |
عربي |
de |
German |
Deutsch |
en |
English |
English |
es |
Spanish |
Español |
fr |
French |
Français |
it |
Italian |
Italiano |
iw |
Hebrew |
עברית |
ja |
Japanese |
日本語 |
ka |
Georgian |
ქართული |
nl |
Dutch |
Nederlands |
pl |
Polish |
Polski |
ru |
Russian |
Русский |
uk |
Ukrainian |
Українська |
zh_CN |
Chinese (simplified) |
中文(简体) |
zh_TW |
Chinese (traditional) |
中文(繁体) |
Browsers and OS Versions
|
| Browser Name | Manufacturer |
|---|---|
Chrome |
|
Firefox |
Mozilla |
Internet Explorer |
Microsoft |
Safari |
Apple |
For desktop Wirecard supports the operating systems (OS) Windows and Mac OS.
The versions of the above mentioned browsers and OS can be combined as indicated here:
| Browser Name | Browser Versions | OS Platform | OS Version | Supported |
|---|---|---|---|---|
Chrome |
33.0 - Latest version |
Windows |
7 / 8 / 8.1 / 10 |
✅ |
Firefox |
28.0 - Latest version |
7 / 8 / 8.1 / 10 |
✅ |
|
Internet Explorer |
8 - 11 |
7 / 8 / 8.1 / 10 |
✅ |
|
Opera |
12.15 - Latest version |
7 / 8 / 8.1 |
✅ |
|
Edge |
14.0 - Latest version |
10 |
✅ |
|
Safari |
8 - Latest version |
Mac OS |
Snow Leopard - Sierra |
✅ |
Mac OS |
Mountain Lion - High Sierra |
✅ |
On mobile devices Wirecard supports the OS Android and iOS. See below, which OS versions are supported.
| OS Platform | OS Version | Supported |
|---|---|---|
Android |
4 - Latest version |
✅ |
iOS |
5.1. - Latest version |
✅ |
Redirect URLs and IPNs
Upon a successful or failed Wirecard Payment Page v1 ![]() transaction,
the consumer is redirected (via automated HTTP POST) back to the successful
or failed URL on the merchant’s site along with the digitally signed
payment message (please refer to Response Signature.
transaction,
the consumer is redirected (via automated HTTP POST) back to the successful
or failed URL on the merchant’s site along with the digitally signed
payment message (please refer to Response Signature.
| We recommend to use IPNs. For details see Instant Payment Notification (IPN) to determine a transaction’s final status. |
Default success and failure URLs are configured as part of the merchant account setup at Wirecard. You also can configure individual redirect URLs in a request. To amend these URLs, please contact Merchant Support.
Customization Options
Wirecard Payment Page v1 ![]() can be customized through a feature called Custom CSS URL,
which provides the option to use an external CSS file and link it to Payment Page.
can be customized through a feature called Custom CSS URL,
which provides the option to use an external CSS file and link it to Payment Page.
This allows the Merchant to
-
customize the Payment Page by editing existing tag styles from an external css file
-
unhide optional fields on the credit card form
-
set up a custom logo
-
send CUSTOM CSS URL per request as parameter
-
use a different CSS file per request
-
use multiple CSS files
| All resources are stored on Merchant side. CUSTOM CSS URL needs to be part of the signature. |
Advantages of Custom CSS URL
Next to the advantage, sending different types of CSS for different kind of requests, the merchant can customize his theme without requiring Wirecard’s permission. Nevertheless, the merchant’s development team is required to follow a few rules and restrictions, which do not present any kind of obstacles to get the page designed into the final theme.
How to use Custom CSS URL
The HPP, EPP, and Seamless Integration is set up to read a default css
file embeddedHpp.css. This file handles basic default color schemas.
The main <form> container is based on BOOTSTRAP Grid systems, which are used to create page layouts through a series of rows and columns that house payment page content.
Developers can customize bootstrap.min.css, so while
customizing a theme, the developer must follow bootstrap grid
system usage rules. For more details about bootstrap CSS conditions and
usage please visit the bootstrap page https://getbootstrap.com/docs/3.4/css/.
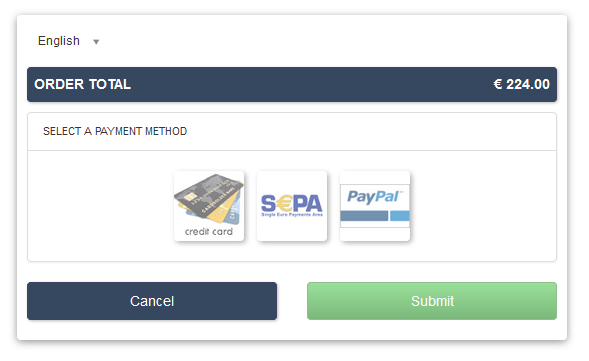
Custom CSS File Content Restrictions
| For security reasons some elements are prohibited in the custom CSS file. The file must follow the criteria described below. |
-moz-binding.CSS attributes beginning with - describe a proprietary attribute which
may not be supported by all browsers. -moz-binding is an attribute
used to load another XML file to describe the presentation of the
selected element.
| If used, an error message appears: "Custom CSS contains not allowed property '-moz-binding'." |
This code segment imports an external XML file to apply CSS properties.
body {
    -moz-binding: url("external-file.xml#xss");
}behavior.The element behavior is an IE property with the same functionality as
-moz-binding.
| If used, an error message appears: "Custom CSS contains not allowed property 'behavior'." |
body {
    behavior:url("script.htc");
}expression.The reasons are the same as described for the properties -moz-binding
and behavior.
| If used, an error message appears: "Custom CSS contains not allowed property value 'expression'. |
::before and ::after.The reasons are the same as described for the properties -moz-binding
and behavior.
If used, an error message appears:
"Custom CSS contains not allowed selectors ::after or ::before."
|
url("javascript:.Some CSS attributes support using url in their declaration.
For example, it is possible to use a URL when setting the source of an
image in CSS. Therefore it is prohibited to use this property.
| If used, an error message appears: "Custom CSS contains not allowed property value 'url("javascript:." |
included.css.In CSS, it is optional to import another stylesheet into the current stylesheet by prepending the file you want to include in a "@import" declaration at the start of the file. For example, the following CSS includes another CSS file called "included.css". This is not possible with Custom CSS.
| If used, an error message appears: "Custom CSS contains not allowed @import directive." |
@import url("included.css");Custom CSS can only use known directives.
| If unknown directives are used, an error message appears: "Custom CSS has been evaluated as harmful because it contains unknown directive." |
Custom CSS can only use known properties.
| If unknown properties are used, an error message appears: "Custom CSS cannot be parsed." |
The custom CSS file and all of the external sources need to be loaded from a server which is running on a valid SSL certificate over HTTPS secured protocol.
| If this condition is not fulfilled, an error message appears: "Custom CSS URL contains sources with absolute path which are not using HTTPS secure protocol." |
/* ********** MAIN ELEMENTS THEMING - START ********** */
#hpp-logo {
/* customizing logo, this field could be hidden */
    height: 45px;
    width: 200px;
    float: right;
    background-image: url("../your-company-logo.png") !important;
    /* Caution: Path to CSS file sent in payment request is used as base URL */

    background-repeat: no-repeat;
    background-position: right top;
}/* ********** MAIN ELEMENTS THEMING - START ********** */
#hpp-logo {
/* customizing logo, this field could be hidden */
height: 45px;
width: 200px;
float: right;
background-image: url("HTTPS://www.your-company-site.com/your-company-logo.png") !important;
/* Absolute path has been used over HTTPS protocol */
background-repeat: no-repeat;
background-position: right top;
}Downloadable CSS Samples of Customized Themes
The following are some examples created to support the design of a customized page to show how certain changes are made. In order to get the default theme and to begin customizing an individual theme, delete the content of the custom CSS file. This is described below.
With a few lines of CSS you are able to change colors, transitions, backgrounds, etc. There is an option to add your own logo or picture with a custom location of the file.
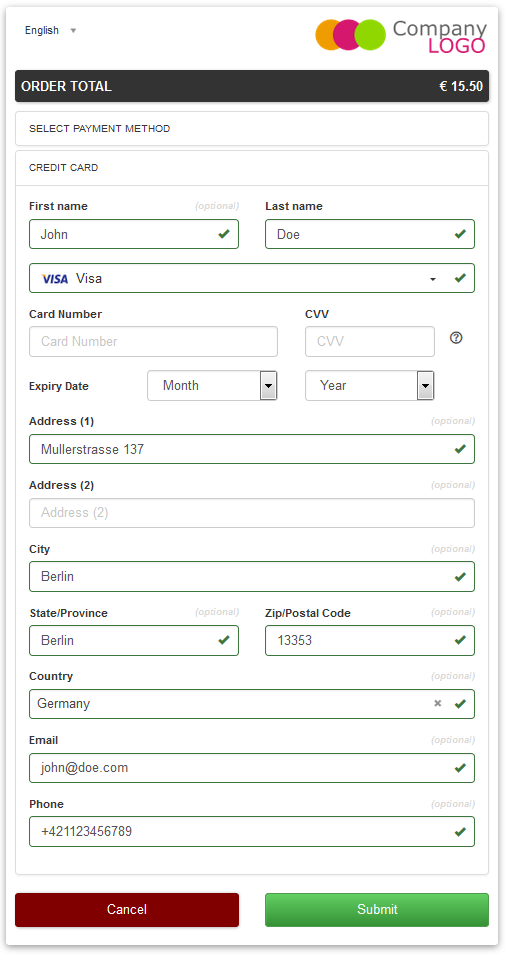
As seen on the image below, there is an option to change bootstrap css properties. In the following example, the bootstrap .checkbox definition has been overlapped by this definition.
/* ********** CUSTOMIZING SEPA PAYMENT PAGE - START ********** */
/* Highlighting SEPA payment consent checkbox */
 #sepaDirectDebitForm.form-horizontal .radio, #sepaDirectDebitForm.form-horizontal .checkbox {
    min-height: 27px;
    background: #EDEDED;
    padding: 8px;
}
/* ********** ENABLING OPTION FIELDS - END ********** */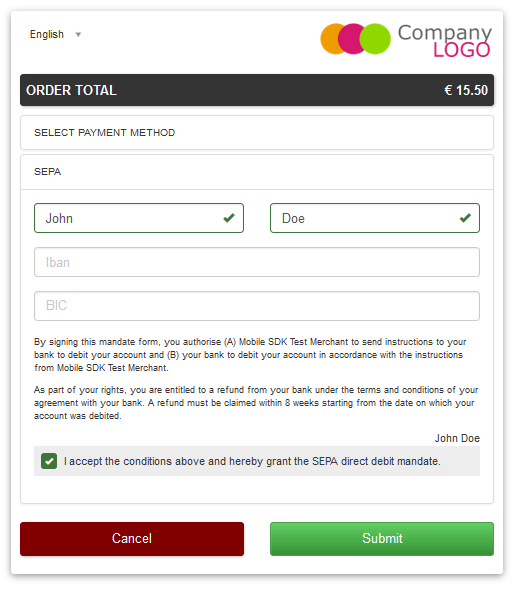
An offline demo page, incuding comments, is available instructing how to customize specific tags to achieve a desired theme.
This example is located inside
wpg-dynamic-css-url.zip\wpg-dynamic-css-url\engine\custom\my-custom-name-css-embeddedHpp.css
which you can find here: wpg-dynamic-css-url.zip
For a more detailed description and to get more familiarized with all of the properties, please visit https://www.w3schools.com/css/ for more information.
/* ********** MAIN ELEMENTS THEMING - START ********** */
#hpp-logo {
/* customizing logo, this field could be hidden */
    height: 45px;
    width: 200px;
    float: right;
    background-image: url(your-company-logo.png) !important; /* Caution: relative path is not allowed. To reach proper functionality, image source file has to be called from absolute path over HTTPS secure protocol.*/
    background-repeat: no-repeat;
    background-position: right top;
}
.hpp-template, .hpp-nav > ul.nav > li.active > a {
    background: #5FD923 !important;
    color: white !important;
}
.hpp-template {
    background:-webkit-linear-gradient(#333333,#333333)!important;
    background:linear-gradient(#333333,#333333)!important;
    border: 1px solid #333333 !important;
}
.hpp-template-hover:hover, .hpp-template-focus:focus {
    background:#00D469!important;
    background:-webkit-linear-gradient(#00D168, #00964A)!important;
    background:linear-gradient(#00D168, #00964A)!important;
    box-shadow:0px 0px 11px #00994C!important;
}
#hpp-form-cancel{
background:maroon !important;
border: 1px solid maroon !important;
}
#hpp-form-cancel:hover, #hpp-form-cancel:focus {
   background:red important;
    background:-webkit-linear-gradient(red, red)!important;
    background:linear-gradient(red, red)!important;
    box-shadow:0px 0px 11px red !important;
}
.hpp-datepicker.datepicker-days td.active {
    background-color: #00A754 !important;
}
.hpp-nav > ul.nav > li.active > a::after {
    border-left-color:#00A754!important;
}
.hpp-loading-spinner {
    background: url('loading.gif') no-repeat; /* Caution: relative path is not allowed. To reach proper functionality, image source file has to be called from absolute path over HTTPS secure protocol.*/
}
.hpp-container .panel-heading {
    background: transparent none repeat scroll 0% 0%;
    -webkit-transition: background-color 0.4s;
    -moz-transition: background-color 0.4s;
    -ms-transition: background-color 0.4s;
    -o-transition: background-color 0.4s;
    transition: background-color 0.4s;
    cursor: pointer;
    cursor: hand;
}
.hpp-container .panel-heading:hover {
    background-color: #DBDBDB;
    -webkit-transition: background-color 0.4s;
    -moz-transition: background-color 0.4s;
    -ms-transition: background-color 0.4s;
    -o-transition: background-color 0.4s;
    transition: background-color 0.4s;
    cursor: pointer;
    cursor: hand;
}
/* ********** MAIN ELEMENTS THEMING - END ********** */
/* ********** ENABLING OPTIONAL FIELDS - START ********** */
#hpp-creditcard-form-row-for-street1-field {
    display : block;
}
#hpp-creditcard-form-row-for-street2-field {
    display : block;
}
#hpp-creditcard-form-row-for-city-field {
    display : block;
}
#hpp-creditcard-form-row-for-state-and-postalcode-fields {
    display : block;
}
#hpp-creditcard-form-row-for-country-field {
    display : block;
}
#hpp-creditcard-form-row-for-email-field {
    display : block;
}
#hpp-creditcard-form-row-for-phone-field {
    display : block;
}
/* ********** ENABLING OPTIONAL FIELDS - END ********** */
/* ********** CUSTOMIZING CREDIT CARD PAYMENT PAGE - START ********** */
/* Setting Optional text to italic and changing color to silver */
form#hpp-creditcard-form small[data-i18n~="optional"] {
    color: #D9D9D9;
    font-style: italic;
    font-weight: 900;
}
/* ********** ENABLING OPTION FIELDS - END ********** */
/* ********** CUSTOMIZING SEPA PAYMENT PAGE - START ********** */
/* Highlighting SEPA payment consent checkbox */
 #sepaDirectDebitForm.form-horizontal .radio, #sepaDirectDebitForm.form-horizontal .checkbox {
    min-height: 27px;
    background: #EDEDED;
    padding: 8px;
}
/* ********** ENABLING OPTION FIELDS - END ********** */The flat design theme has been prepared for mobile users. Developers can completely change design, look, and structure of the payment page.
This example is located inside wpg-dynamic-css-url-flat-design.zip\wpg-flat_demo\index_files\FLAT-DESIGN-CUSTOM-embeddedHpp.css
which you can find here: wpg-dynamic-css-url-flat-design.zip
html, body, .hpp-container {
    height:99%;
}
*:not(.caret) {
    box-shadow:none!important;
    border:none!important;
    border-radius: 0!important;
}

.form-control {
    background: rgb(241,241,241) !important;
    color:rgb(85,85,85)!important;
}
.form-group input {
    background: rgb(241,241,241) !important;
    color:rgb(85,85,85)!important;
}
.panel-heading {
    padding:0;
    margin:20px 0 30px;
    display:none; /* JS managed visibility */
}
.panel, .panel-group, .panel-body{
    padding:0!important;
    margin:0!important;
}
.hidden-xs, .hidden-sm {
    display:none;
}

.hpp-template {
    background: #072C4A!important;
    color:#fff!important;
    font-size:14px!important;
}
.hpp-template-hover:hover, .hpp-template-focus:focus {
    background: #103757!important;
    box-shadow: none!important;
}
#hpp-header {
    display:none;
}
.hpp-btn-success {
    background: #14AF96!important;
    color:#fff!important;
    font-size:14px;
}
.hpp-btn-success:focus, .hpp-btn-success:hover, .hpp-template-bg .panel-heading a:hover {
    background:#16B89E!important;
}
.hpp-template-bg .panel-heading a {
    padding:13px 15px;
    background: #14AF96!important;
    color:white!important;
}
.hpp-container {
    width:100%;
    padding:0!important;
    margin:0 auto!important;
}
.hpp-container > div {
    padding-left:10px!important;
    padding-right:10px!important;
}
.hpp-btn {
    padding:10px 15px!important;
    font-size:21px!important;
    font-weight: bold;
}
.hpp-grid-selection {
    width: 175px;
}
.hpp-grid-selection > button > img {
    margin:5px;
}
.dropdown-menu {
    z-index:1002;
}
.hpp-grid-selection img,
.hpp-select2-lang-drop, .hpp-select2-drop,
.dropdown-menu {
    border:1px solid #f1f1f1!important;
}
.hpp-select2-lang-container {
    background: rgb(241,241,241) !important;
    color:rgb(85,85,85)!important;
}
.hpp-row-card-num > div:first-child {
    float:left!important;
    width:65%!important;
    padding-right:5px!important;
}
.hpp-row-card-num > div:nth-child(2) {
    float:right!important;
    width:35%!important;
    padding-left:5px!important;
}
.hpp-row-exp-date > div:first-child {
    display:none;
}
.hpp-row-exp-date > div:nth-child(2) {
    width:50%;
    padding-right:5px!important;
}
.hpp-row-exp-date > div:nth-child(3) {
    width:50%;
    padding-left:5px!important;
}
.hpp-white-glass {
    position:fixed;
    top:0;
    right:0;
    left:0;
}
#hpp-payment-methods > .hpp-white-glass > .hpp-loading-spinner {
    display:none!important;
}
#hpp-header {
    padding:0!important;
}
.hpp-form-title {
    background: #fff !important;
    color:rgb(85,85,85)!important;
}
.hpp-modal-confirm-dialog .hpp-form-title {
    text-align:center;
    margin:0;
}
#hpp-form-buttons {
    position:fixed;
    bottom:0;
    width:550px;
    margin:0!important;
    padding-top:5px;
    background:#fff;
    z-index: 1001;
}
#hpp-form-buttons > div {
    padding:0!important;
}
#hpp-confirm-dialog-buttons > .hpp-btn {
    width:50%;
}
#hpp-form-buttons > div:first-child {
     float:right!important;
     left:0;
     width:100%;
}
#hpp-form-buttons > div:nth-child(2)  {
    display:none;
}
#hpp-form-navigation {
    padding:0!important;
}
#hpp-form-navigation > div {
    border-spacing:0;
}
#hpp-payment-methods {
    margin-top:15px;
    position:relative;
    padding-bottom:70px!important;
}
#hpp-form-previous {
    border-left: 2px solid #fff !important;
}
form div[class^="col"] > label, form div[class^="col"] > label + small {
    display:none;
}
@media screen and (max-width: 560px), screen and (max-height: 560px),
  screen and (max-device-width: 560px), screen and (max-device-height: 560px) {
    #hpp-form-buttons {
        width:100%;
    }
}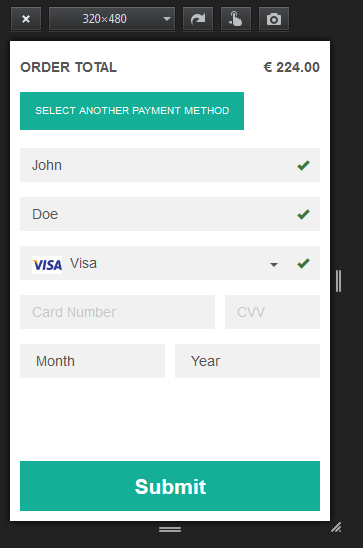
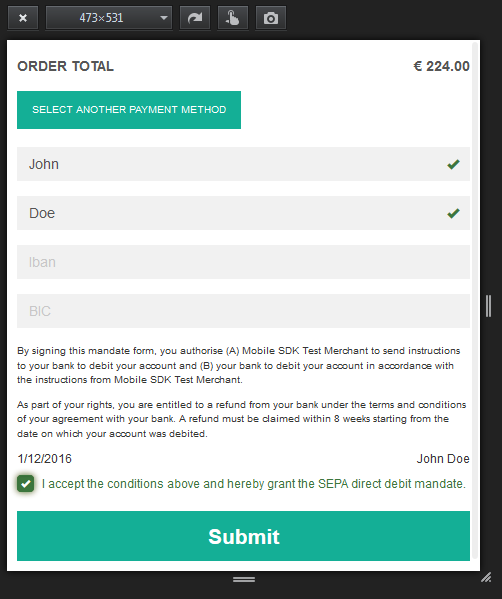
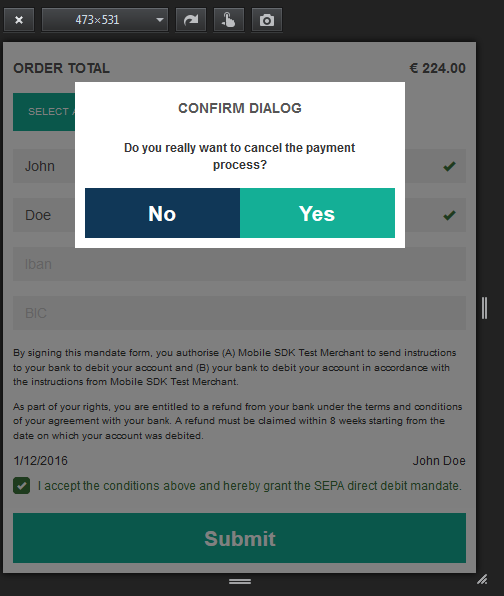
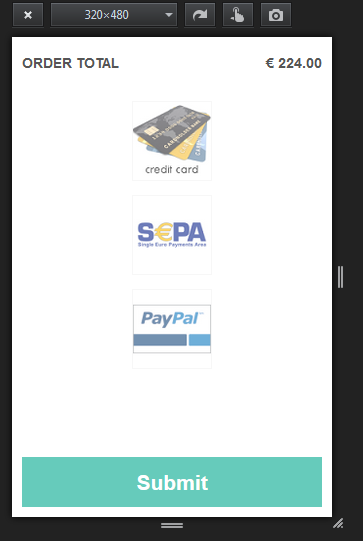
Dynamic Custom CSS URL
This functionality has been implemented to overlap default styling
definitions in embeddedHpp.css. and bootstrap.min.css. Custom css
appears at the bottom of css files in the head tag.
This guarantees that existing bootstrap.min.css declarations are
overlapped correctly.
Dynamic Custom CSS URL is an optional field named as custom_css_url
which is also a mandatory part of the signature, in case that the
merchant sends the custom_css_url. Dynamic Custom CSS URL must meet the
criteria mentioned below.
Custom CSS URL must be shorter than 2000 characters including non-alfa-numerical characters.
| In case of an error the developer is notified by an error message: "Custom CSS URL is too long - more than 2000 characters." |
In general URIs as defined by RFC 3986 may contain any of the following characters: A-Z a-z 0-9 -._~:/?#[]@!$&'()*+,;=.
| In case of an error the developer is notified by an error message: "Custom CSS URL has invalid format." |
Custom CSS file must be smaller than 50 kb.
| In case of an error the developer is notified by an error message: "Custom CSS is too large. Max. 50 kB" |
Custom URL must be sent without any errors, or more precisely, the URL must have a valid format.
| In case of an error the developer is notified by an error message: "Custom CSS cannot be fetched." |
http://www.your-site.com/custom-style.css
http://www.your-site.com/custom-stylecss (missing dot: custom-style.css)
http://www.your-site.com/custom-style.php (php is unsupported postfix)Custom URL must be stored on a server, which is running on a valid SSL certificate. Custom CSS URL must be requested over HTTPS protocol.
| In case of an error the developer is notified by an error message: "Custom CSS URL must be loaded from HTTPS source with valid SSL certificate." |
http://www.your-site.com/custom-style.css (only HTTPS URL is permitted)https://www.your-site.com/custom-style.cssMerchant is unable to request psp name and custom css url at
the same time. If both are requested only custom css url will be
accepted.
Merchant needs to create a digital signature on his own server as it is the only place where the secret is stored. The client’s server also provides the Merchant Account ID to the mobile app client.
To calculate the signature, following conditions need to be met:
-
Fields need to be concatenated,
-
Leading and trailing space removed,
-
SHA-256 signature follows the combined string.
| The field order is important. Also: The values in the request signature must be identical with the client side form/data (with the exception of the secret key). |
1. request_time_stamp
2. request_id
3. merchant_account_id
4. transaction_type
5. requested_amount
6. requested_amount_currency
7. redirect_url (optional)
8. custom_css_url (optional)
9. ip_address (optional)
10. [secretkey]request_time_stamp = '20120430123012'
request_id = 'order-12345'
merchant_account_id = 'b19fb056-d8da-449b-ac85-cfbfd0558914'
transaction_type = 'purchase'
requested_amount = '1.01'
requested_amount_currency = 'USD'
redirect_url = 'https://test.com'
custom_css_url = 'https://test.com/custom.css'
ip_address = '127.0.0.1'
secret_key = 'efabf47b-e43b-4785-873f-1c5bc65b7cd2'
Pre SHA-256 string
20120430123012order-12345b19fb056-d8da-449b-ac85-cfbfd0558914purchase1.01USDhttps://test.comhttps://test.com/custom.css127.0.0.1efabf47b-e43b-4785-873f-1c5bc65b7cd2
SHA-256 signature
a186cd295f5b0da14aa158090ee8abfcc1ca22961f2c19ea659c4a8f5cbb4a03Input Fields for Credit Card
The following elements are mandatory/optional for sending a request for
the payment method Credit Card. All of the optional fields are hidden by
default. There is an option to unhide optional fields in Custom CSS by
setting the value of the div ID parameter Display to block.
| Term | Man/Opt | Type | Value | Div tag ID |
|---|---|---|---|---|
First Name |
O |
Input |
String |
#f_name_id |
Last Name |
M |
Input |
String |
#l_name_id |
Card Type |
M |
Select |
String |
Explicitly shown |
Card Number |
M |
Input |
Numerical |
Explicitly shown |
CVV |
O |
Input |
Numerical |
#cvv_id |
Expiry Date - Month |
M |
Select |
Numerical |
Explicitly shown |
Expiry Date - Year |
M |
Select |
Numerical |
Explicitly shown |
Address (1) |
O |
Input |
String |
#hpp-creditcard-form-row-for-street1-field |
Address (2) |
O |
Input |
String |
#hpp-creditcard-form-row-for-street2-field |
City |
O |
Input |
String |
#hpp-creditcard-form-row-for-city-field |
State/Province Postal Code/Zip |
O |
Input |
String |
#hpp-creditcard-form-row-for-state-and-postalcode-fields |
Country |
O |
Select |
String |
#hpp-creditcard-form-row-for-country-field |
O |
Input |
Valid email address |
#hpp-creditcard-form-row-for-email-field |
|
Phone |
O |
Input |
Valid phone number |
#hpp-creditcard-form-row-for-phone-field |
/* ********** ENABLING OPTIONAL FIELDS - START ********** */
#hpp-creditcard-form-row-for-email-field {
    display : block;
}
#hpp-creditcard-form-row-for-phone-field {
    display : block;
}
/* ********** ENABLING OPTIONAL FIELDS - END ********** */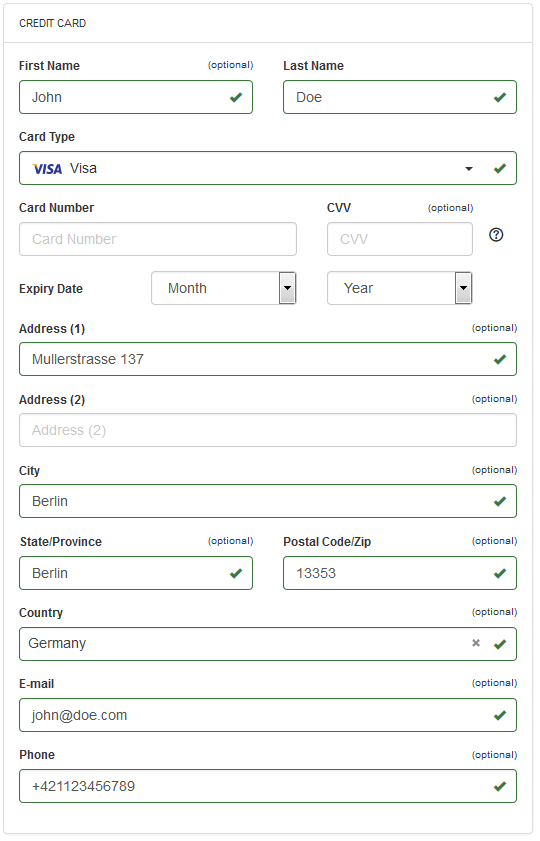
Demo Shop
Read how you can use the Wirecard Demo Shop.
Payment Solutions
Pay by Link via API
Merchants can offer payment on Hosted Payment Page (HPP) using a hyperlink from their own newsletter or an email. The hyperlink redirects the consumer to a credit card form within HPP in order to supply consumer’s card data. Additionally, the merchant can accept MOTO (Mail Order/Telephone Order) payments and remain PCI SAQ-A compliant. Pay by Link via API can also be used with the WPP v2 integration.
Merchant can offer payment on Hosted Payment Page (HPP) which has been
provided by hyperlink functionality for custom limited time by sending
hyperlink_expiration_time_stamp in request. Timestamp is in ISO 8601
format consisting of combined date and time in UTC:
YY-MM-DDTHH:MM:SS±HH:MM.
For XML and JSON Requests:
In order to generate payment link, send credit card payment request to
REST API, specifically paymentmethods endpoint without entering card
information. If request does not include all necessary parameters to
execute the payment, URL to HPP card form is returned in the response.
If request contains also optional hyperlink-expiration-time-stamp
field, hyperlink will be valid until provided timestamp instead of
default value of 30 minutes.
For XML and JSON Responses:
The response contains the actual path stored at <payment-method url>
which renders card payment form. This path needs to be copied to
customer.
<?xml version="1.0" encoding="UTF-8" standalone="yes"?>
<payment xmlns="http://www.elastic-payments.com/schema/payment">
    <merchant-account-id>9105bb4f-ae68-4768-9c3b-3eda968f57ea</merchant-account-id>
    <request-id>3317a94b-c31a-a88d-4d03-ee5009f6cd44</request-id>
    <transaction-type>authorization</transaction-type>
    <payment-methods>
        <payment-method name="creditcard"/>
    </payment-methods>
    <requested-amount currency="EUR">10.15</requested-amount>
    <account-holder>
        <first-name>John</first-name>
        <last-name>Doe</last-name>
        <email>john.doe@wirecard.com</email>
        <phone>5555555555</phone>
        <address>
          <street1>123 anystreet</street1>
          <city>Brantford</city>
          <state>ON</state>
          <country>CA</country>
          <postal-code>M4P1E8</postal-code>
        </address>
    </account-holder>
    <hyperlink-expiration-time-stamp>2018-12-07T13:20:00+02:00</hyperlink-expiration-time-stamp><!-- optional -->
</payment><?xml version="1.0" encoding="UTF-8" standalone="yes"?>
<payment xmlns="http://www.elastic-payments.com/schema/payment" xmlns:ns2="http://www.elastic-payments.com/schema/epa/transaction">
<merchant-account-id>9105bb4f-ae68-4768-9c3b-3eda968f57ea</merchant-account-id>
<transaction-id>293d85c9-95ce-47f1-b82c-e4a8602e024f</transaction-id>
<request-id>3317a94b-c31a-a88d-4d03-ee5009f6cd44</request-id>
<transaction-type>authorization</transaction-type>
<transaction-state>success</transaction-state>
<completion-time-stamp>2018-11-19T11:50:36.000Z</completion-time-stamp>
<statuses>
<status code="201.0000" description="The resource was successfully created." severity="information"/>
</statuses>
<requested-amount currency="EUR">10.15</requested-amount>
<account-holder>
<first-name>John</first-name>
<last-name>Doe</last-name>
<email>john.doe@wirecard.com</email>
<phone>5555555555</phone>
<address>
<street1>123 anystreet</street1>
<city>Brantford</city>
<state>ON</state>
<country>CA</country>
<postal-code>M4P1E8</postal-code>
</address>
</account-holder>
<payment-methods>
<payment-method url="https://api-test.wirecard.com:443/engine/hpp/creditcard/293d85c9-95ce-47f1-b82c-e4a8602e024f/?request_time_stamp=20181119115036&request_id=3317a94b-c31a-a88d-4d03-ee5009f6cd44&merchant_account_id=9105bb4f-ae68-4768-9c3b-3eda968f57ea&transaction_id=293d85c9-95ce-47f1-b82c-e4a8602e024f&transaction_type=authorization&requested_amount=10.15&requested_amount_currency=EUR&redirect_url=&ip_address=&request_signature=70a697bd993dc381cbea1b5263b55154cf7ec8872b4ed8d6bfcc9820fdd0f194&psp_name=elastic-payments&hyperlink_expiration_time_stamp=20181207112000&country=CA" name="creditcard">
<card-types>
<card-type>jcb</card-type>
<card-type>discover</card-type>
<card-type>mastercard</card-type>
<card-type>visa</card-type>
<card-type>maestro</card-type>
<card-type>amex</card-type>
<card-type>diners</card-type>
<card-type>upi</card-type>
</card-types>
</payment-method>
</payment-methods>
<hyperlink-expiration-time-stamp>2018-12-07T13:20:00+02:00</hyperlink-expiration-time-stamp>
</payment>{
"payment" : {
"merchant-account-id" : {
"value" : "9105bb4f-ae68-4768-9c3b-3eda968f57ea"
},
"request-id" : "{{$guid}}",
"transaction-type" : "authorization",
"requested-amount" : {
"value" : 10.15,
"currency" : "EUR"
},
"payment-methods" : {
"payment-method" : [ {
"name" : "creditcard"
} ]
},
"hyperlink-expiration-time-stamp" : "2017-05-05T01:00:00.000+03:00"
}
}{
"payment": {
"statuses": {
"status": [
{
"code": "201.0000",
"description": "The resource was successfully created.",
"severity": "information"
}
]
},
"merchant-account-id": {
"value": "9105bb4f-ae68-4768-9c3b-3eda968f57ea"
},
"transaction-id": "0430dd85-aa3f-45e7-85f5-d8dbfd370a80",
"request-id": "1ce3fba5-5cfc-4b94-988a-3f6927055a03",
"transaction-type": "authorization",
"transaction-state": "success",
"completion-time-stamp": 1493707087000,
"requested-amount": {
"value": 10.15,
"currency": "EUR"
},
"payment-methods": {
"payment-method": [
{
"card-types": {
"card-type": [
"hipercard",
"amex",
"uatp",
"cartebleue",
"diners",
"aura",
"maestro",
"cup",
"jcb",
"discover",
"visa",
"mastercard"
]
},
"url": "https://api-test.wirecard.com:443/engine/hpp/creditcard/0430dd85-aa3f-45e7-85f5-d8dbfd370a80/?request_time_stamp=20170502063807&request_id=1ce3fba5-5cfc-4b94-988a-3f6927055a03&merchant_account_id=05fd7b10-2ccc-4e95-a790-ca9452153e37&transaction_id=0430dd85-aa3f-45e7-85f5-d8dbfd370a80&transaction_type=authorization&requested_amount=10.15&requested_amount_currency=EUR&redirect_url=&ip_address=&request_signature=d7e9ba9c032668299ba6ac7a03acbc192145bf9a4b4aa2e3ab14320e0cc20565&psp_name=elastic-payments&hyperlink_expiration_time_stamp=20170504220000&",
"name": "creditcard"
}
]
},
"hyperlink-expiration-time-stamp": 1493935200000
}
}-
The payment hyperlink is valid until provided expiration timestamp. If expiration timestamp is not provided, hyperlink is valid only 30 minutes, then the request ID expires.
-
The payment hyperlink may be used only once.
-
Merchant must generate own
<request-id>as for every request. -
Redirect URL must be specified. If merchant hasn’t been configured on merchant level configuration, redirect URL must be sent via request.
Invoice via Email
Invoice via Email allows the merchant to send the consumer a generated payment link automatically via email (or manually via other devices/units of the merchant’s choice).
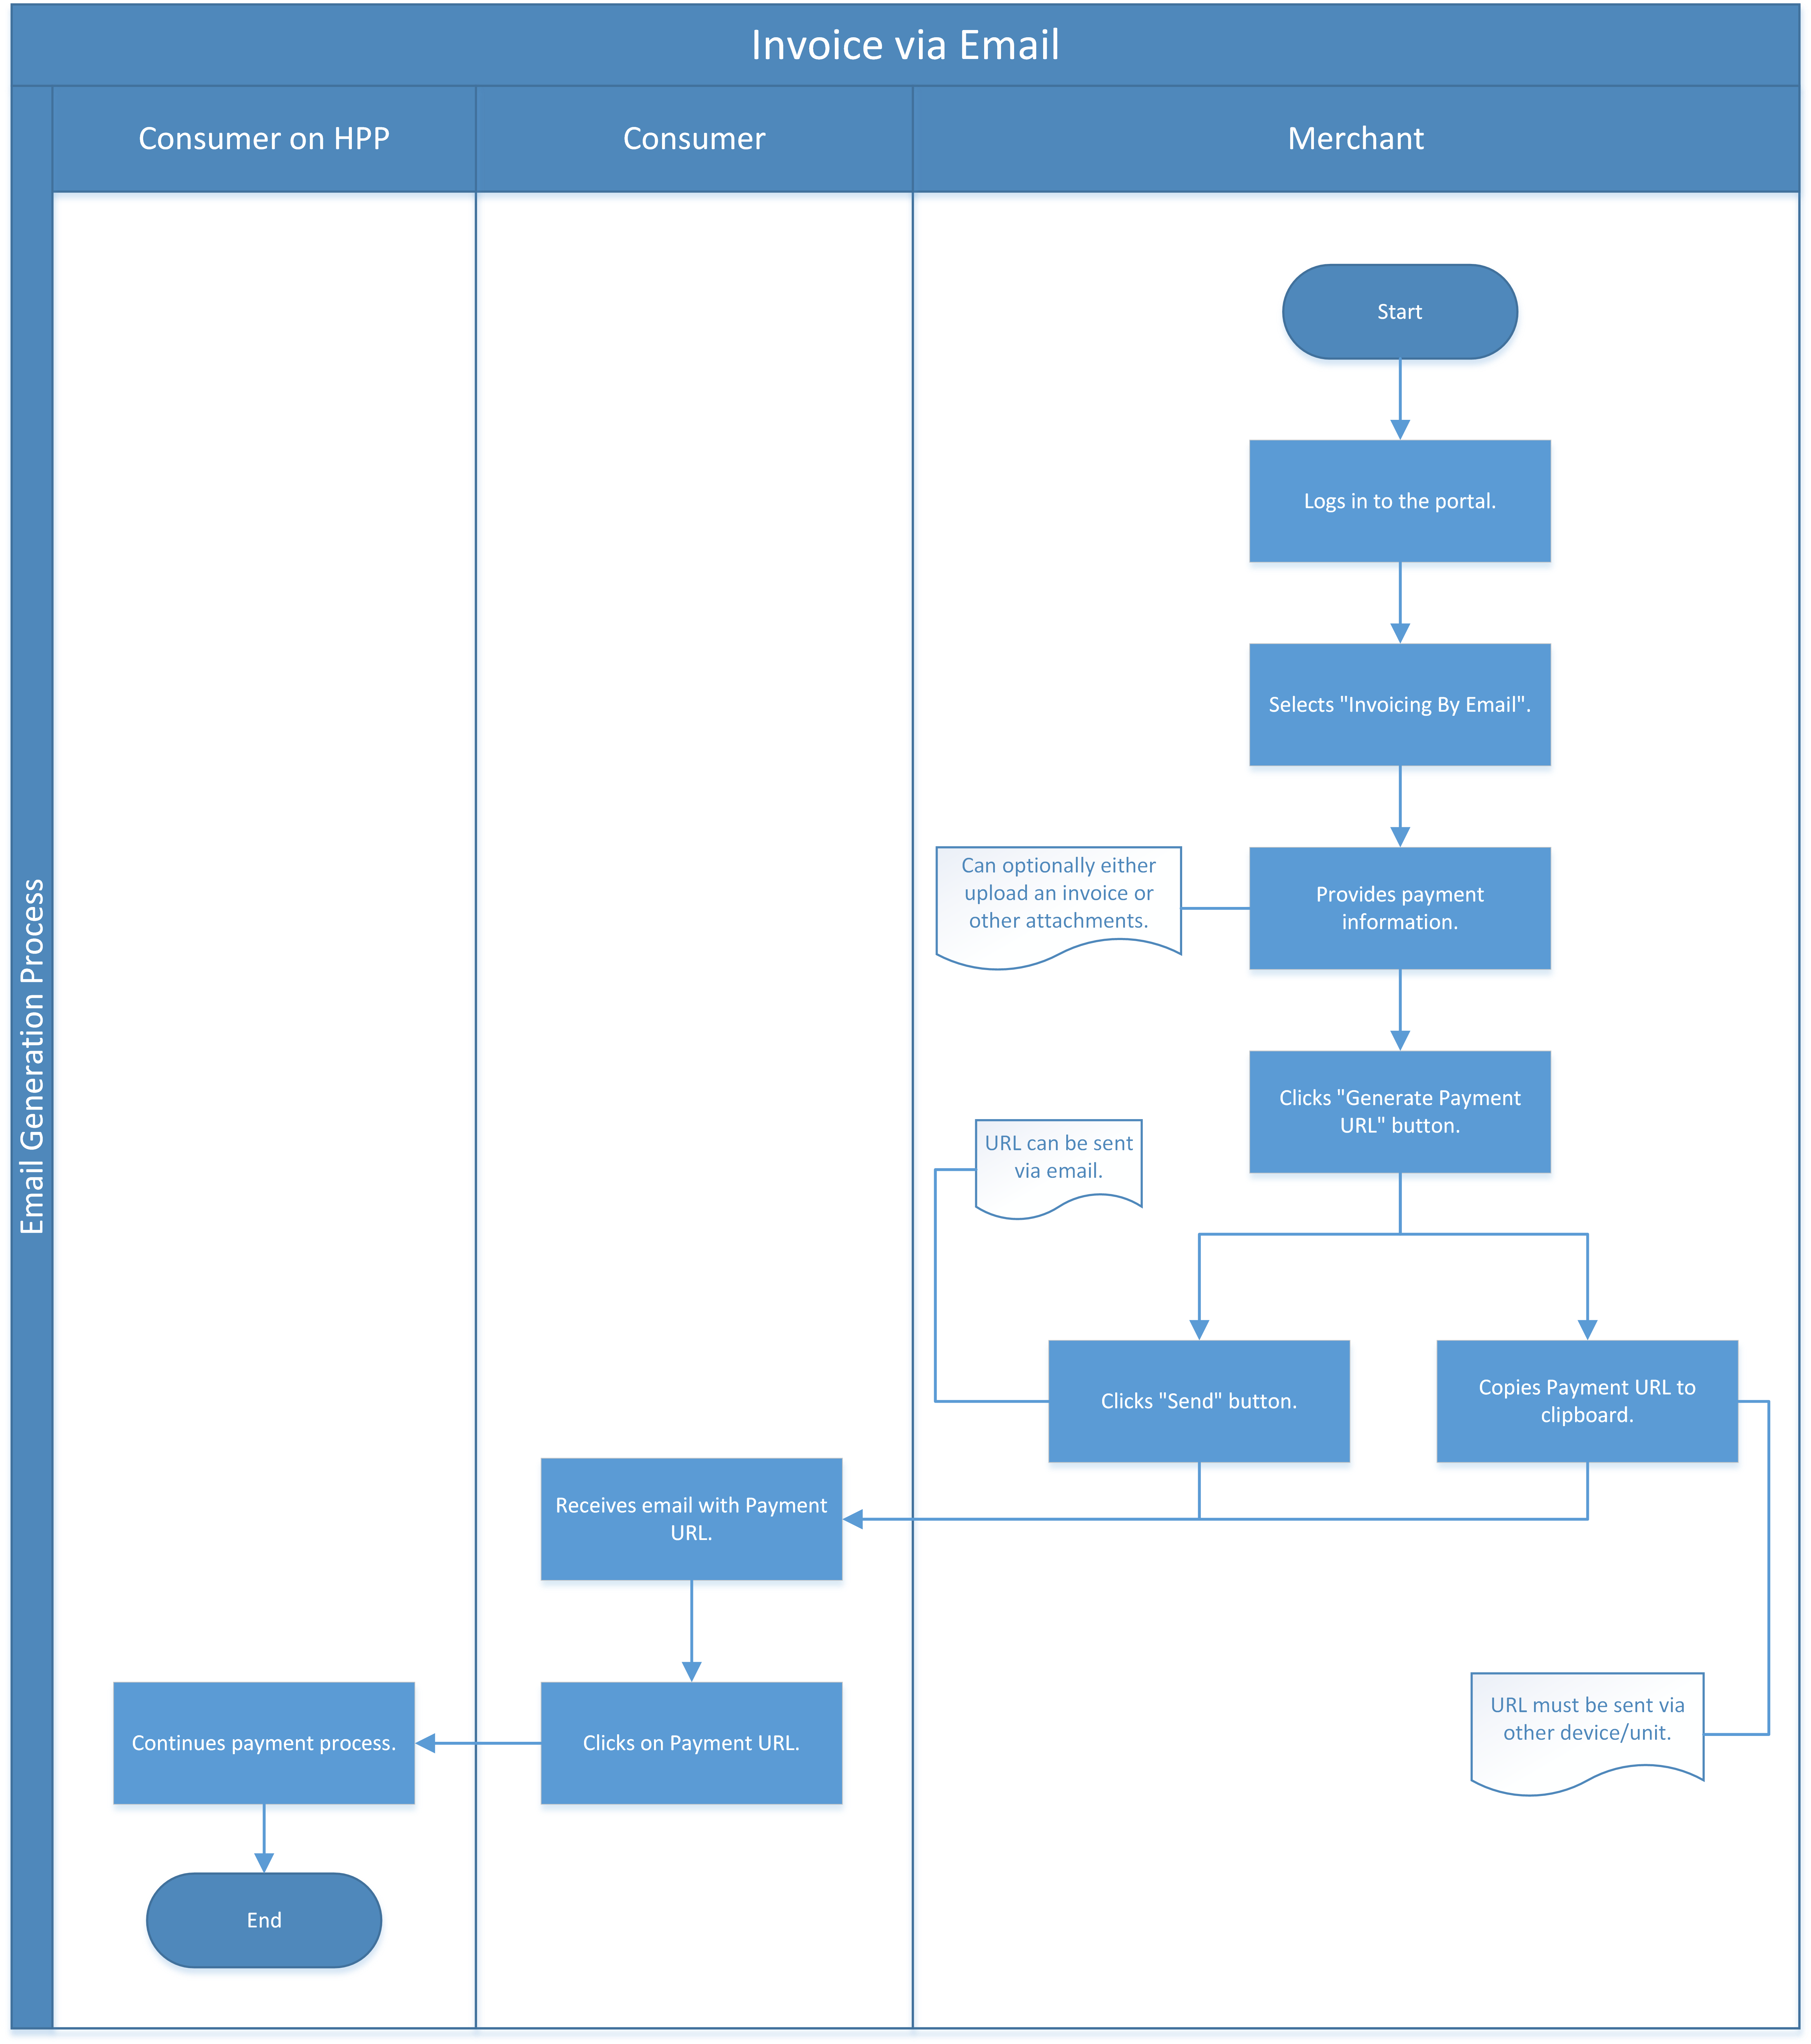
-
The merchant logs in to the Wirecard Enterprise Portal.
-
The merchant provides the required payment information.
-
The merchant generates the URL.
-
The merchant sends the URL to the consumer.
Demo Shop
You can go directly to the Wirecard Demo Shop.
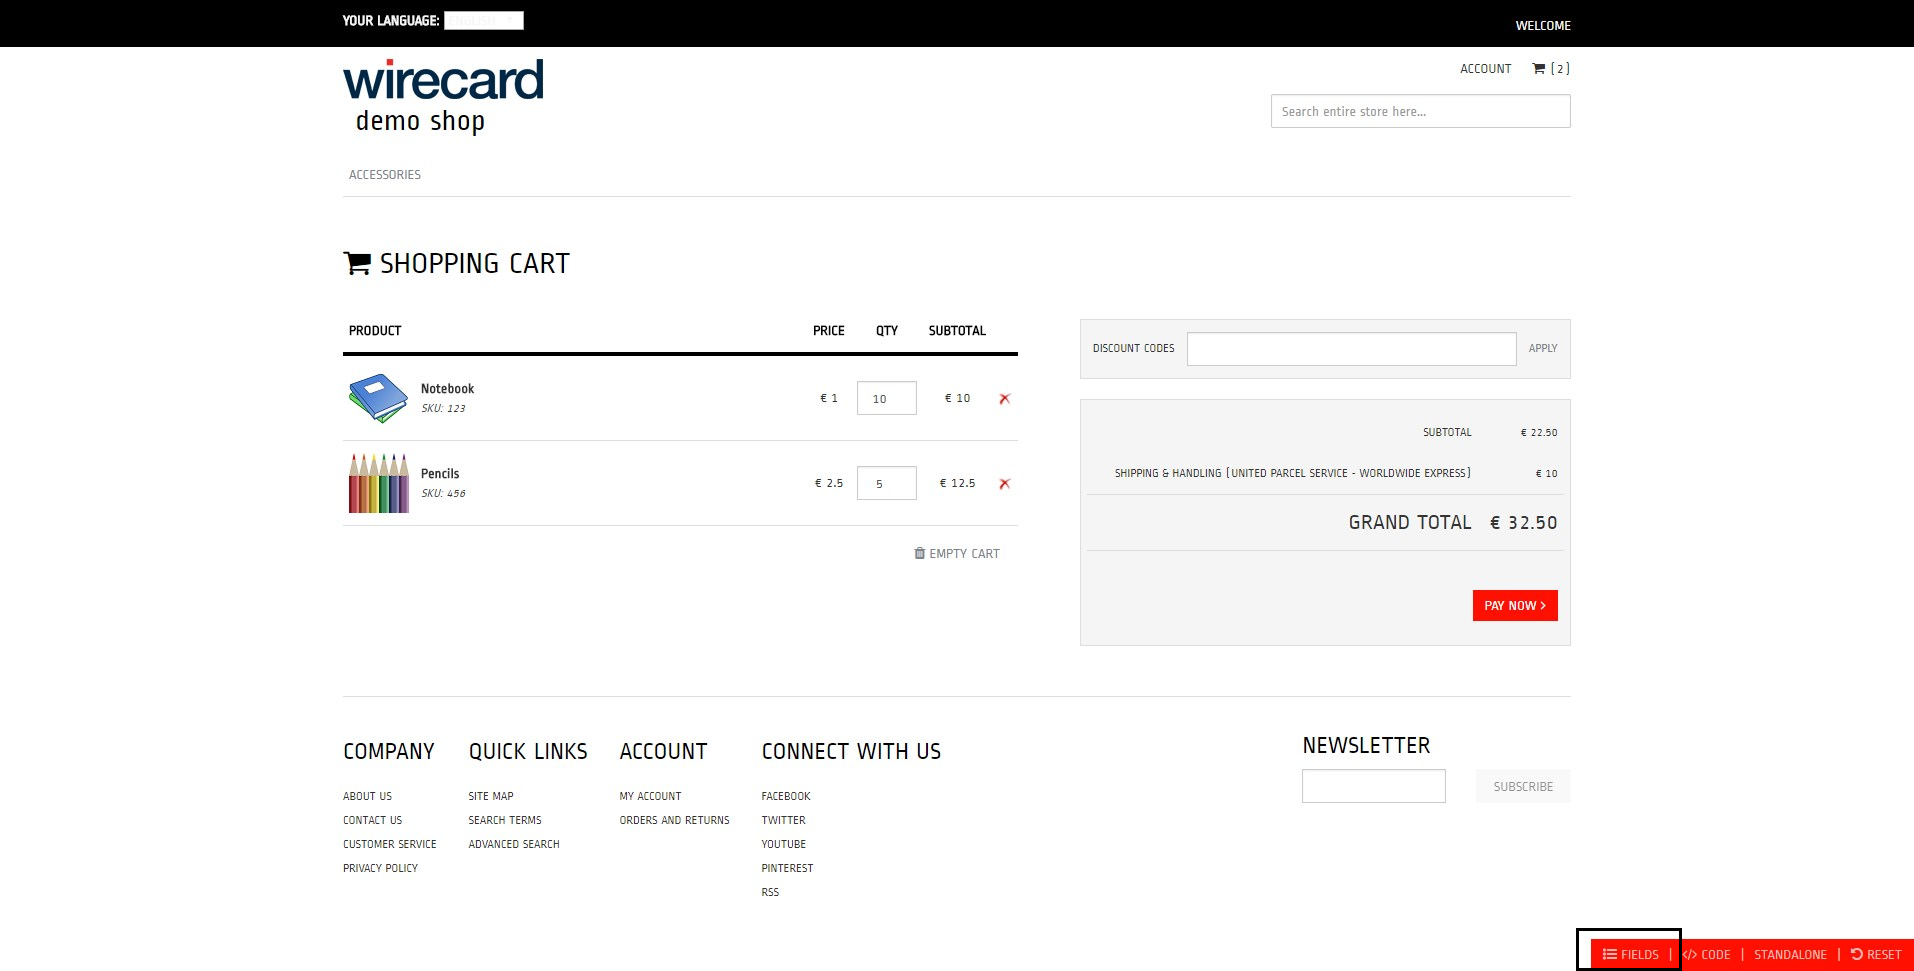
The Wirecard Demo Shop simulates a merchant e-shop with integrated Wirecard Payment Gateway capabilities, serving as a showcase of our Hosted Payment Page, Embedded Payment Page and Seamless Payment Page solutions.
All through a straightforward, minimalistic interface you can, among others,
-
edit the fields.
-
test various payment methods under different conditions.
-
switch between the different payment page types.
-
customize the shopping cart items.
The integration code is ready-to-use at all times, reacting to your changes, with logs available as well.
The Custom Merchant
The Custom Merchant allows you to use different merchant configurations when testing on Wirecard Demo Shop.
To use it:
-
Click Fields in the right bottom corner of the Wirecard Demo Shop start page.
-
Click on the field Merchant Account.
-
Select Click here for custom merchant ID from the drop down menu.
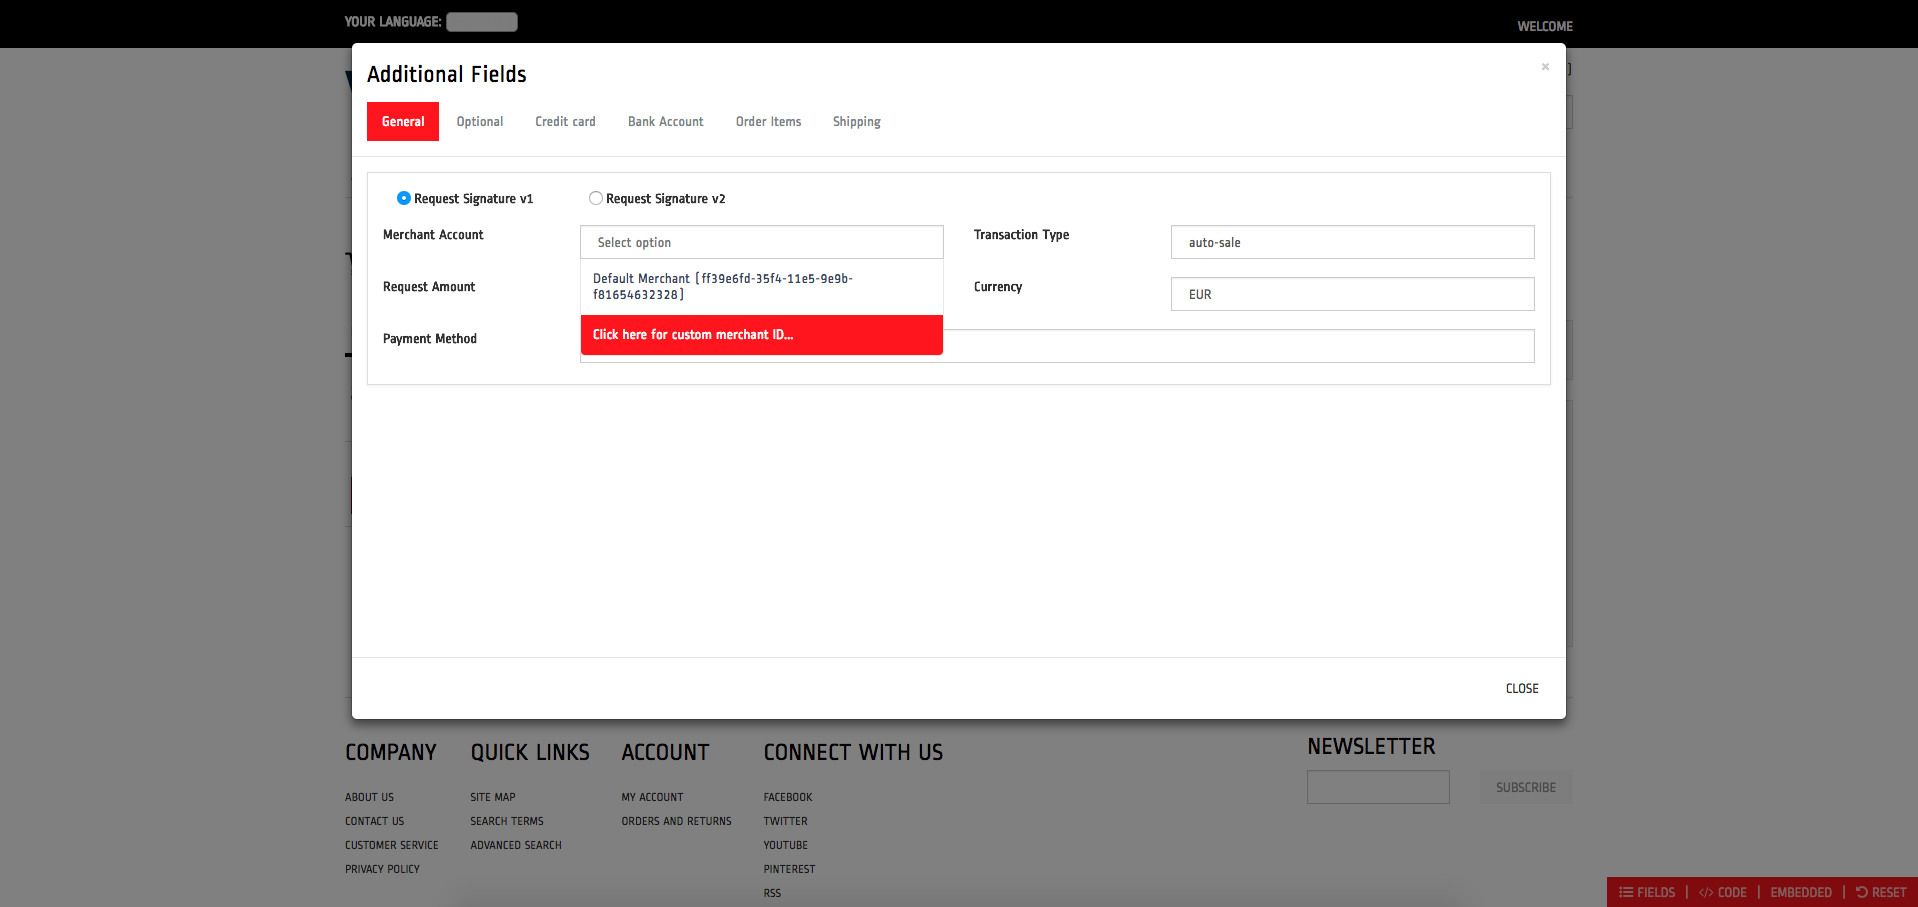
-
The input field Secret Key is displayed below the Merchant Account field.
-
Enter your custom Merchant Account ID and Secret Key in order to load the configured payment methods, currencies and transaction types on the test instance.
-
The Wirecard Demo Shop now uses the selected merchant account’s configuration.
You receive your Secret Key during the merchant account setup. Please contact Merchant Support if you do not have one. 
Raw Code View
To see the Wirecard Demo Shop fields as raw code:
-
Click Fields in the right bottom corner of the Wirecard Demo Shop start page.
-
Enable the Show Raw view.
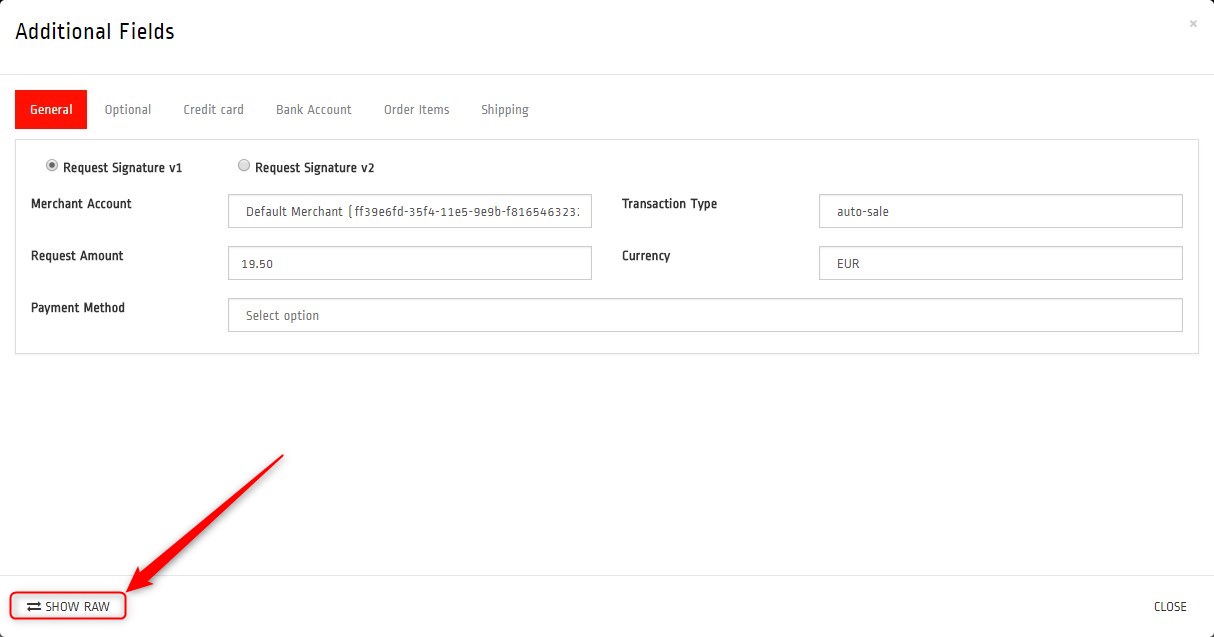
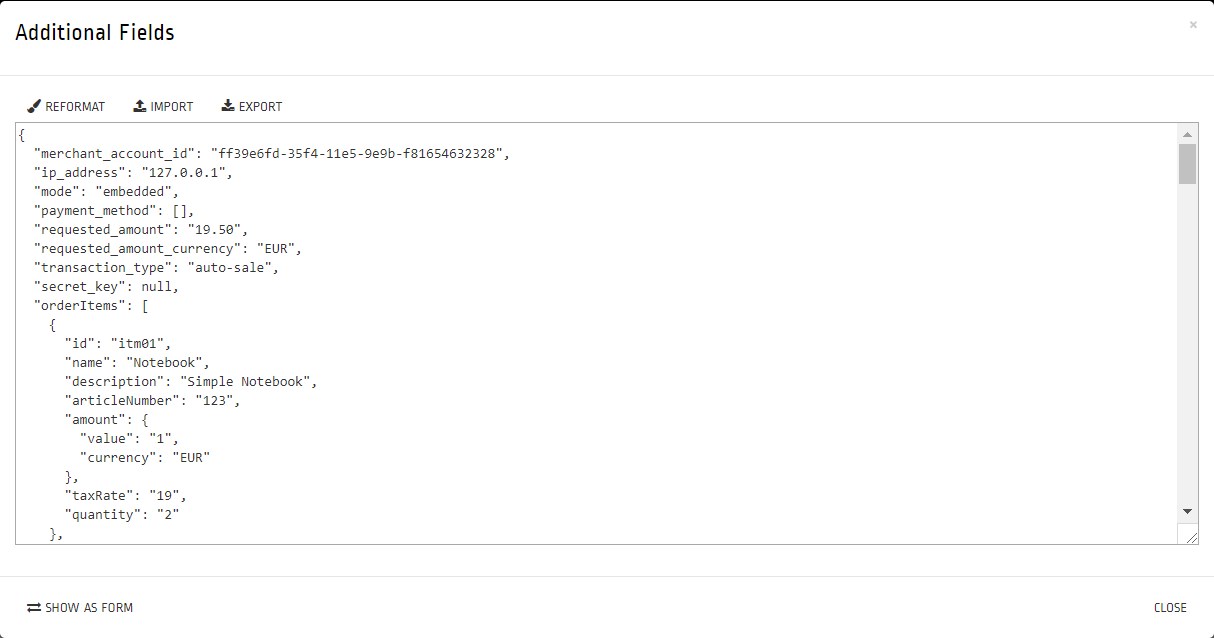
On this screen, you can,
-
beautify the code using the Reformat button.
-
import a
.jsonfile to replace the code using the Import button. -
export the code as a
.jsonfile using the Export button.
Change Default Redirect URLs
Merchants may prefer to apply their own redirect URLs rather than the default
https://demoshop-test.wirecard.com/demoshop/#/success.
To overwrite the redirect URL, add the shop_success_url as well as the actual HTTP in format "https://google.com" in the Additional Fields > Optional tab.
For a complete list of redirect URLs see XML Schema Specification.